This Tutorial is 60% Done. We are getting feedback for the Current layout so excuse us while we have it public and unfinished :) We're dealing with Website issues regarding editing a Tutorial with over 100 Images as well (LOL) PLEASE FIX THIS FACEPUNCH.
Love, SubZero
This Tutorial is meant to cover the fundamentals of Level design for s&box. Please note that there are faster workflows / different ways for designing in the editor but I want to keep it simple for anyone who's new to this so they understand the basics. After this you should have a better idea on how to bring your own ideas to life inside the editor!
We will be releasing more specific Tutorials on Workflow Techniques, Creating Certain Scenes and how to go about it, In depth Tutorials on certain Mapping Tools, etc along with Programming Tutorials. If you have ANY suggestions on educational content we should make please let us know :)
Need Support? Join our Discord!
We don't just make Content for s&box, We also host a whole Community filled with many Talented Level Designers, Modelers, and Developers within the s&box ecosystem that Help each other Learn, Provide Feedback to, and Hangout with!
Now Lets build a House which covers alot of fundamentals and gets you used to Key binds and where things are.
Section 1: Creating Your Map Project
Open up the s&box Dev Editor. In the top right you'll see a New Project button — click that. A template picker will pop up. Select Map, give your project a title, and hit Create.
The ident field fills in automatically based on your title. You can leave it as is. Don't worry about the other settings — everything is already configured correctly for a map project.
Section 2: Getting to Know the Editor
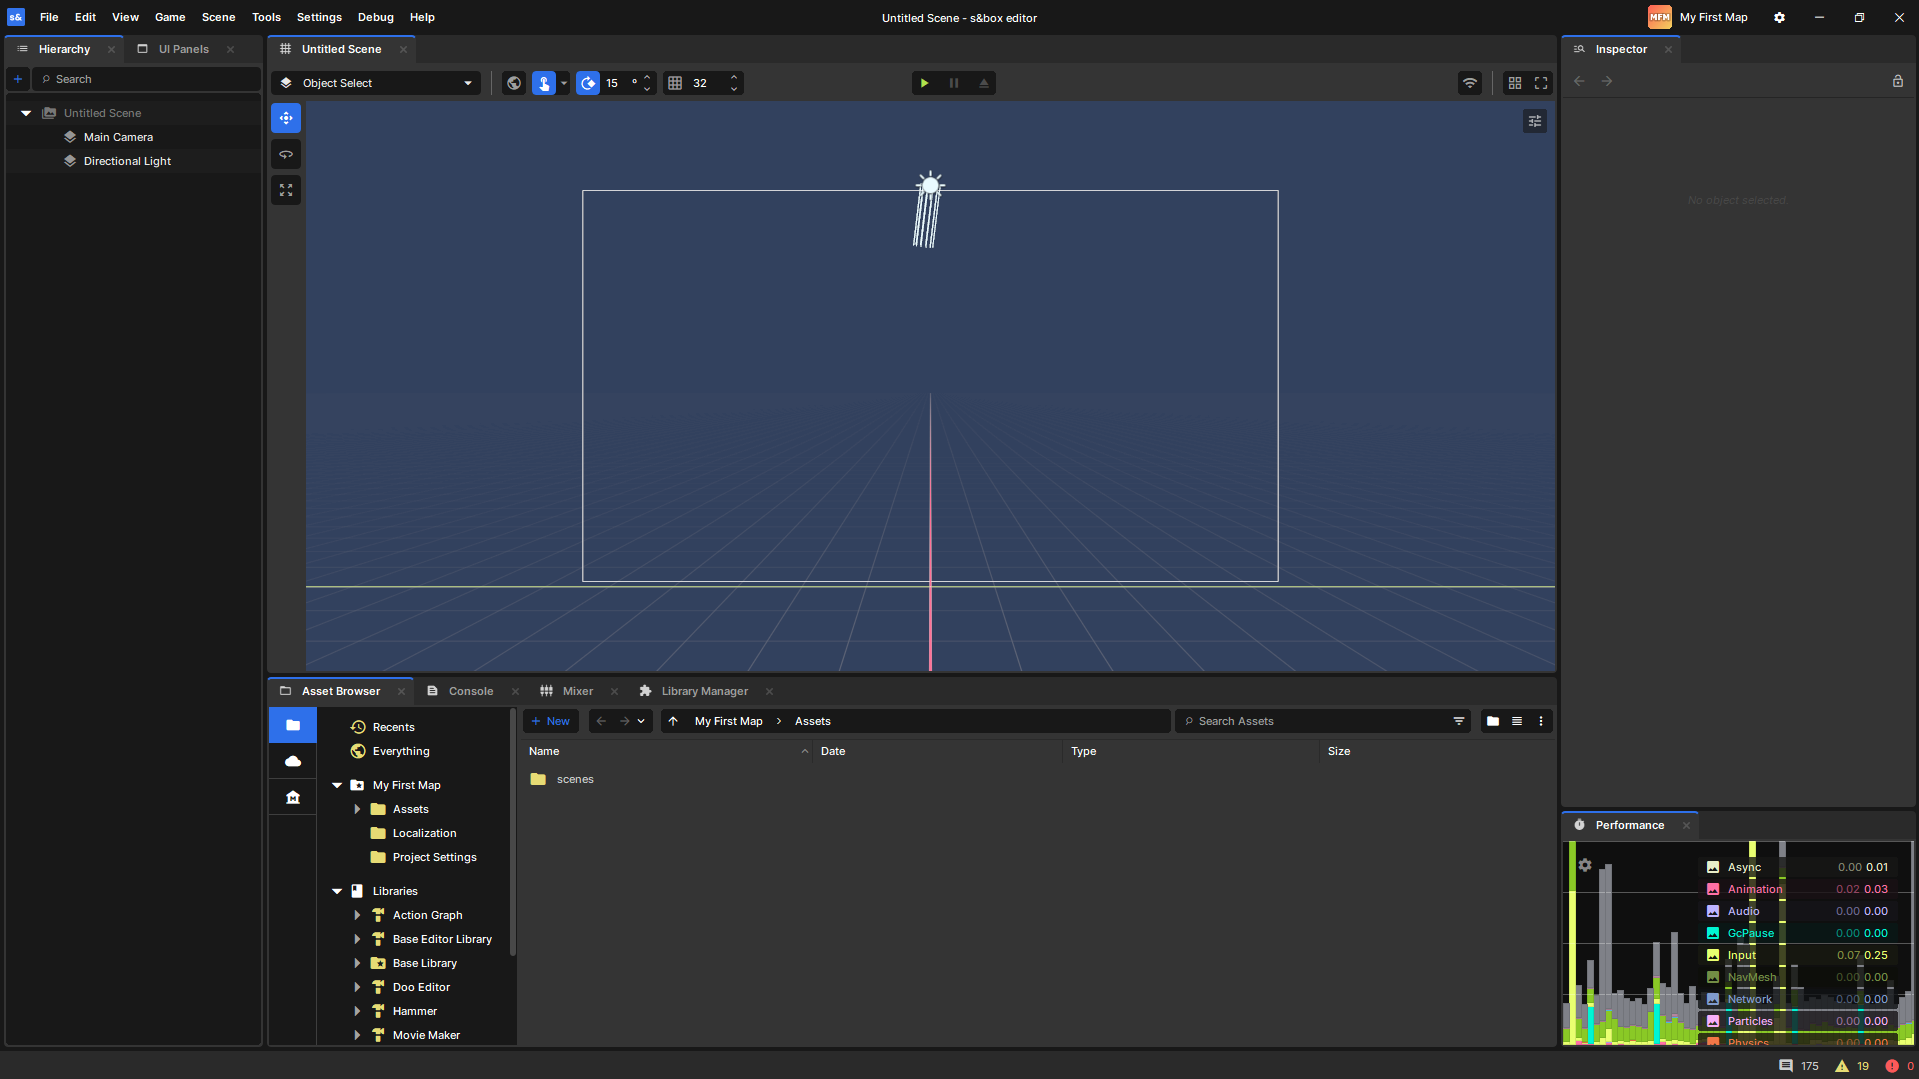
When you first open your map you'll see several panels arranged around the main viewport. Here's a quick breakdown of what each one does.
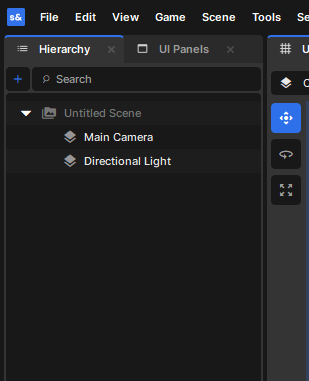
Hierarchy
The Hierarchy lives in the top left. It lists every GameObject in your scene — think of it as your scene's table of contents. Right now it just shows the default Main Camera and Directional Light that every new Scene starts with.
Don't skip naming your objects. A Hierarchy full of objects called "GameObject", "GameObject (2)", "GameObject (3)" is a nightmare to work with once your map gets bigger. Name as you go, not at the end.
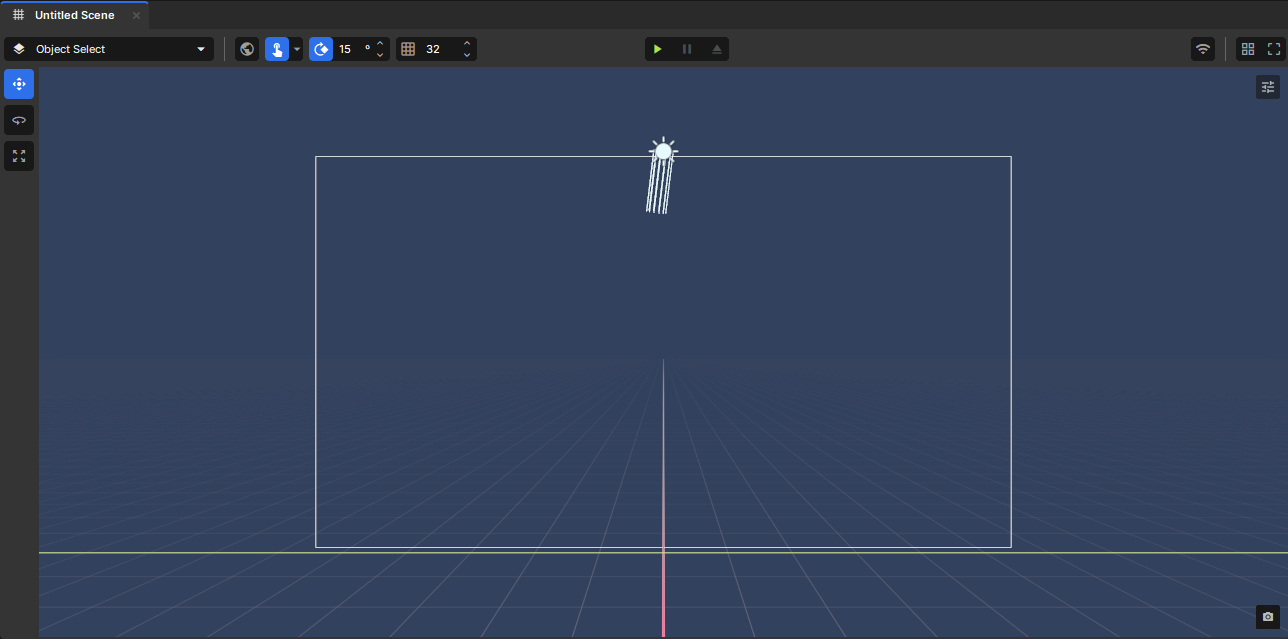
Scene Viewport
This is where you build and navigate your map. The grid you see is your world floor. You can navigate by holding right click and using WASD to fly around. Go ahead and get a good Feeling of movements before we move on.
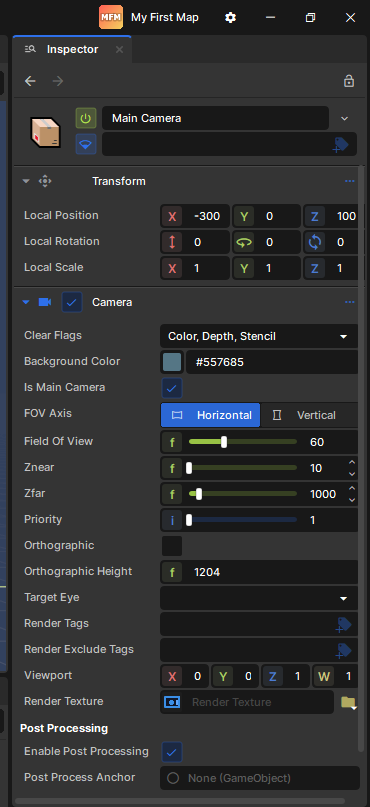
Inspector
The Inspector lives on the right side. When you select a GameObject it shows you all of its properties and components — position, rotation, scale, and anything else attached to it.
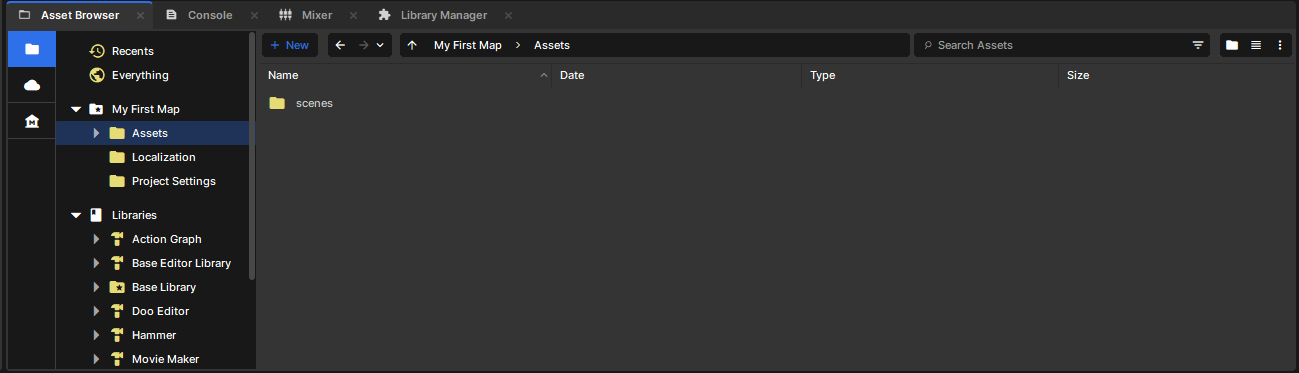
Asset Browser
The Asset Browser sits at the bottom. This is where you find materials, models, and other assets to use in your map.
Don't worry about memorizing all of this right now. You'll get comfortable with each panel naturally as we start building.
Section 3: Editor Settings
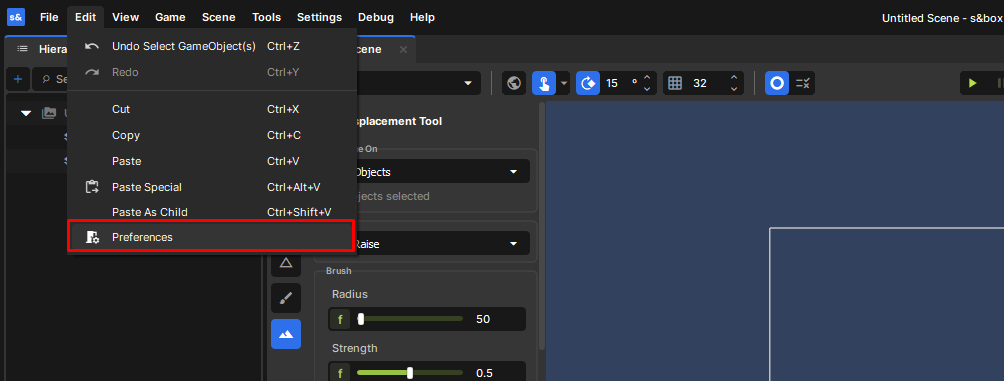
Before we start building it's worth taking a minute to set the editor up the way you want it. Go to Edit → Preferences to open Editor Settings.
Scene View
Scene View controls how the viewport camera behaves. There are a lot of options in here, but only two actually matter while you're getting started:
Movement Speed — How fast you fly around the viewport with WASD. This is the first thing to adjust if navigation felt too slow or too fast from earlier.
Sensitivity — Your mouse look sensitivity inside the viewport. Adjust this if rotating the view feels off.
Info — Everything else in here can stay at default for now. Set Movement Speed and Sensitivity to whatever feels comfortable and move on — we'll break down the rest of these settings in a dedicated tutorial if you ever need them.
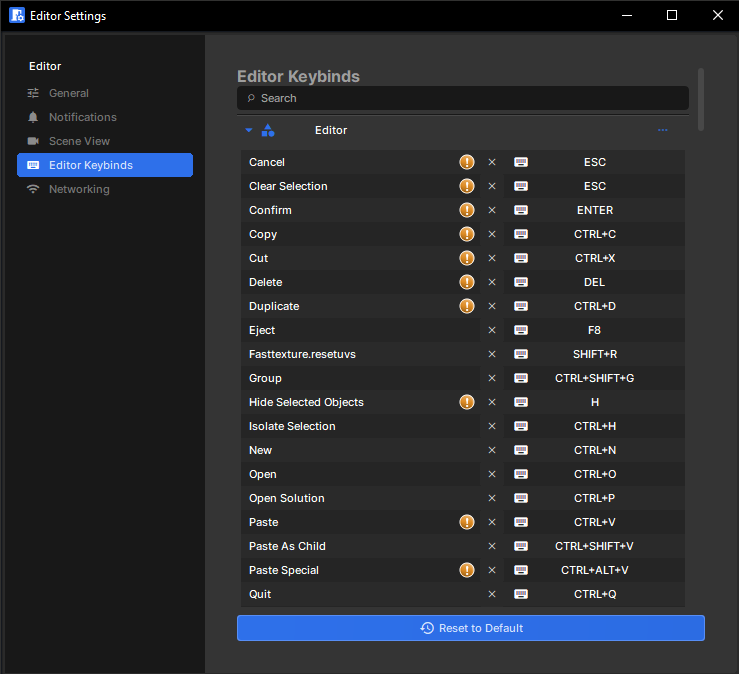
Editor Keybinds
Here are the keybinds you'll use the most while building maps. We'll cover the full keybind reference in a separate tutorial.
Please take the time to study this. It makes you work 10x faster and makes it a much more enjoyable process TRUST ME.
General
Undo Ctrl+Z — Undoes the Action you did.
Redo Ctrl+Y — When you spammed Ctrl+Z too many times.
Save Ctrl+S — Make this one a Habit! s&box is prone to crash.
Duplicate Ctrl+D — Awesome for making multiple objects that are the same
Toggle Play F5 — How to quickly Test your map (Needs a Spawn Point Component)
Hide Selected H — VERY useful! Hides things so you can get to something.
Hide/Show Alt+H — Toggles your hidden stuff back into view.
Isolate Selection Ctrl+H — Hides EVERYTHING but what you picked. Perfect for focusing on one room.
Unhide All U — Don't forget to do this one..
Grid
Decrease Grid Size [ — Shrinks the grid for fine, precise detail work.
Increase Grid Size ] — Grows the grid for blocking out big stuff fast.
Toggle Grid Snap G — Keep this ON! Off-grid geometry will cause you more problems than anything.
Mapping
Enter Mapping Mode M — Step one, every time.
Primitive Tool Shift+B — Where you create your Geometry
Object Selection 4 — Grab whole meshes to move them around.
Face Tool 3 — Gives you the ability to select individual Faces on a mesh.
Edge Tool 2 — Gives you the ability to select individual Edges on a mesh.
Vertex Tool 1 — Gives you the ability to select individual Vertices/Corners on a mesh.
Position W — Move your selection around.
Rotate E — Spin it.
Scale R — Make it bigger or smaller.
Resize Y — Drag the bounding-box handles — perfect for blocks.
Apply Material Shift+T — Places your active material onto the selected faces.
Apply Hotspot Alt+H — Auto-fits the texture cleanly to each face for you.
Select Loop L — Grabs a whole edge loop in one click. Huge time saver.
Combine Faces Backspace — Merges flat neighboring faces into one.
Thicken Faces G — turns a plane into a slab.
Flip All Faces F — Flips stuff inside out.
Frame Selection Shift+A — Snaps the camera right to your selection.
For the full keybind reference check out our Editor Keybinds tutorial. [link here before publish]
Section 4: Entering Mapping Mode
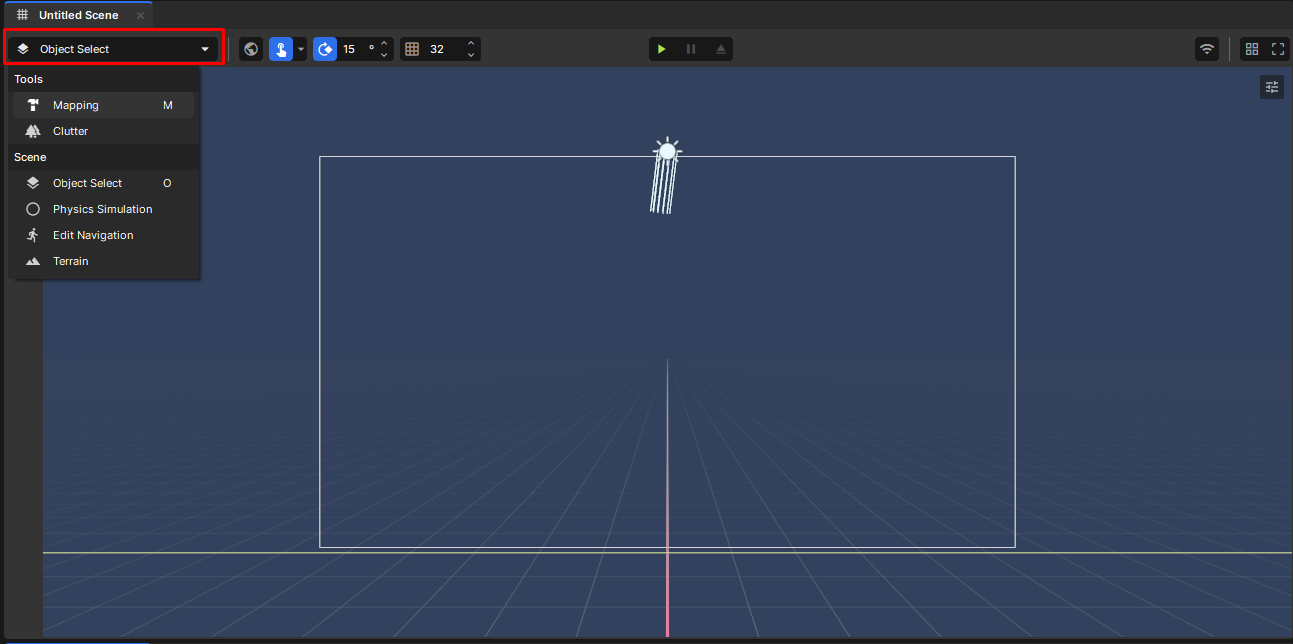
To start building you need to switch into Mapping mode. Click the mode dropdown in the top left of the viewport — it shows Object Select by default. Under Tools select Mapping, or just press M while clicked into the viewport.
Once you're in Mapping mode the toolbar appears on the left side of your viewport. Here's what each tool does and how to get to it fast.
PrimitiveShift+B — Where you create geometry. Every surface in your map starts here.
Object Select4 — Select and move whole meshes.
Vertex1 — Edit individual points on a mesh.
Edge2 — Edit the lines between vertices.
Face3 — Edit individual surfaces and apply materials.
Vertex Paint5 — Paint colors and blend masks onto surfaces.
Displacement — Sculpt and push vertices like terrain.
Get used to hitting Shift+B, 4, 3, and 2 to switch tools, plus W, E, and R to Move, Rotate, and Scale — these cover most of what you do in this tutorial and every map after it.
Section 5: Building the Floor
Before we place anything — a quick note on workflow. Geometry first, textures second, lighting third. Don't worry about how anything looks until the space feels right to walk through. Everything starts on dev textures and we clean it up later.
Always build on the grid. Use [ to make it smaller for precision work and ] to make it larger for laying out big surfaces. Geometry that's off grid causes seams, lighting issues and z-fighting. Build on the grid every time.
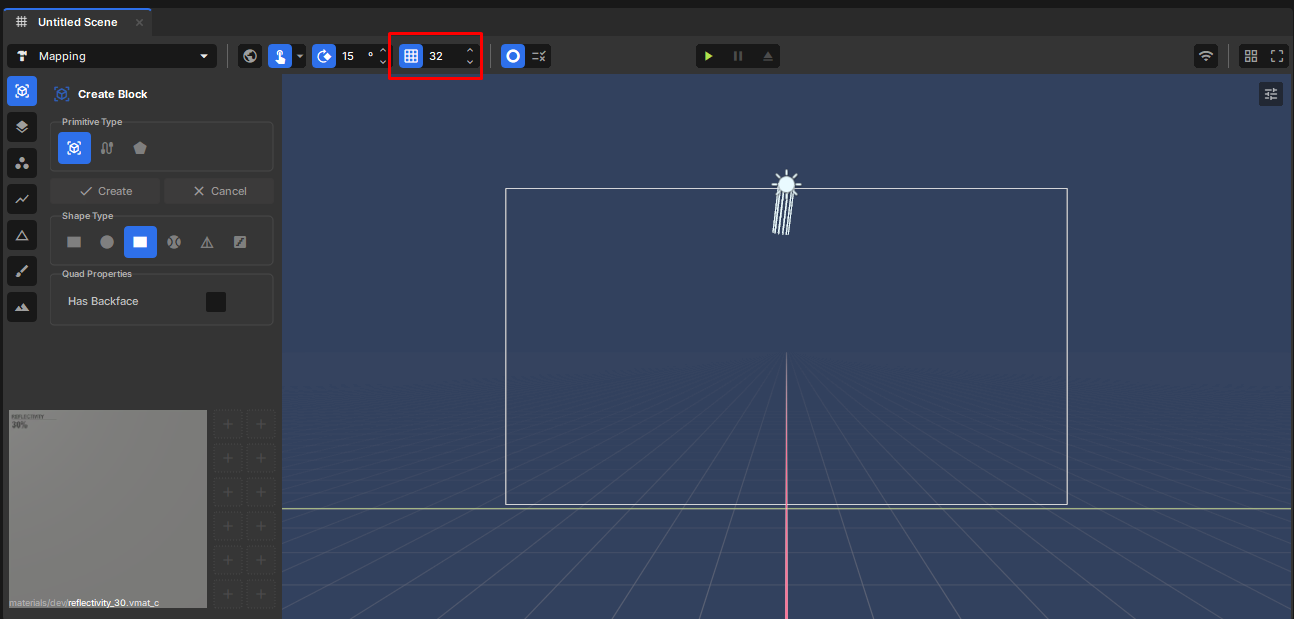
Before you place anything make sure Grid Snap is turned on. You can see the grid size indicator in the top bar of the viewport — it shows 32 by default. Click the grid icon next to it to enable snapping, or press G to toggle it on.
Grid snap is not on by default. If you place geometry without it your surfaces will be off grid and won't line up cleanly when you try to connect walls, floors and ceilings later. Turn it on before you place your first Quad and leave it on.
Placing the Floor Quad
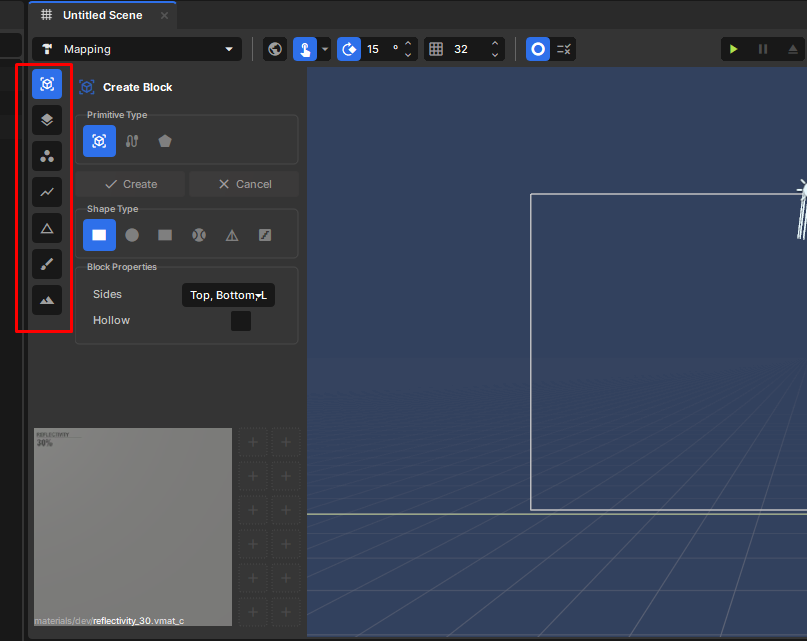
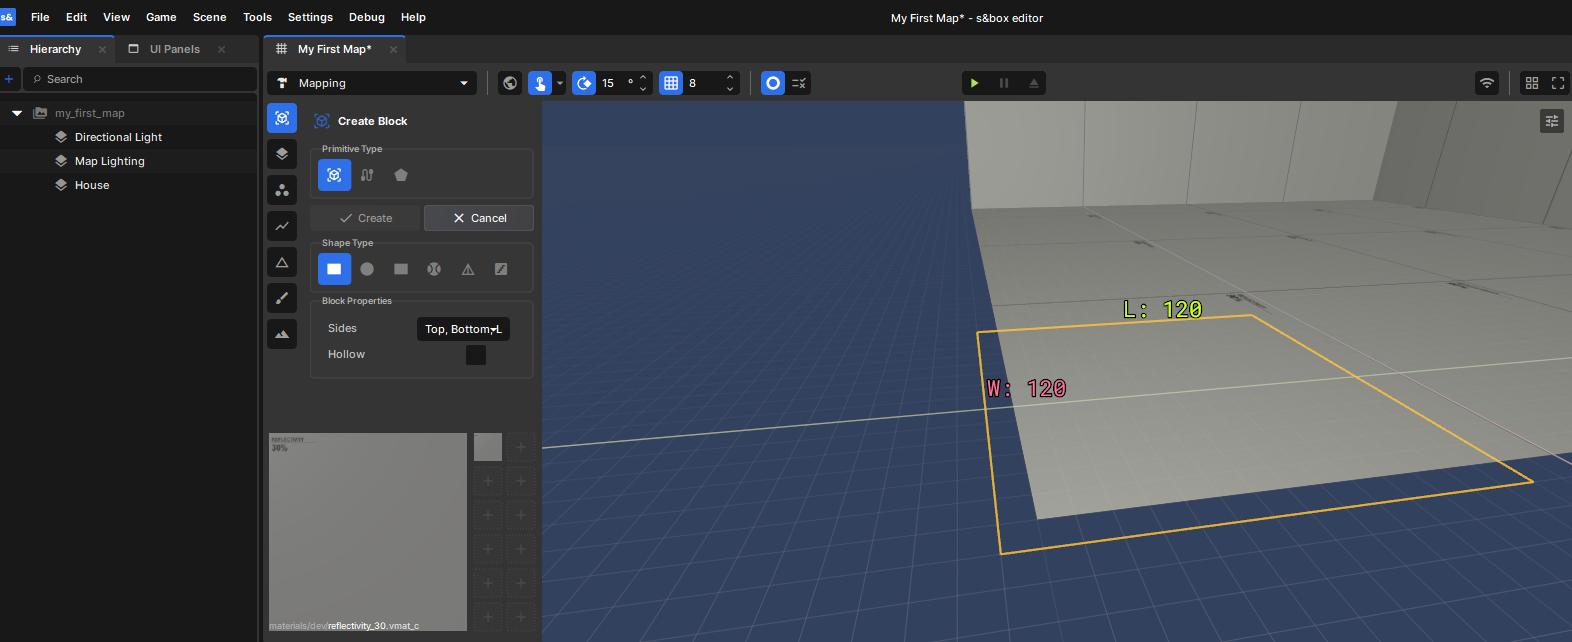
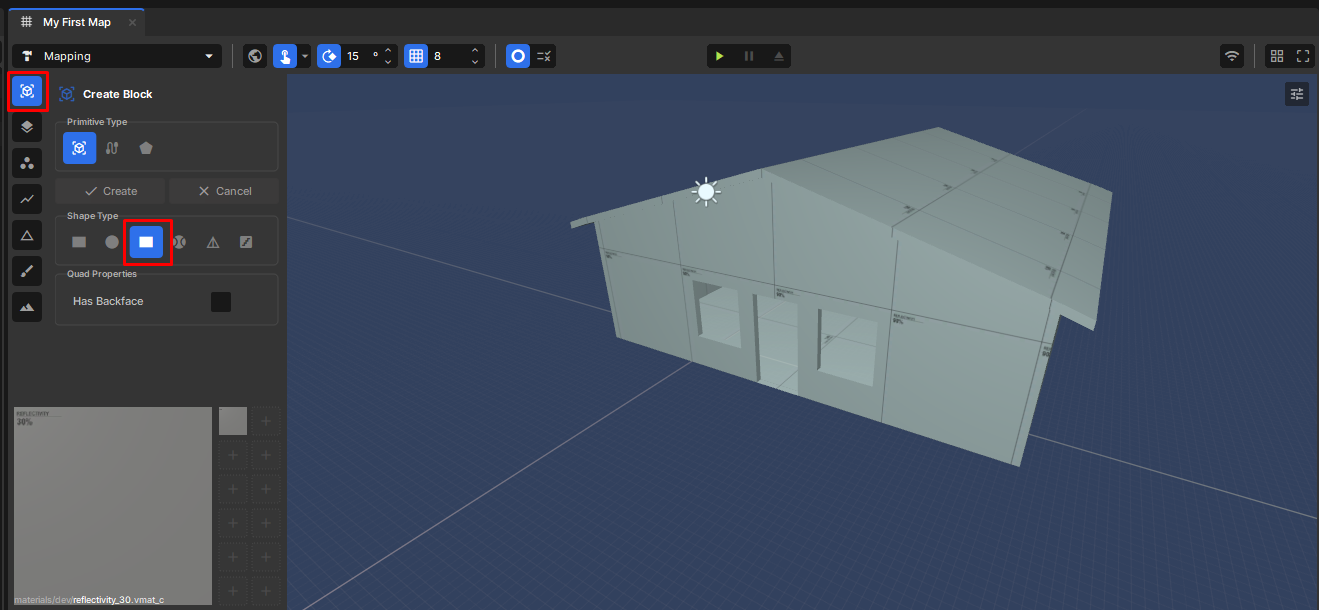
Press Shift+B to open the Primitive Tool. It opens on Block by default — click the Quad icon in the Primitive Type selector to switch to it.
Quad vs Block — What's the difference? A Block is a 3D box primitive — it creates six faces all at once, one for every side. Great for quick solid objects but gives you geometry you didn't ask for. A Quad is a flat 2D plane — a single face with zero thickness. When you build with Quads you place every surface on purpose, which means cleaner geometry, less waste, and more control over your map from the start.
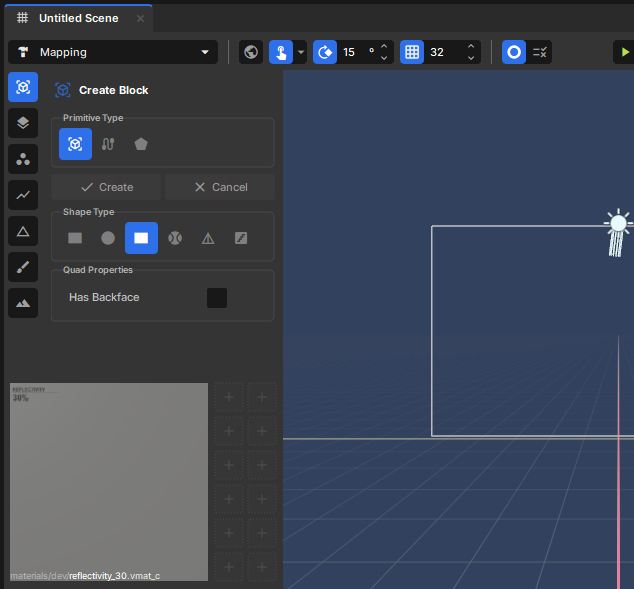
Leave HasBackface off. The floor only needs to be visible from above — the player never sees the underside of it.
When should you use HasBackface? Only turn it on for surfaces the player can see from both sides — a floating platform, a thin fence, a hanging sign. For any surface inside a closed room leave it off. Rendering faces the player can never see is wasted performance.
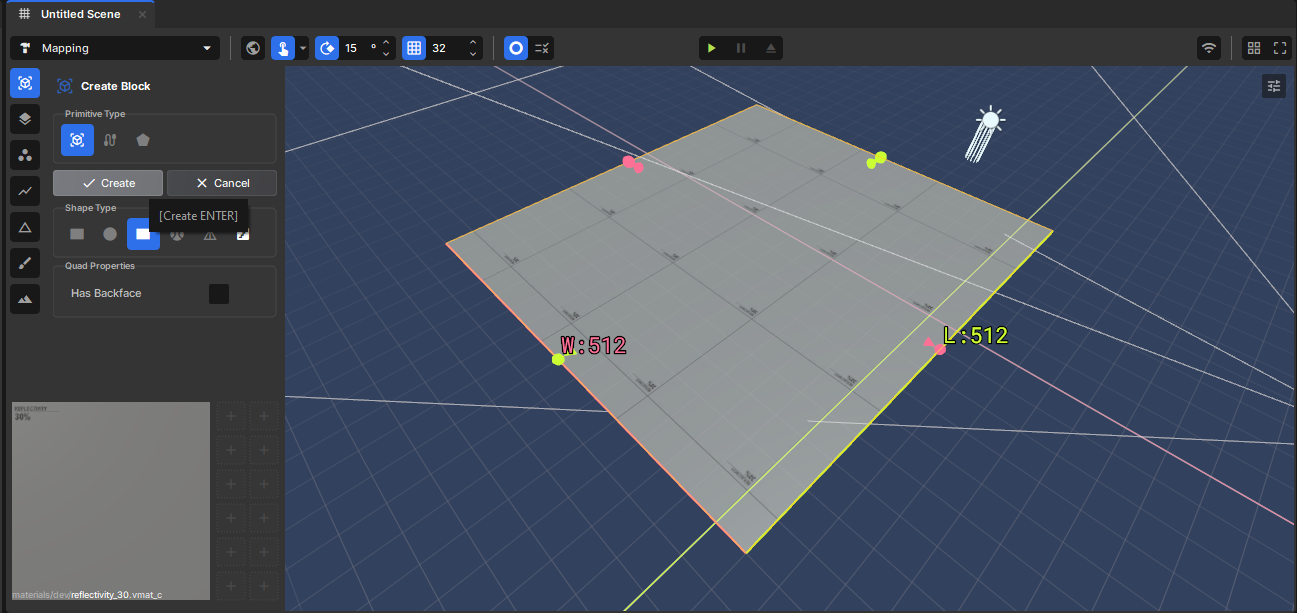
Click and drag on the grid to draw out your floor. You'll see the dimensions update live as you drag — aim for W:512 L:512. Once you're happy with the size either click Create in the sidebar or hit Enter to commit it.
If your Quad is standing up vertically instead of lying flat you dragged in the wrong direction. Hit Ctrl+Z and try again — drag horizontally across the grid floor.
Name Your Objects
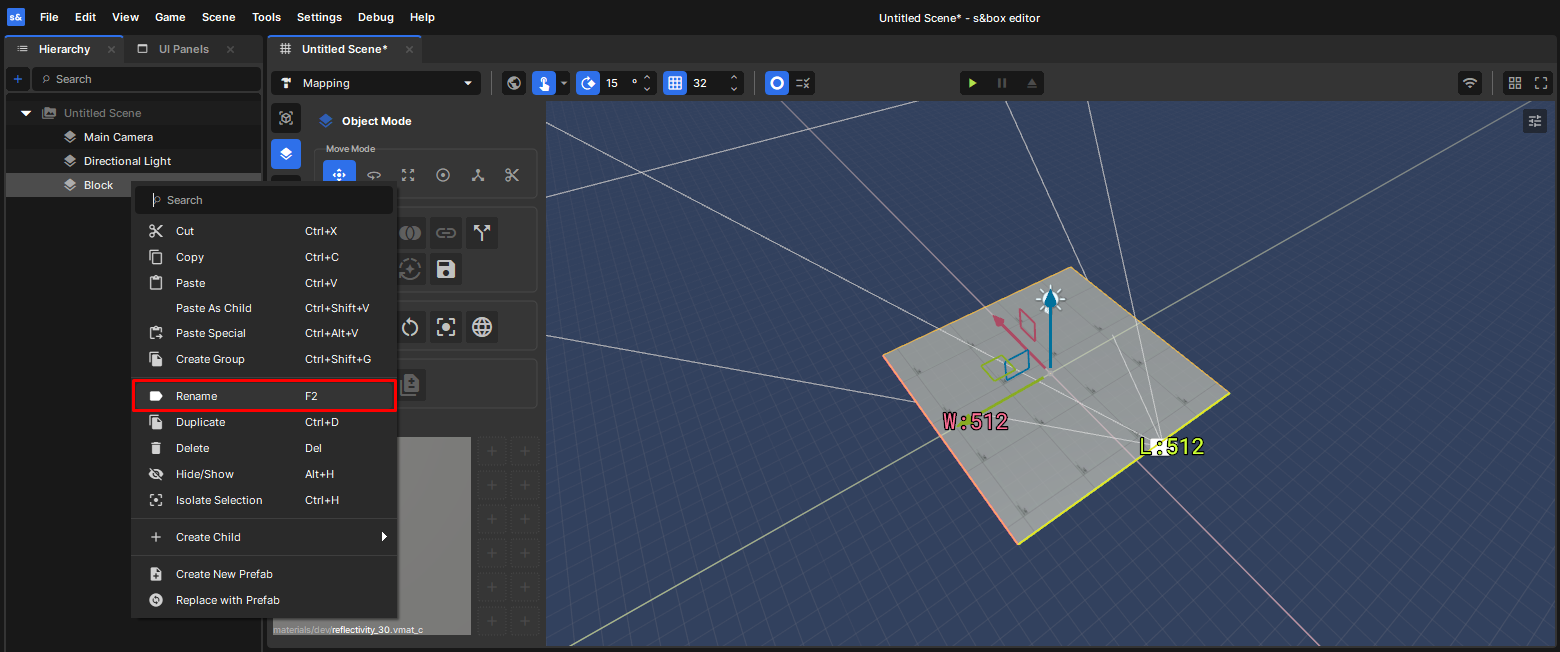
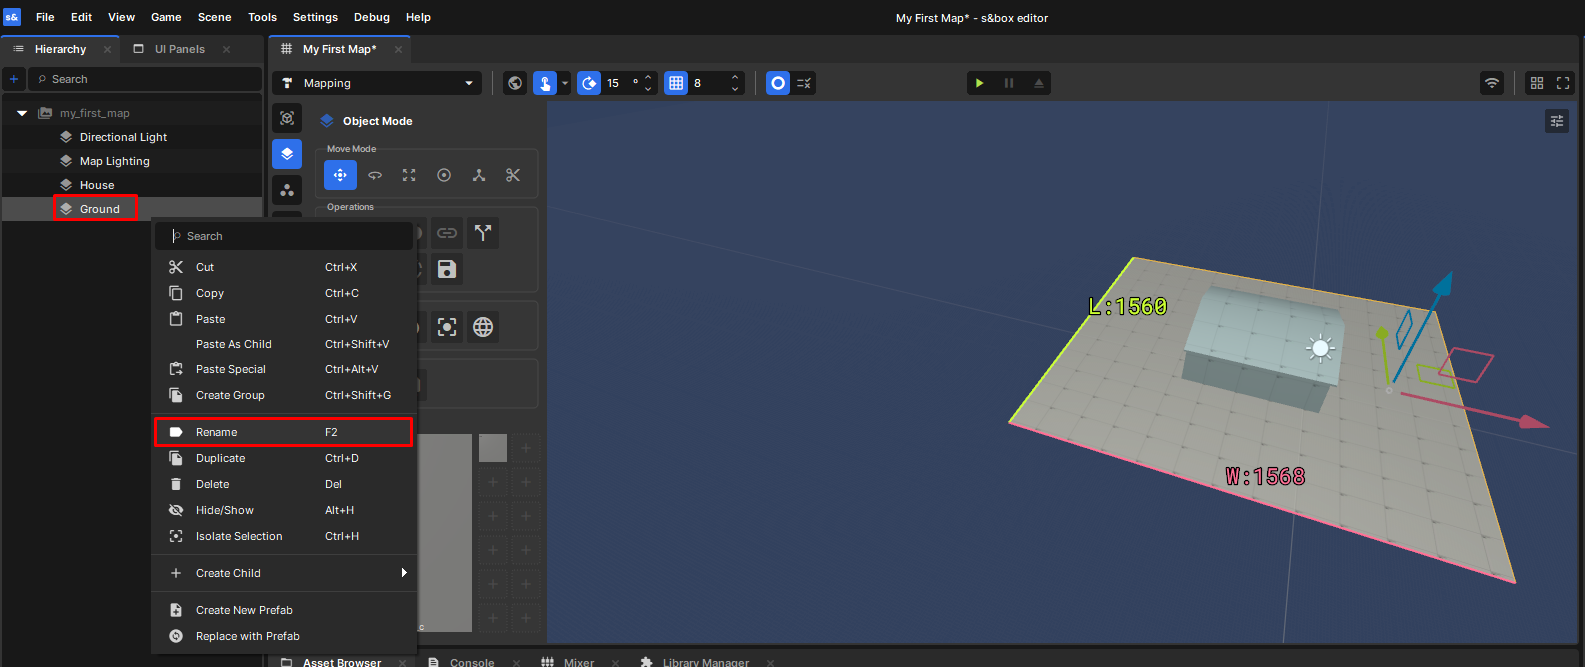
Right click your object in the Hierarchy and select Rename, or press F2. Type your new name and hit Enter to confirm it.
You must hit Enter to save the rename. Clicking away without pressing Enter will revert the name back to what it was.
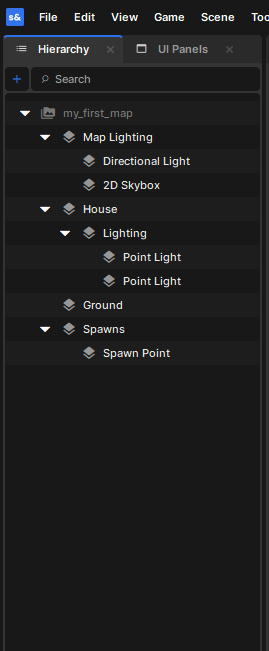
Organize Your Scene
Save Your Map
Before we start adding walls, save your work. Press Ctrl+S. The first time you save, s&box will ask where to put the scene — drop it in your project's assets/scenes folder and give it a clear name like My First Map. After that, Ctrl+S saves instantly.
Get in the habit of saving constantly. Hit Ctrl+S after finishing each section. The editor is still in active development and can crash — don't lose an hour of work because you forgot to save.
Section 6: Building the Walls
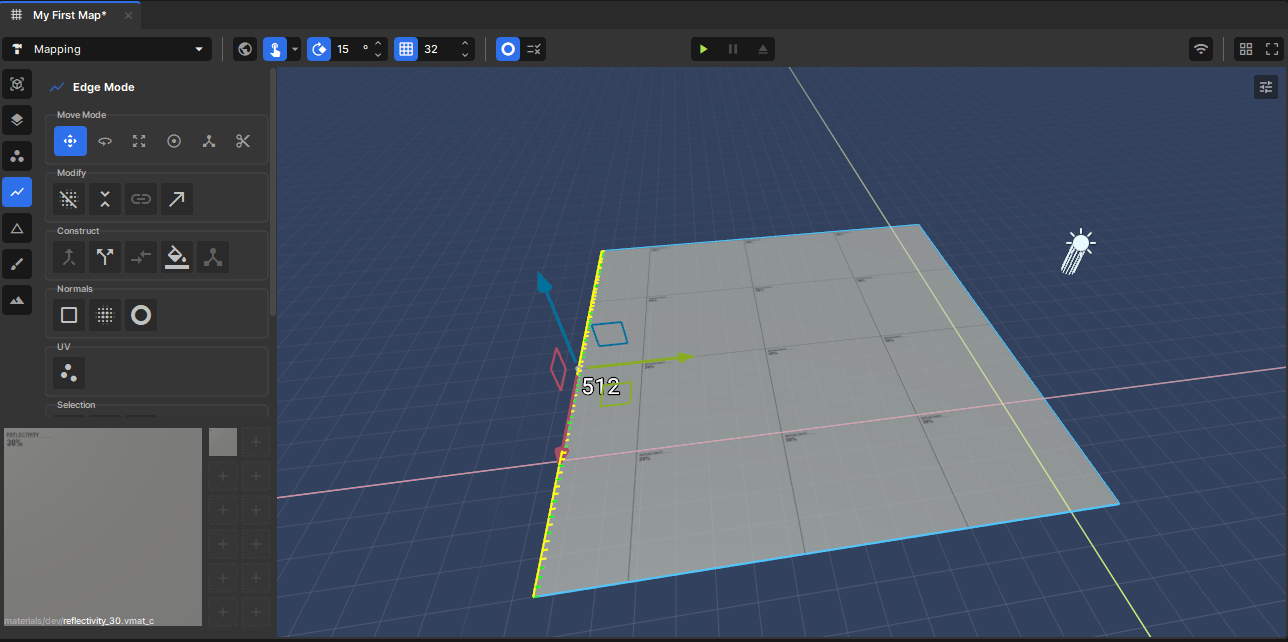
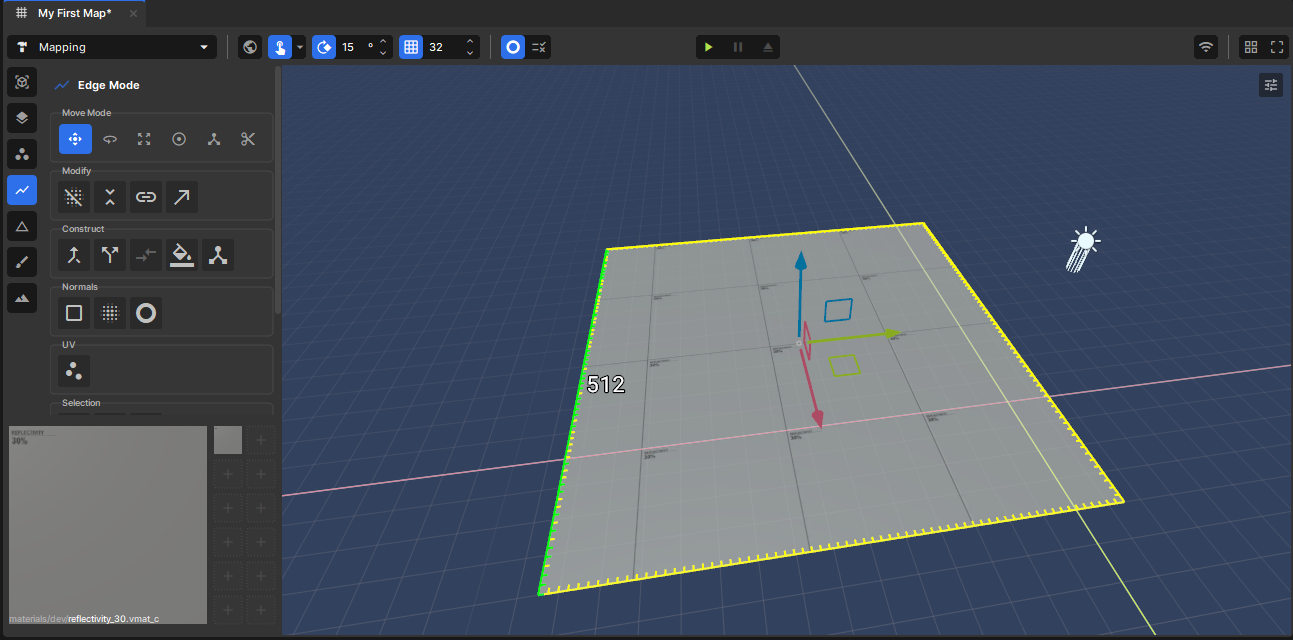
Select the Floor Edges
Edge Tool (2), select all four floor edges (double-click / L for the loop).
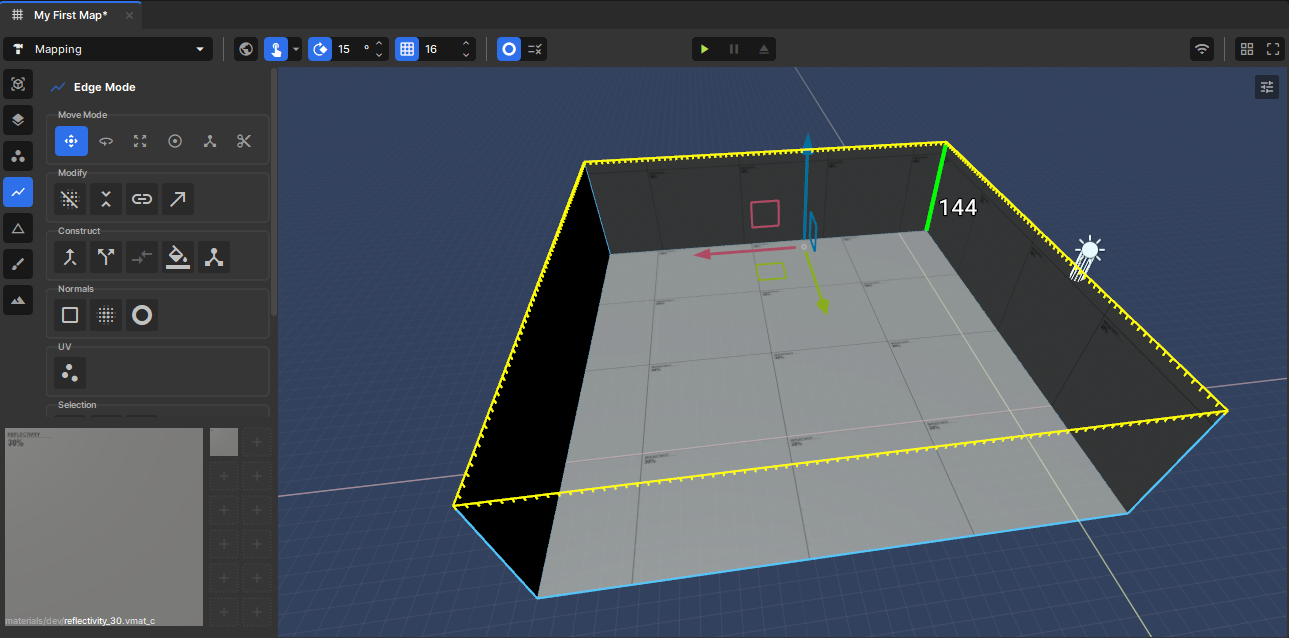
Extrude the Walls Up
Extrude the selected edges upward to 144.. Note grid snap keeps it clean.
Save Your Scene
Quick reminder: Ctrl+S again — save often.
Section 7: Building the Ceiling & Doorway
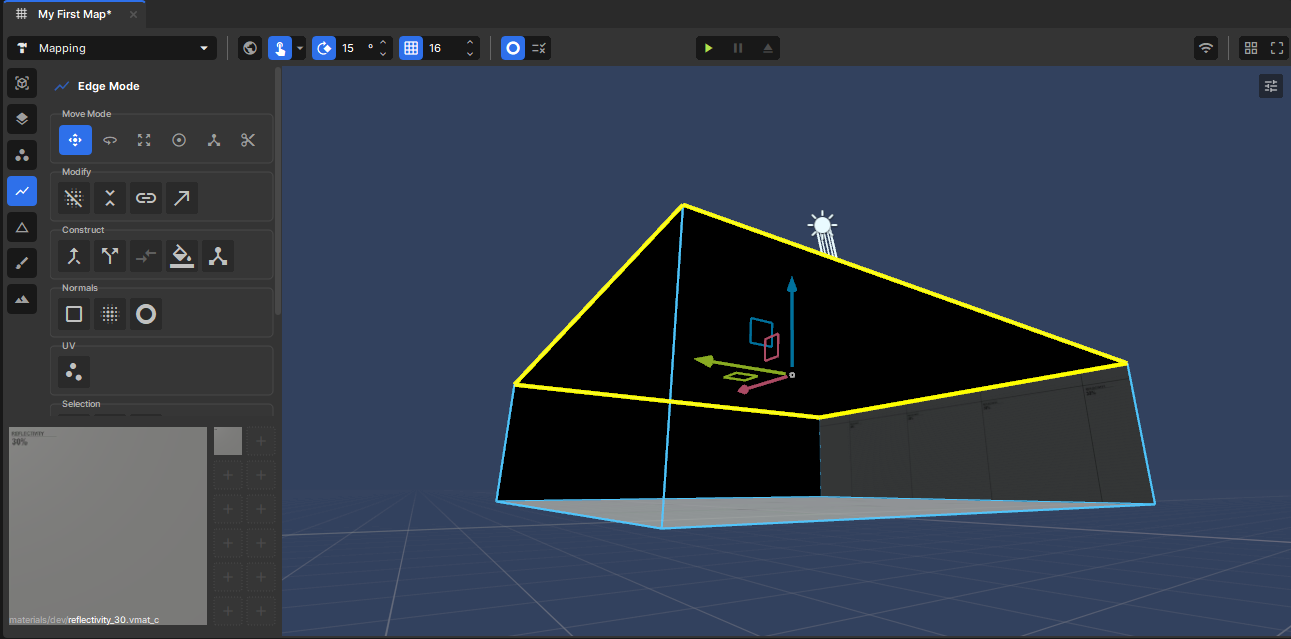
Closing the Ceiling
Fill the top opening (Fill Hole P on the top edge loop, or a ceiling Quad). Now you have a ceiling!
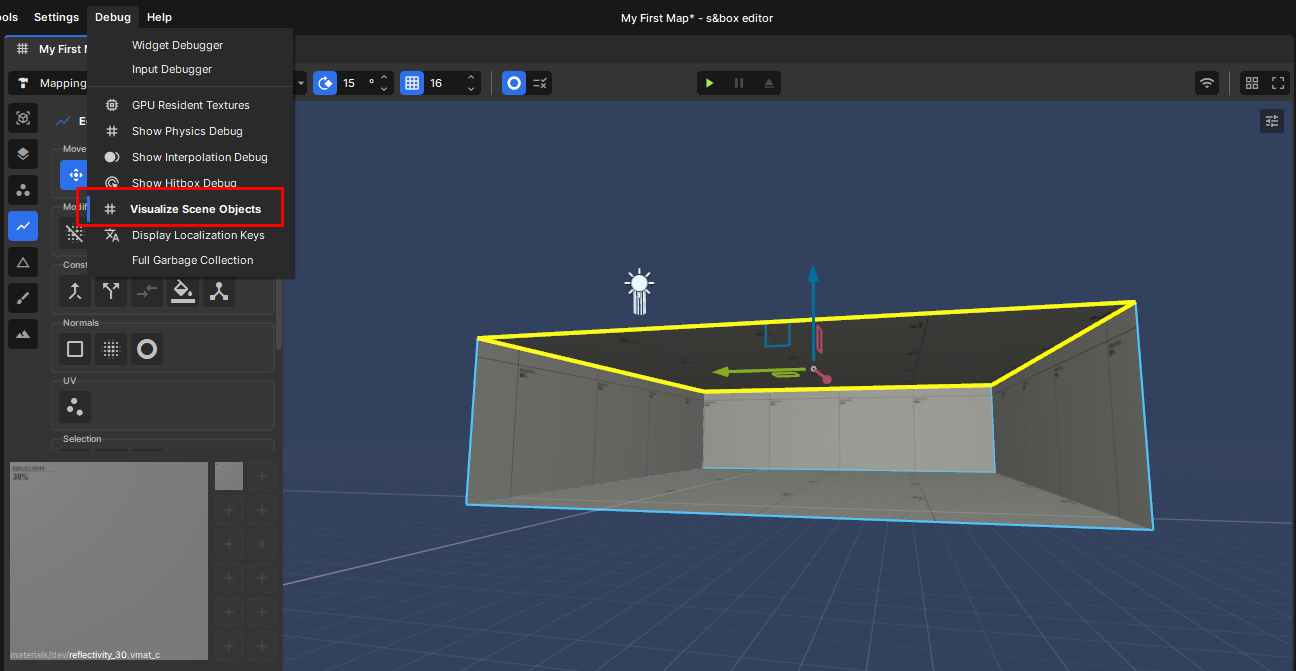
Now before we continues lets make it easier to see things. There's a few ways to do this.
Turn on Full bright mode.
Visualize Scene Object Debugger (My Favorite)
Cutting the Doorway
Cut the doorway opening into an interior wall — pick a side, any side!
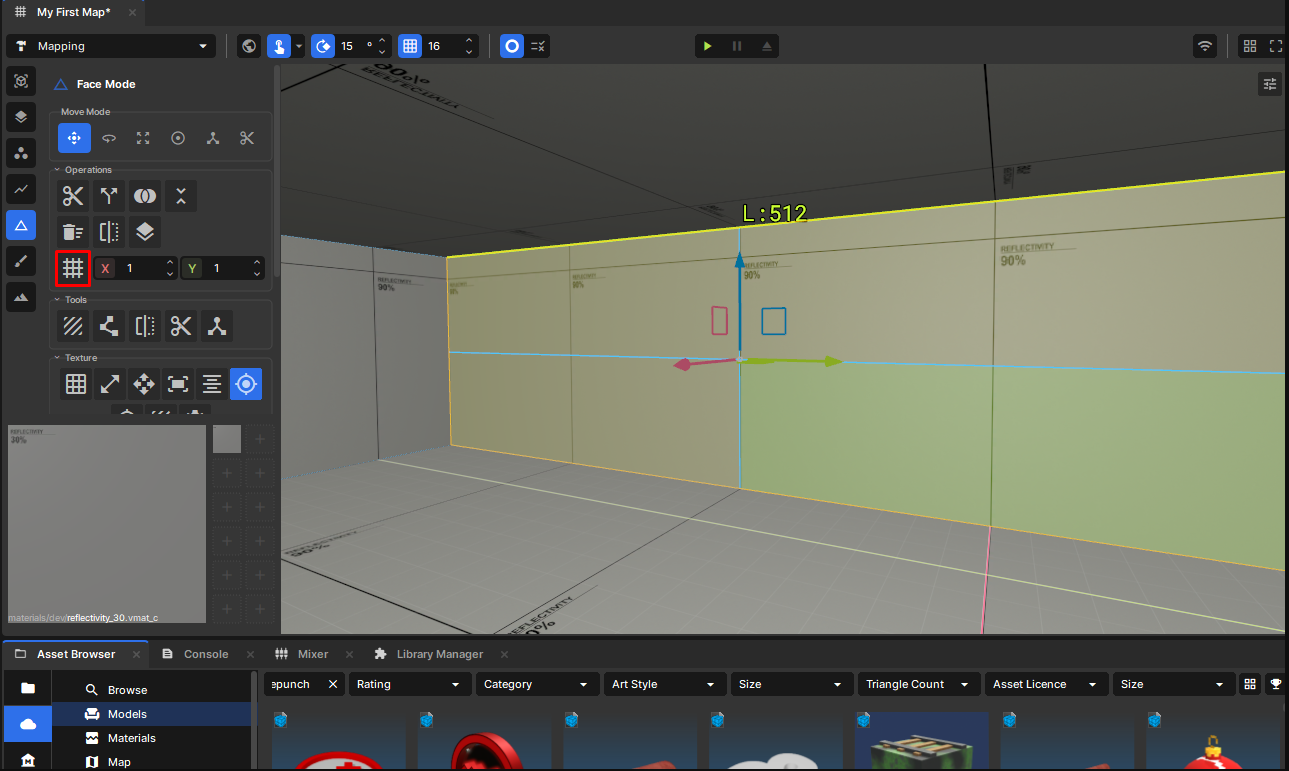
In the Face Tool (3), select the wall face.
Press Ctrl+D to duplicate the face — this keeps the doorway centered on the wall.
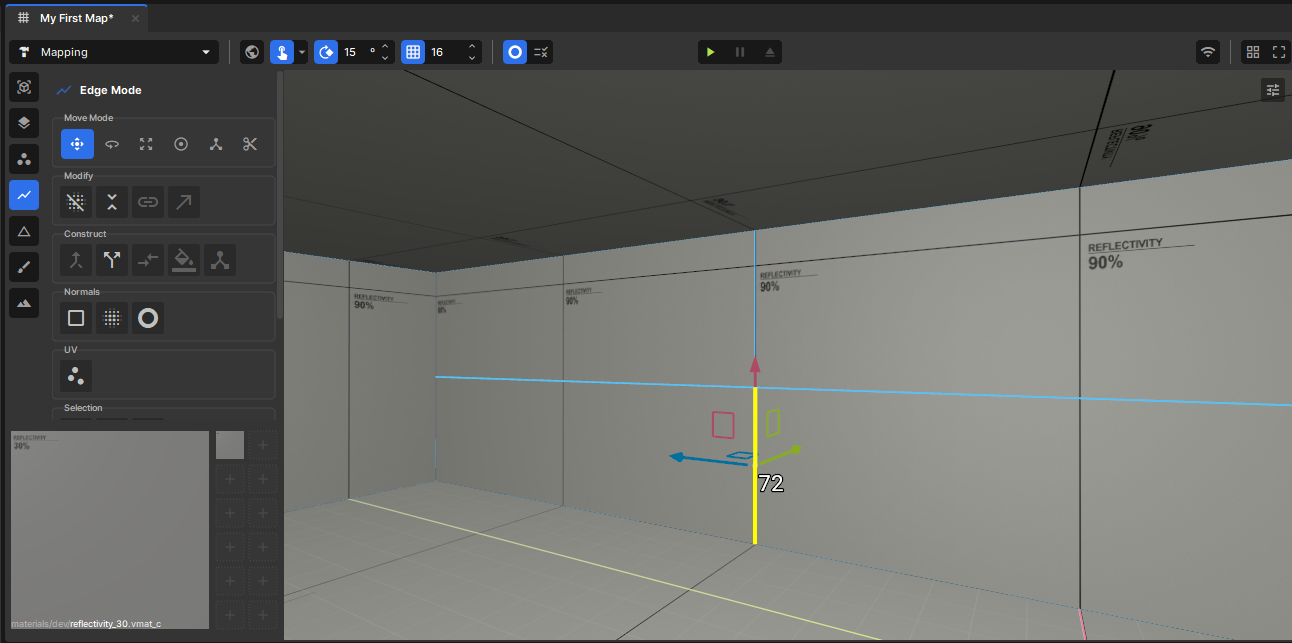
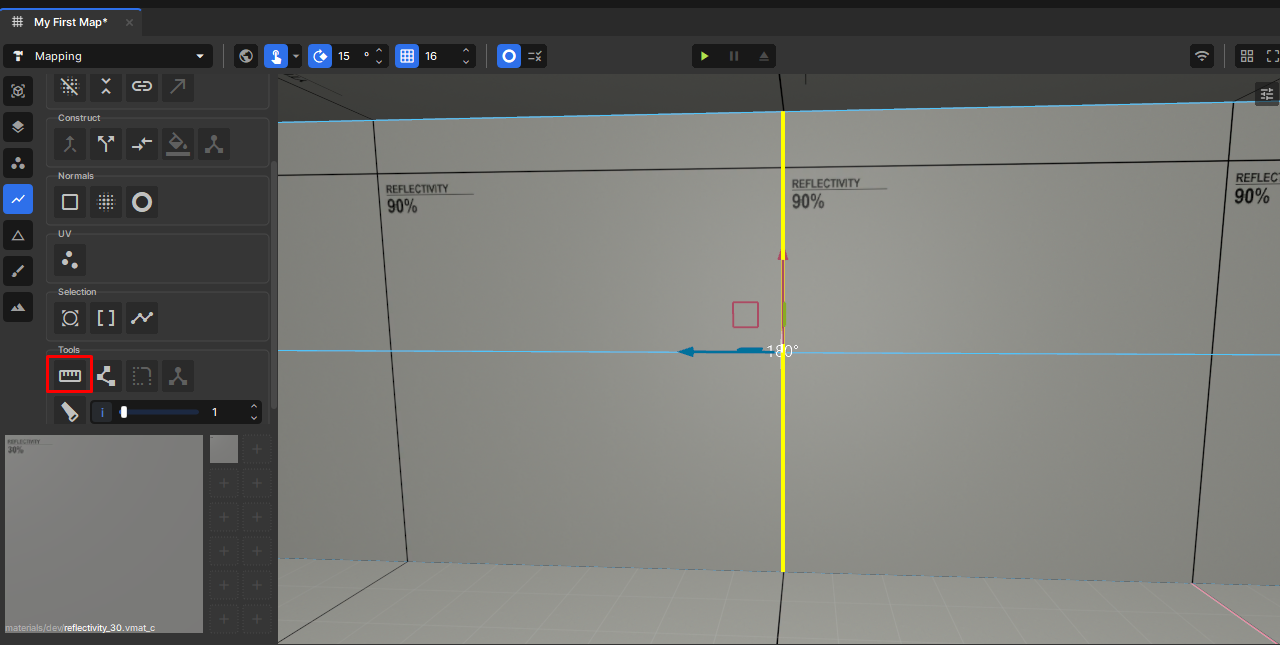
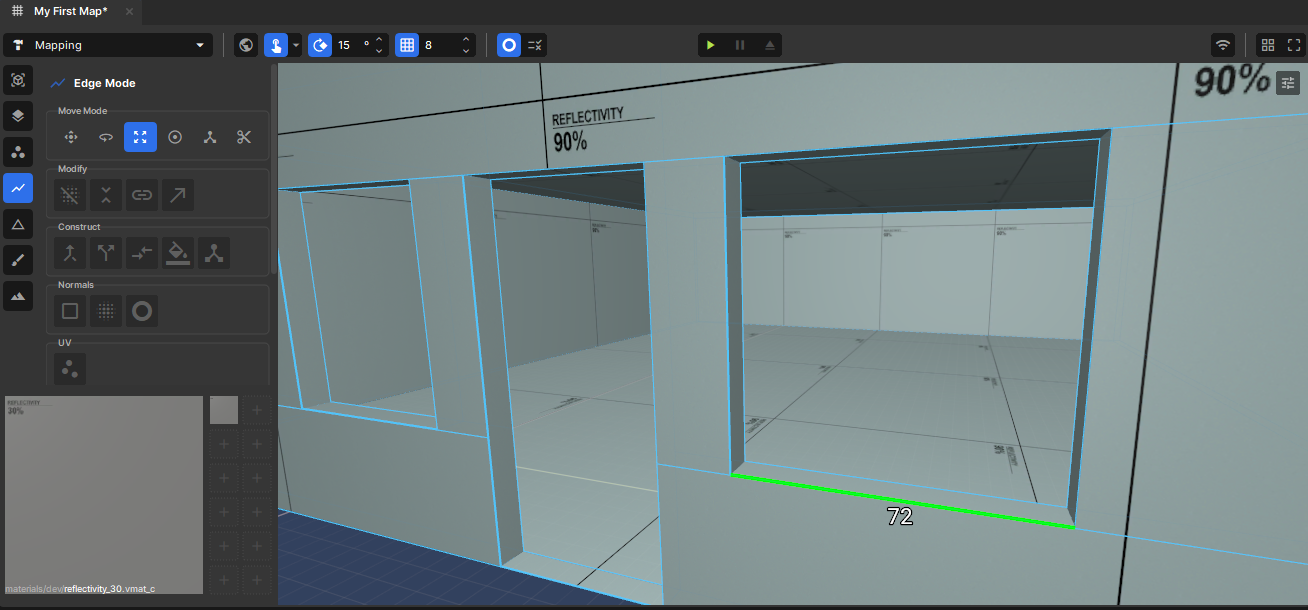
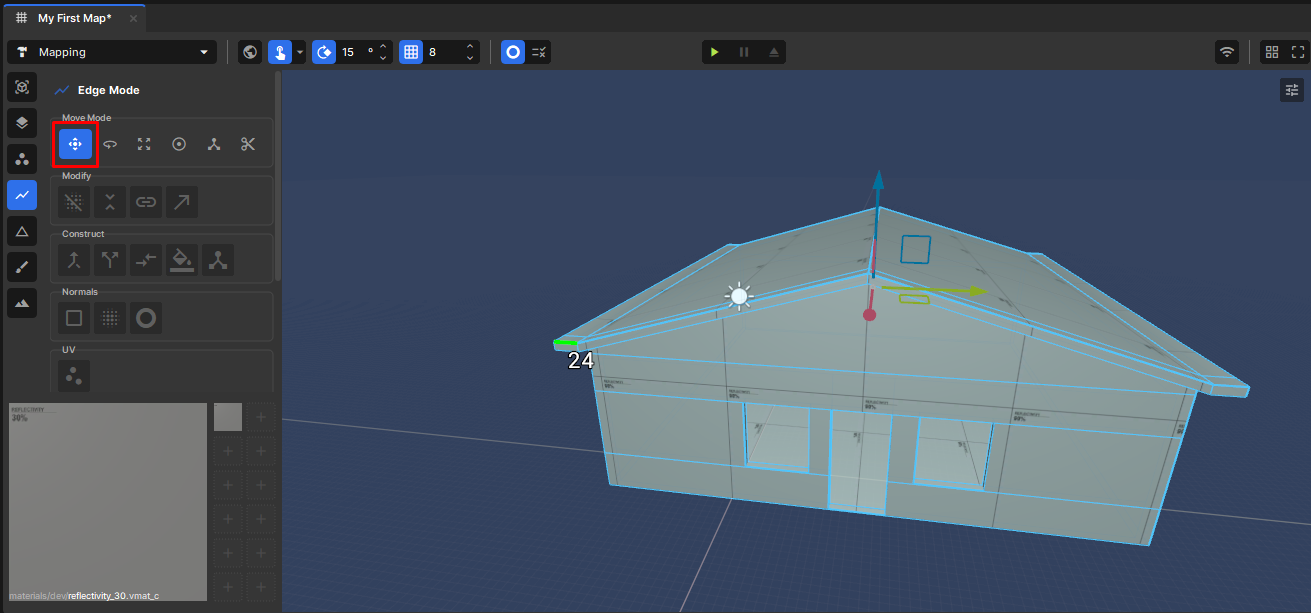
Switch to the Edge Tool (2) and select the doorway edge — press L or double-click to grab the whole edge.
Press F to bevel the edge.
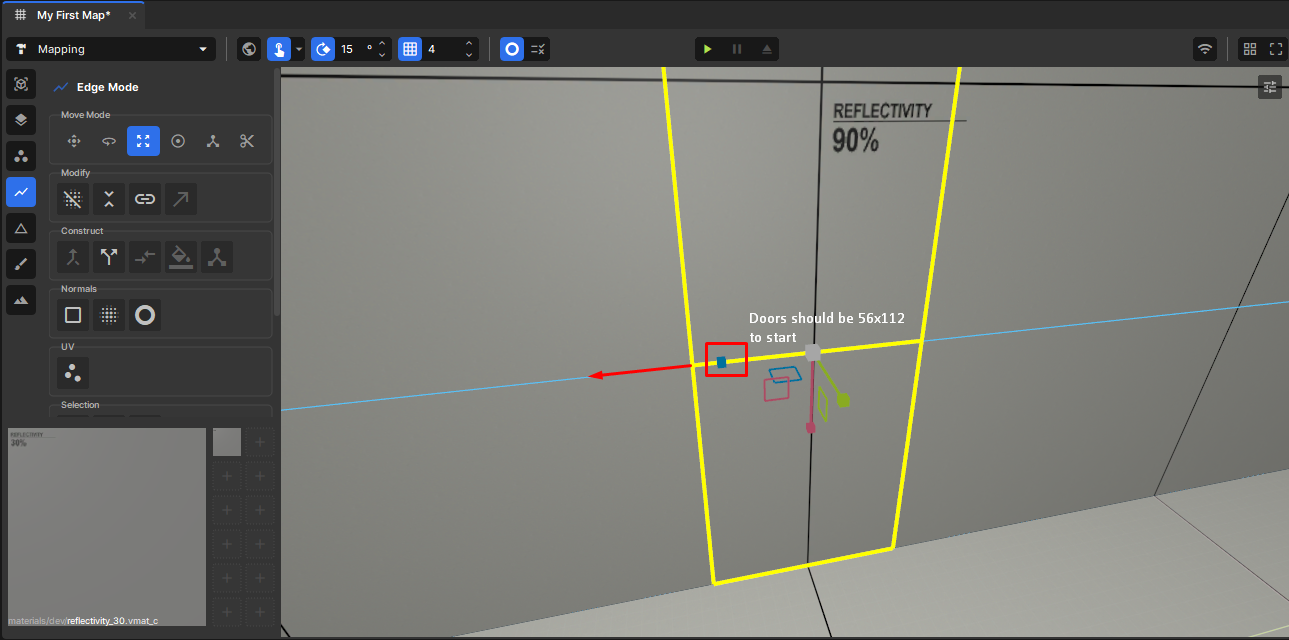
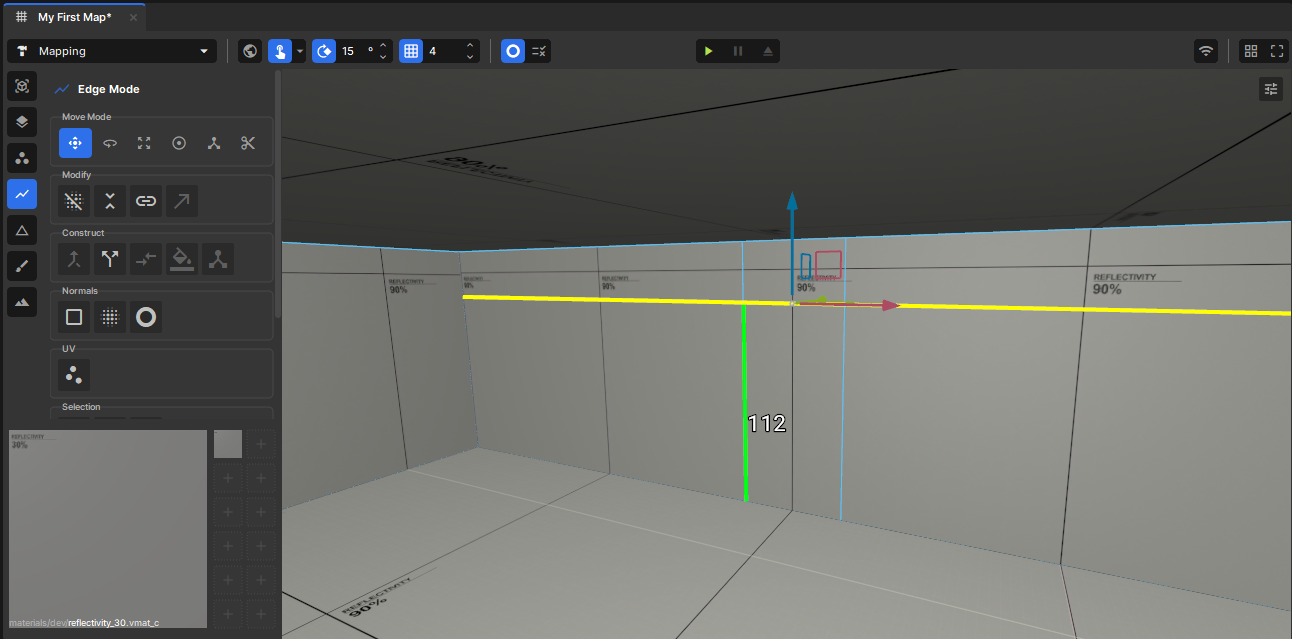
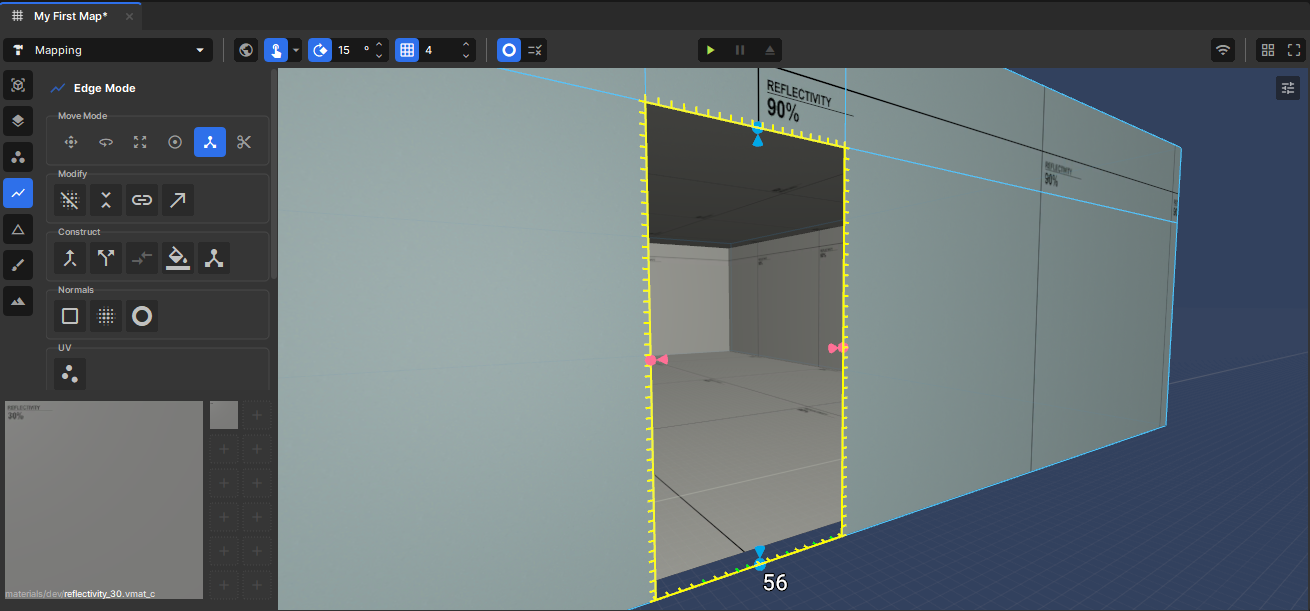
Switch to the Scale move mode, drop the grid down to 4, and drag it out until the door is 56 units wide.
Switch to the Scale move mode, drop the grid down to 4, and drag it out until the door is 56 units wide.
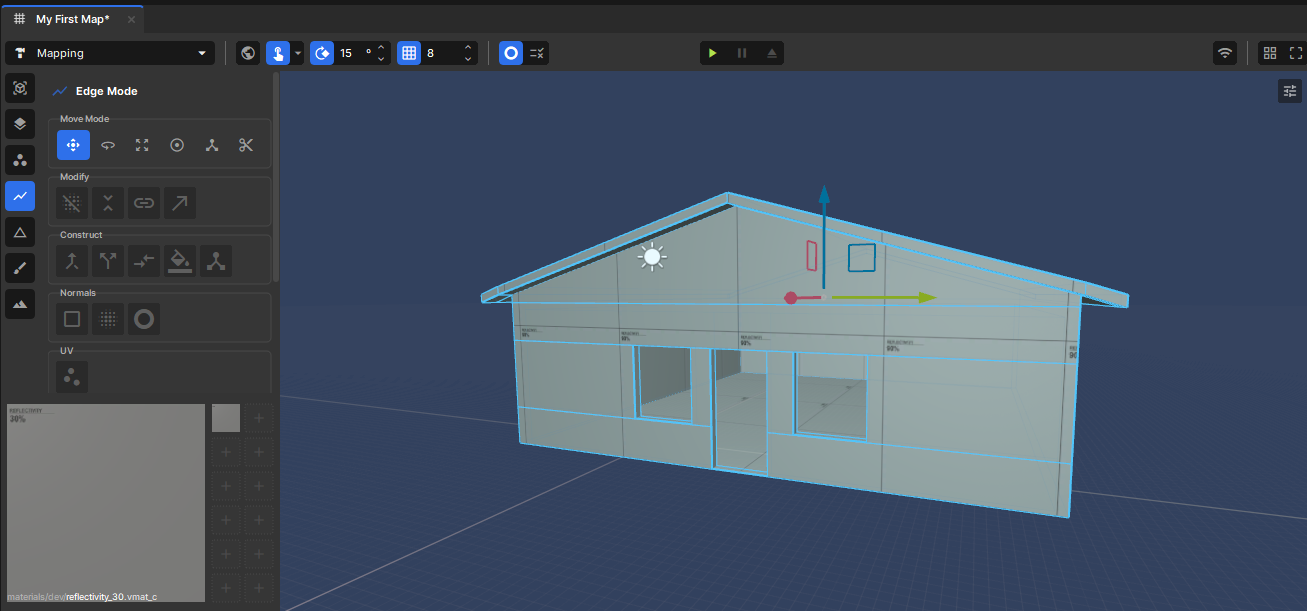
Switch back to the Face Tool (3), select the doorway face, and press Del to open it up.
Section 8: Building the Exterior & Roof
The house is solid on the inside — now we wrap it in an outer shell. The gap between the inside walls and the outer shell becomes your wall thickness (usually 8 units on residential buildings, 16 units on commercial).
Wrap the House in an Exterior Shell
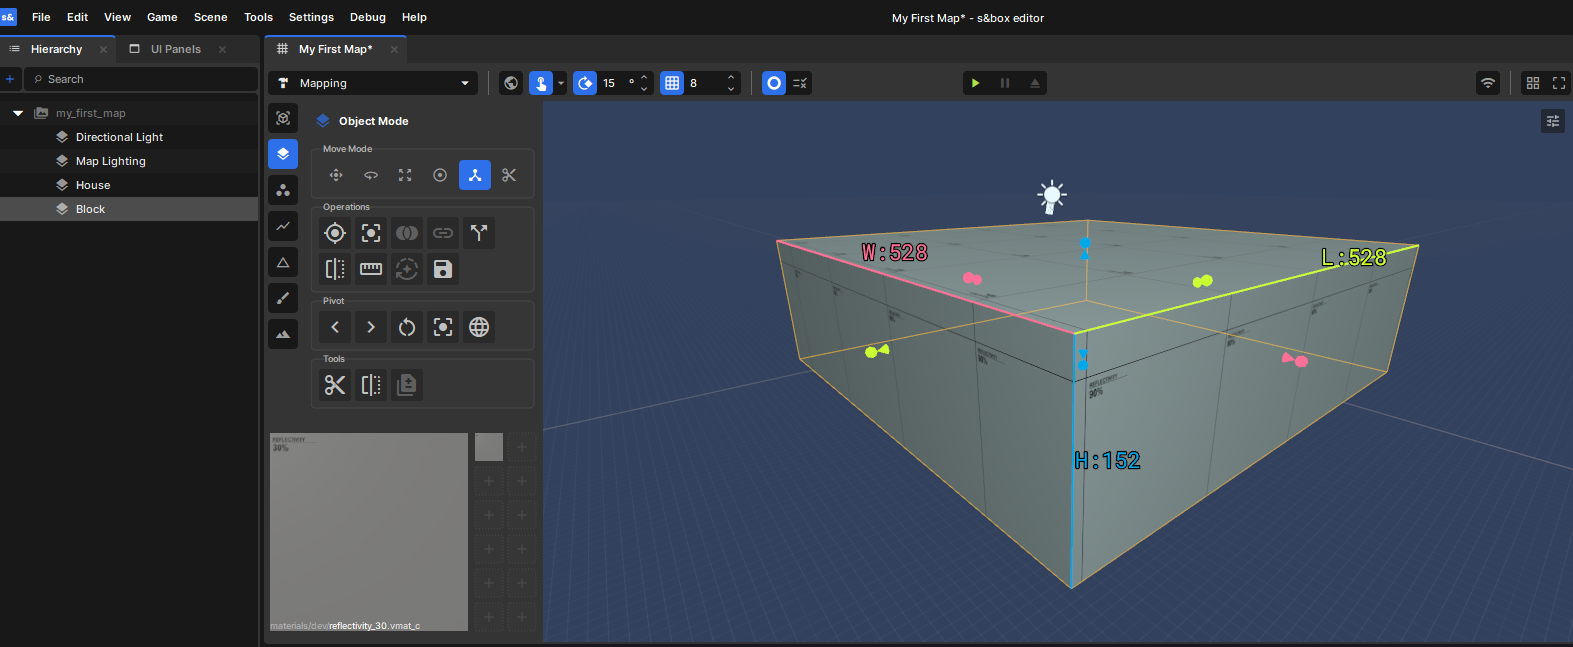
Set the grid size to 8.
Press Shift+B and place a Block that's 8 units bigger than the outside of your walls on every side, wrapping the whole house.
Line it up so there's a consistent 8-unit gap between the interior walls and the outer shell all the way around — that gap is your wall thickness.
Switch to the Face Tool (3), select the bottom face of the shell and press Del — it sits on the ground and the player never sees it.
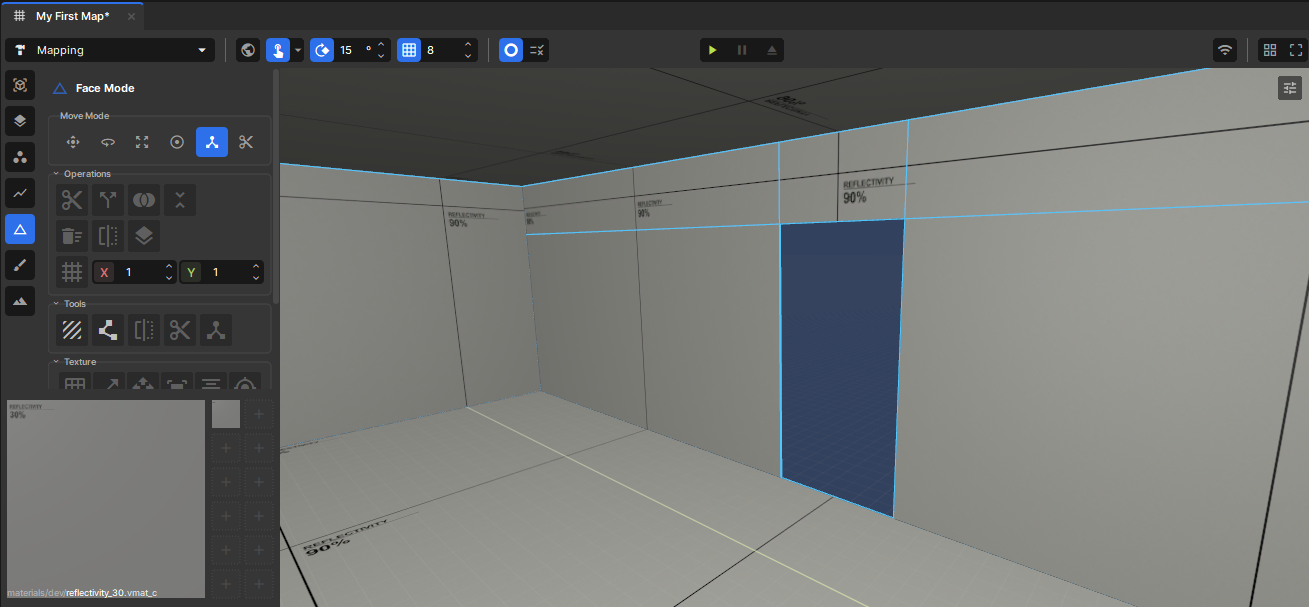
Cut the Exterior Doorway
Now punch the doorway through the outer shell so it lines up with the interior opening you already cut.
In the Face Tool (3), select the exterior front face. (Go inside the house in the editor to figure out which wall is which.)
Set the grid size to 4.
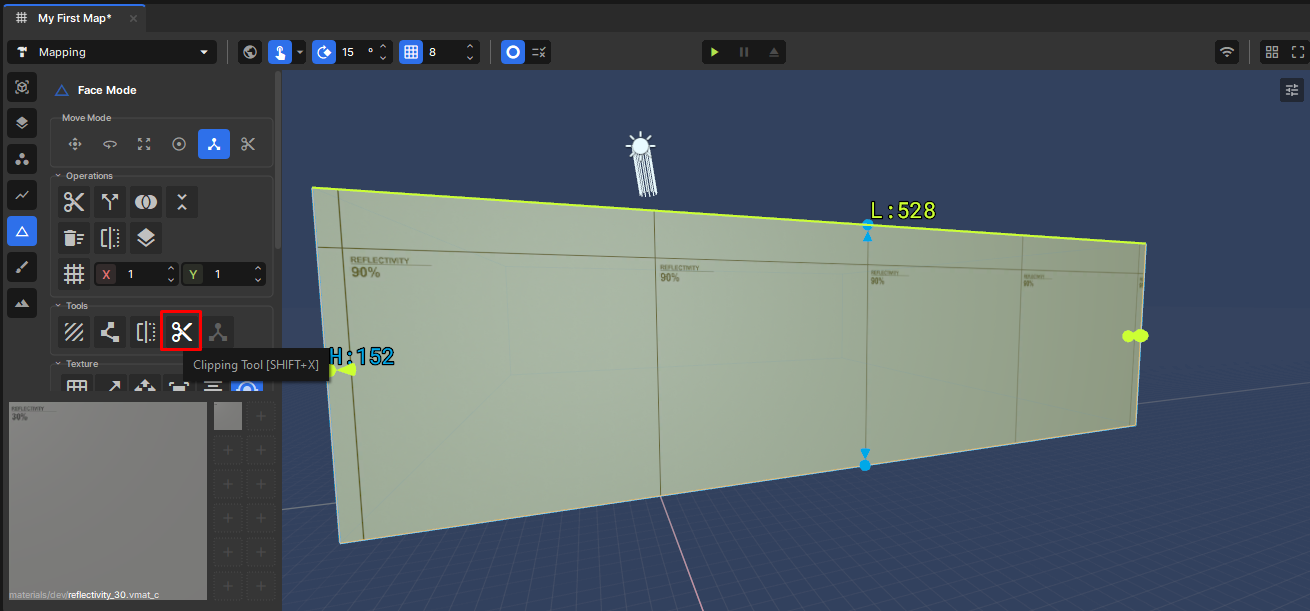
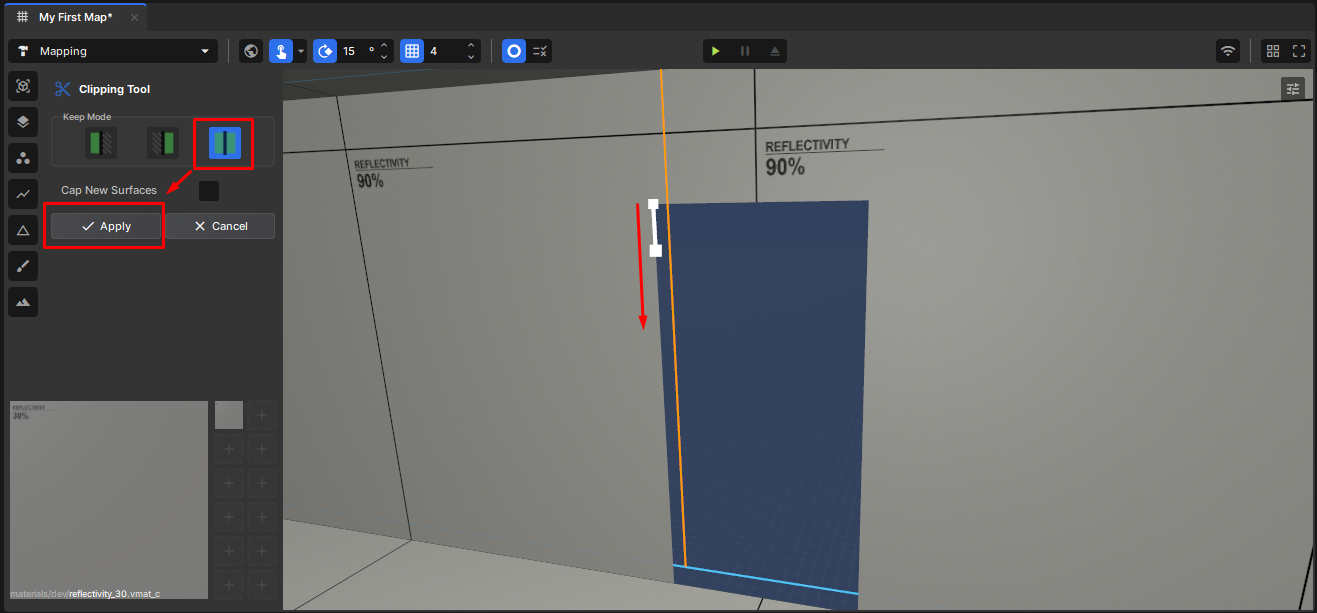
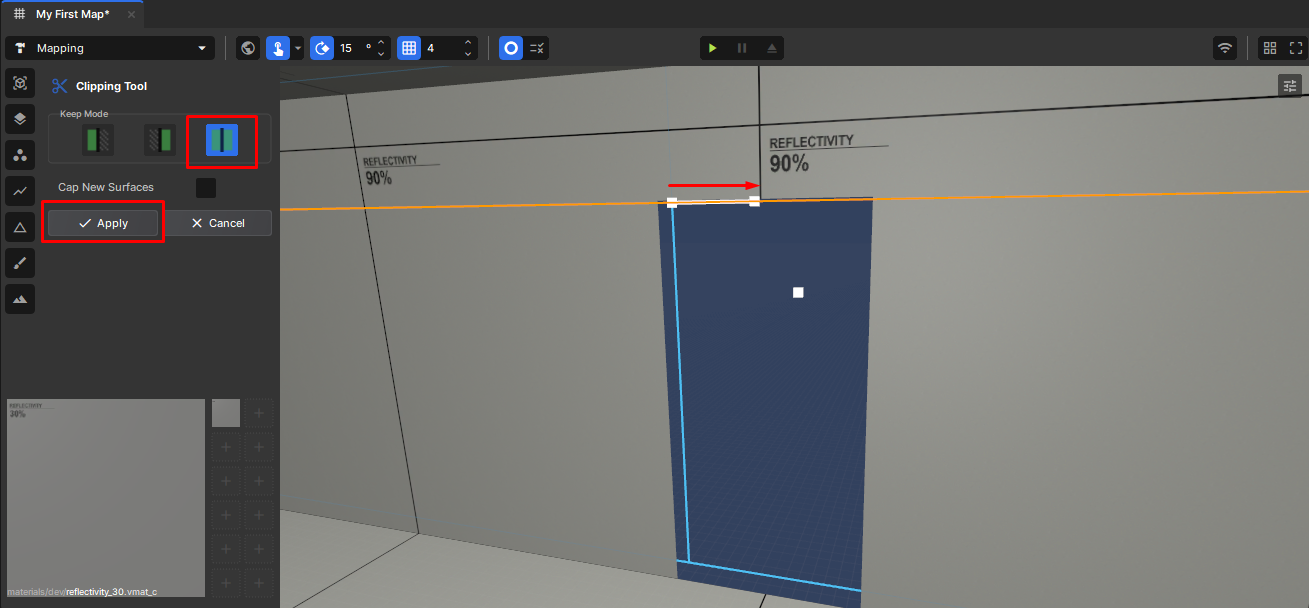
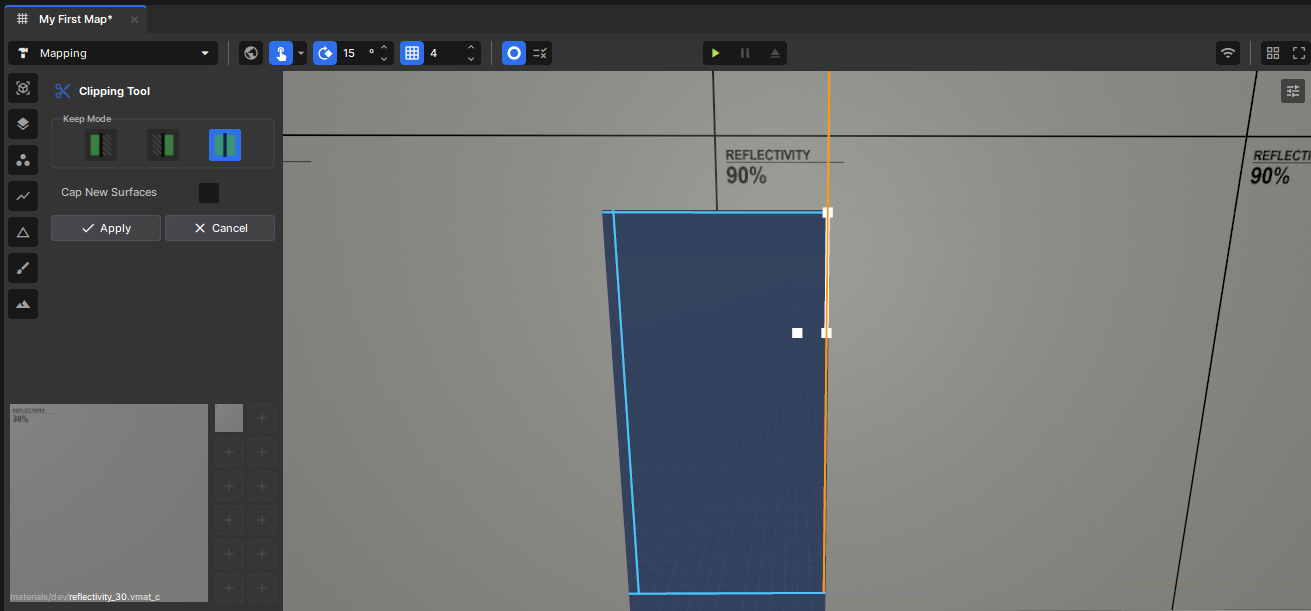
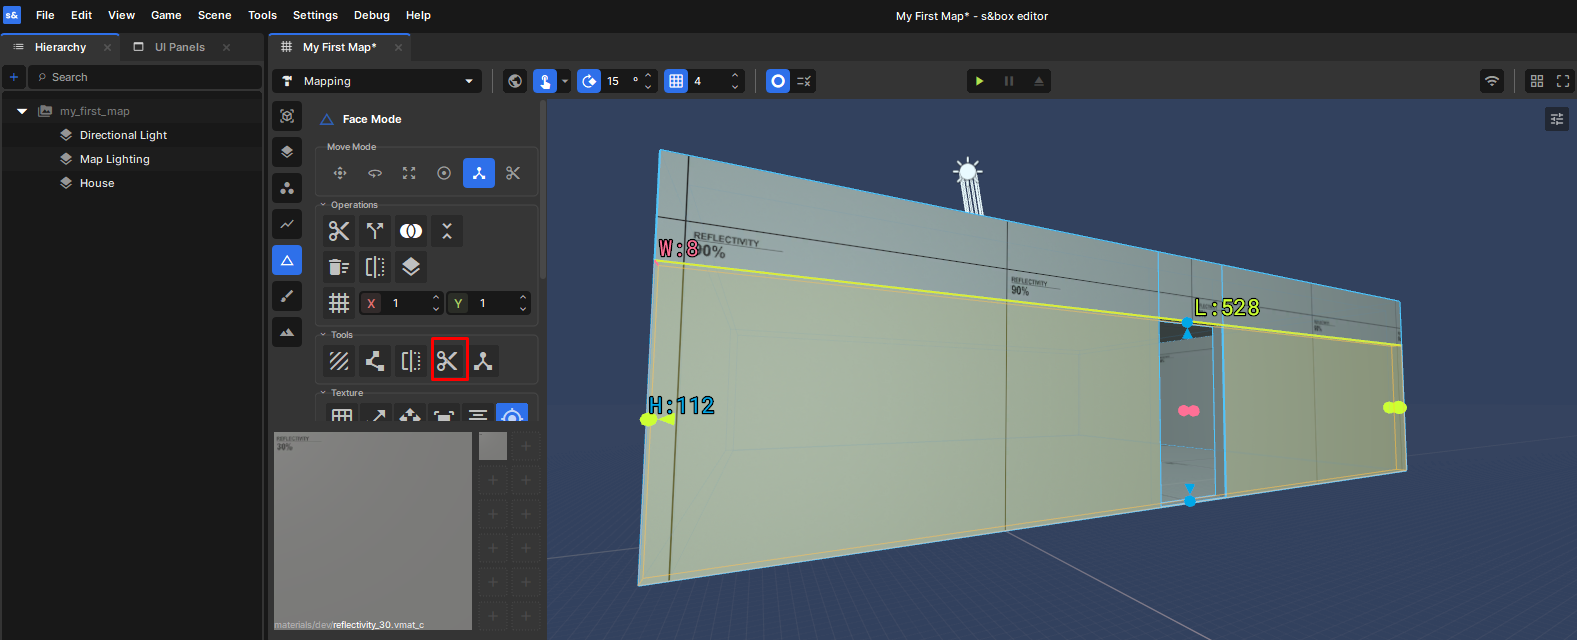
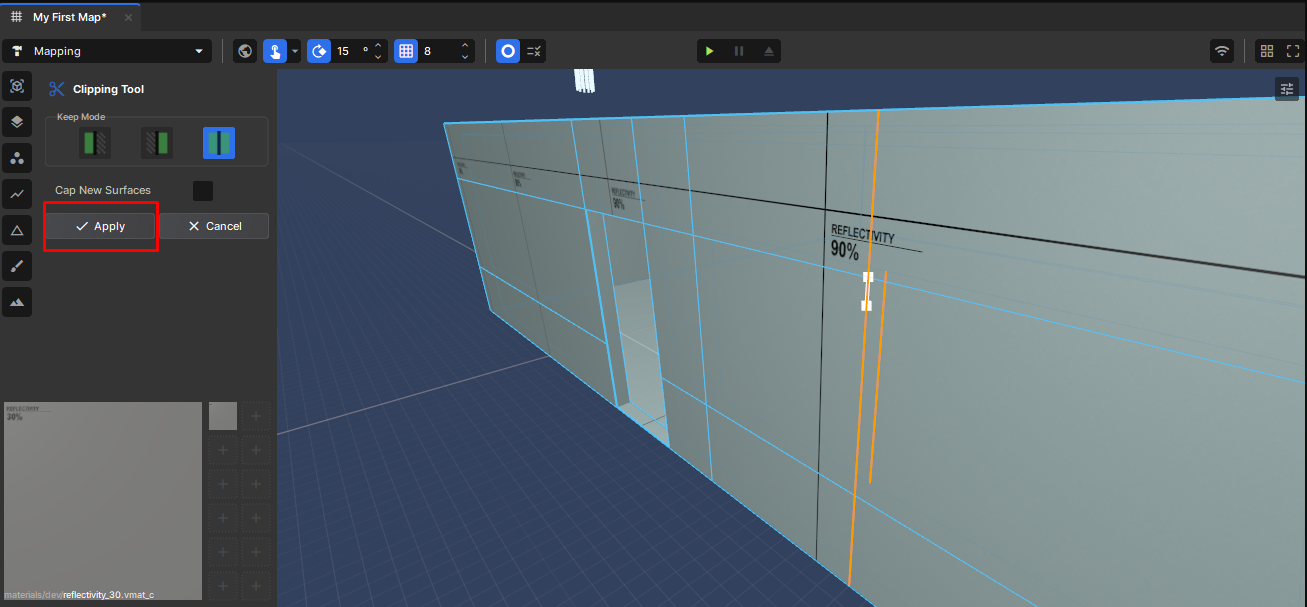
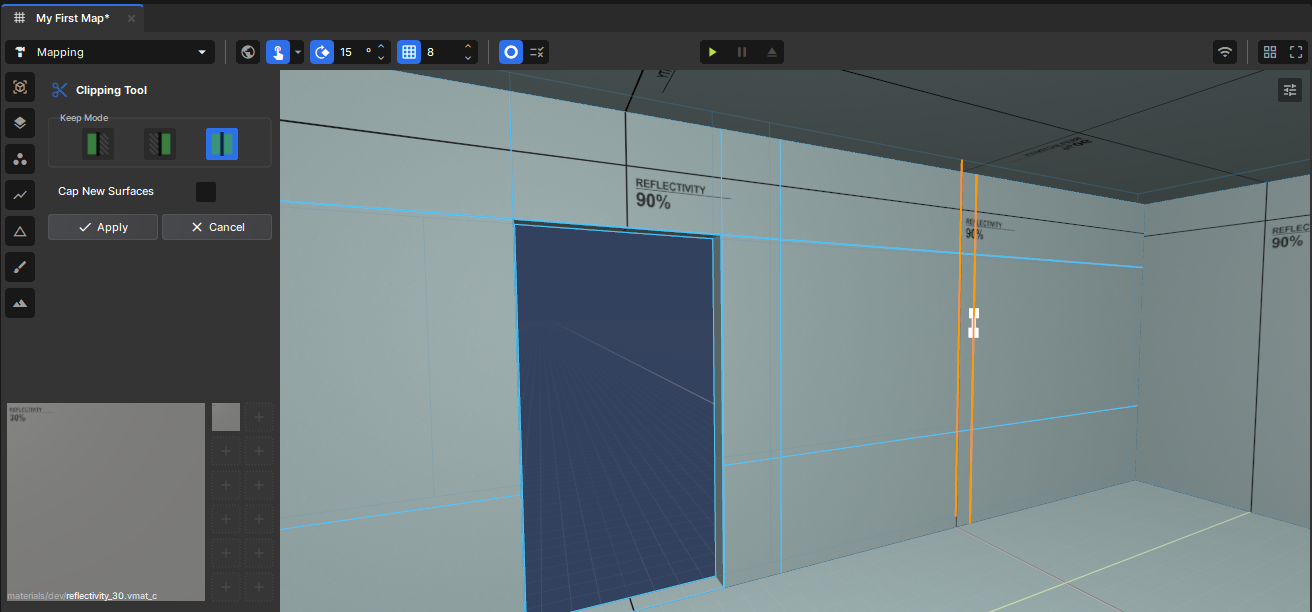
Press Shift+X to open the Clip Tool and clip the doorway to match the interior frame cuts. Press Space after each cut to keep clipping without reopening the tool. You don't have to drag it all the way. Just match the edges up. Don't over think it.
Select the exterior doorway face and press Del. (If you haven't already removed the interior doorway face, do that now too.)
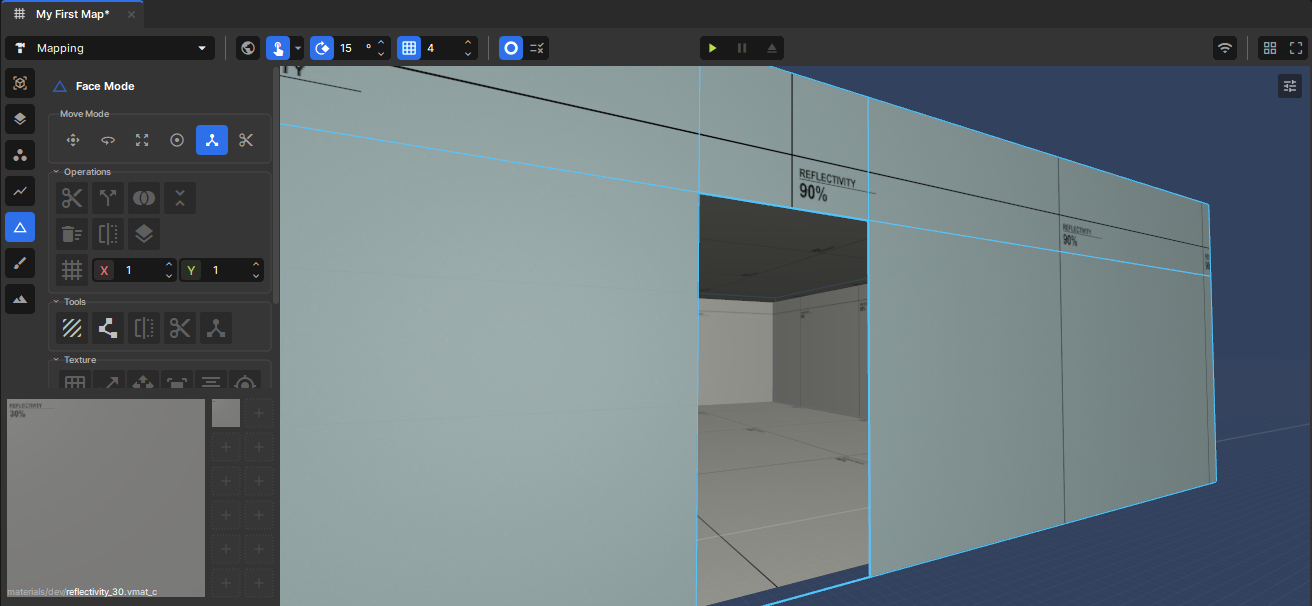
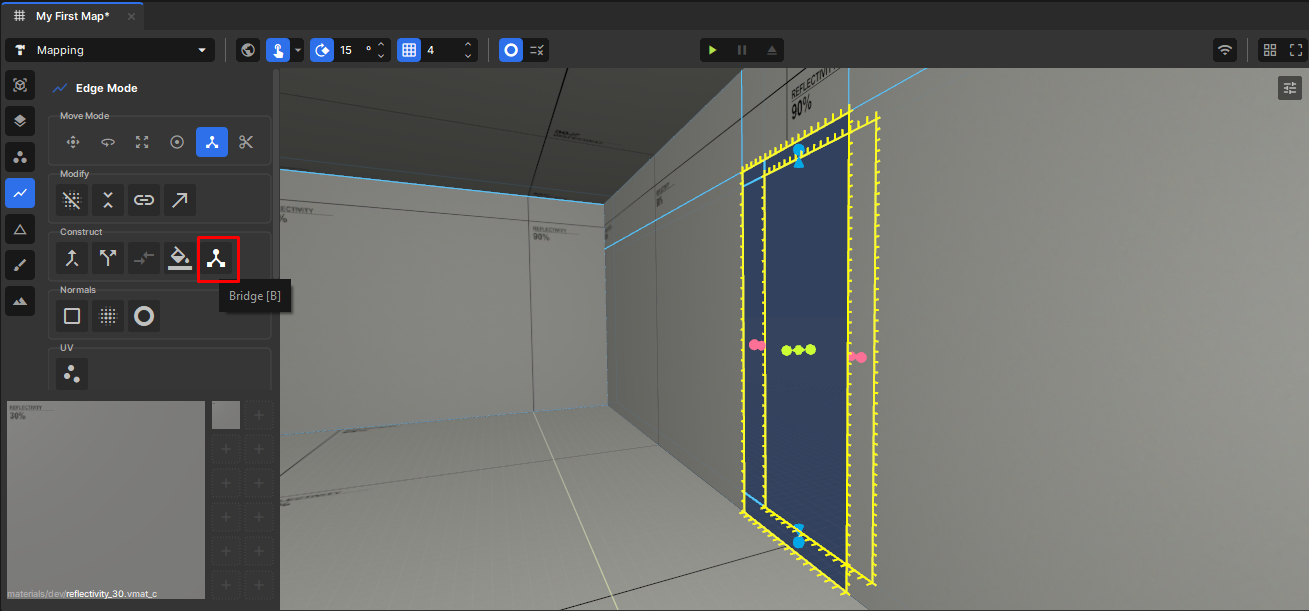
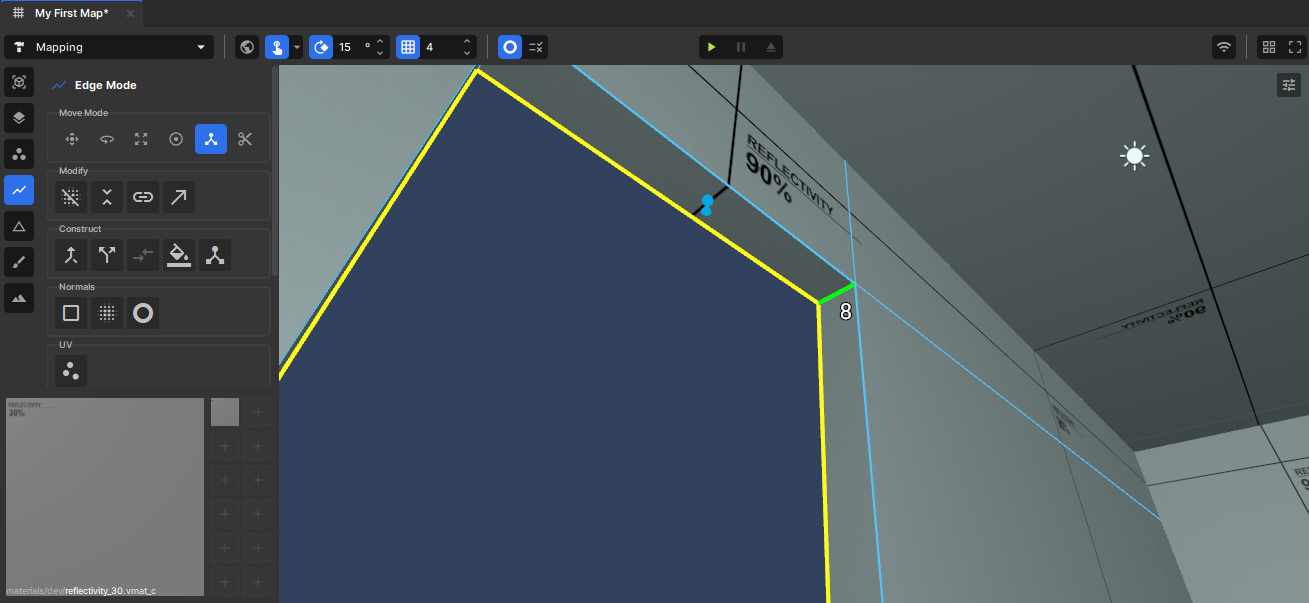
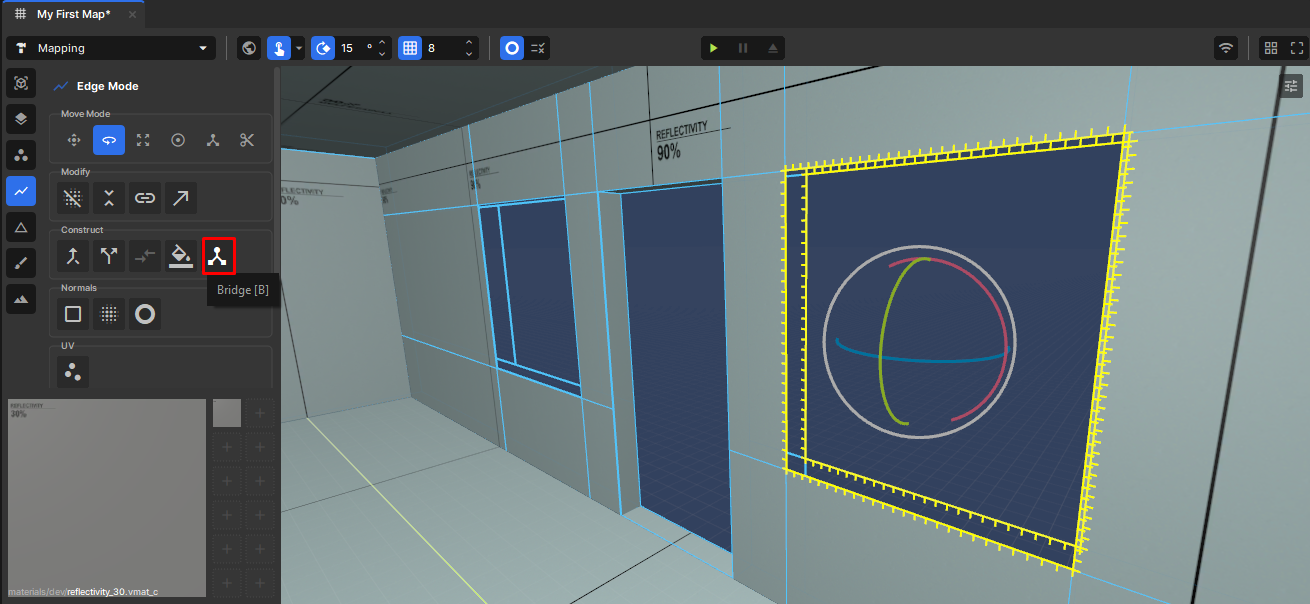
Switch to the Edge Tool (2), double-click the open edge loop on the interior opening and the exterior opening to select both, then press B to bridge them. That stitches the two walls together into a solid doorway jamb through the 8-unit thickness.
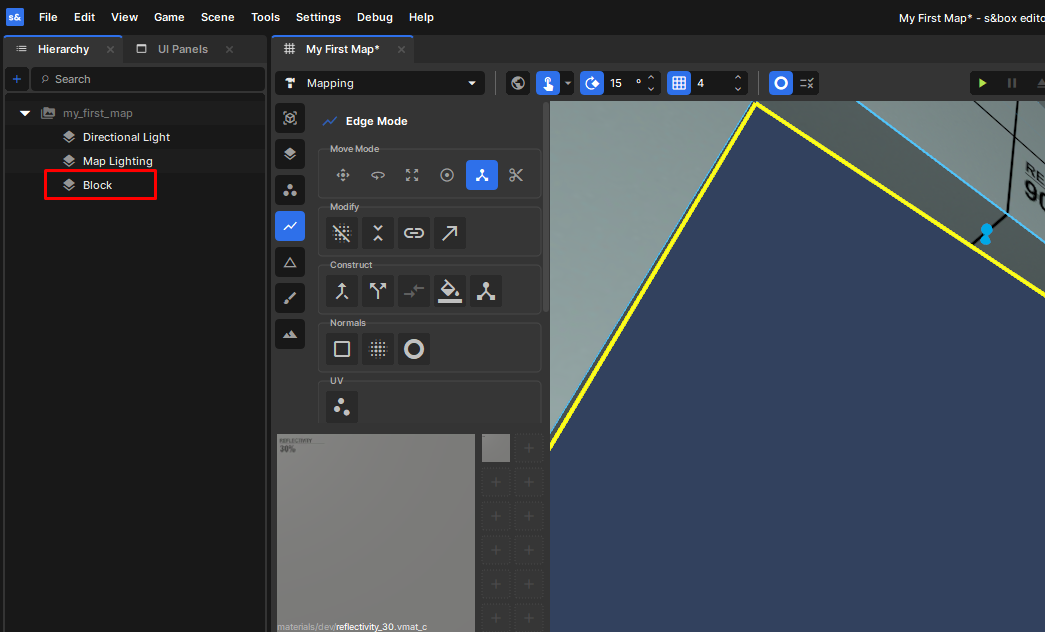
Bridging merges the two walls into a single mesh, so it shows back up in the Hierarchy as a generic Block. Rename it (F2) back to something clear like House.
Add Windows
Windows work a lot like the doorway — just clipped instead of beveled. We'll cut both windows, open them up, bridge the reveals through the wall, then size them to a clean 64 × 8 × 72 (64 wide, 8 deep through the wall, 72 tall).
Cut the first window
In the Face Tool (3), select the wall faces where the window goes — both the inside and outside face. Hold Shift to grab both faces at once.
Set the grid size to 8.
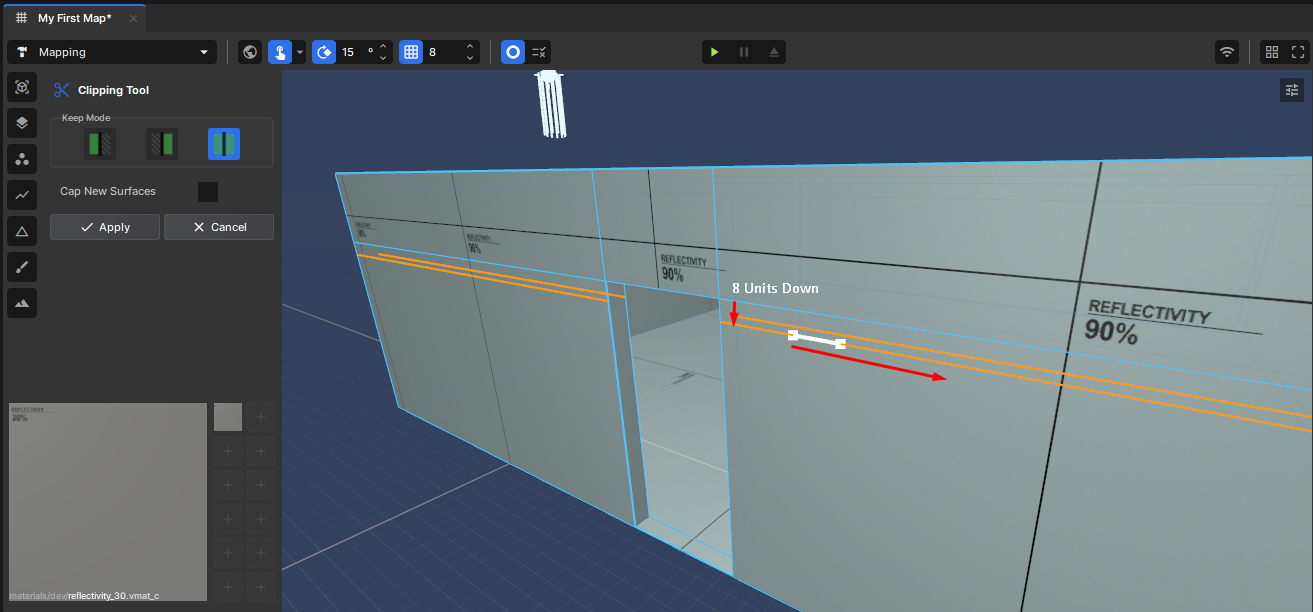
Press Shift+X to open the Clip Tool, then cut the top of the window 8 units down from the top of the door height line. (Press Space between cuts to keep the tool open, same as the doorway.)
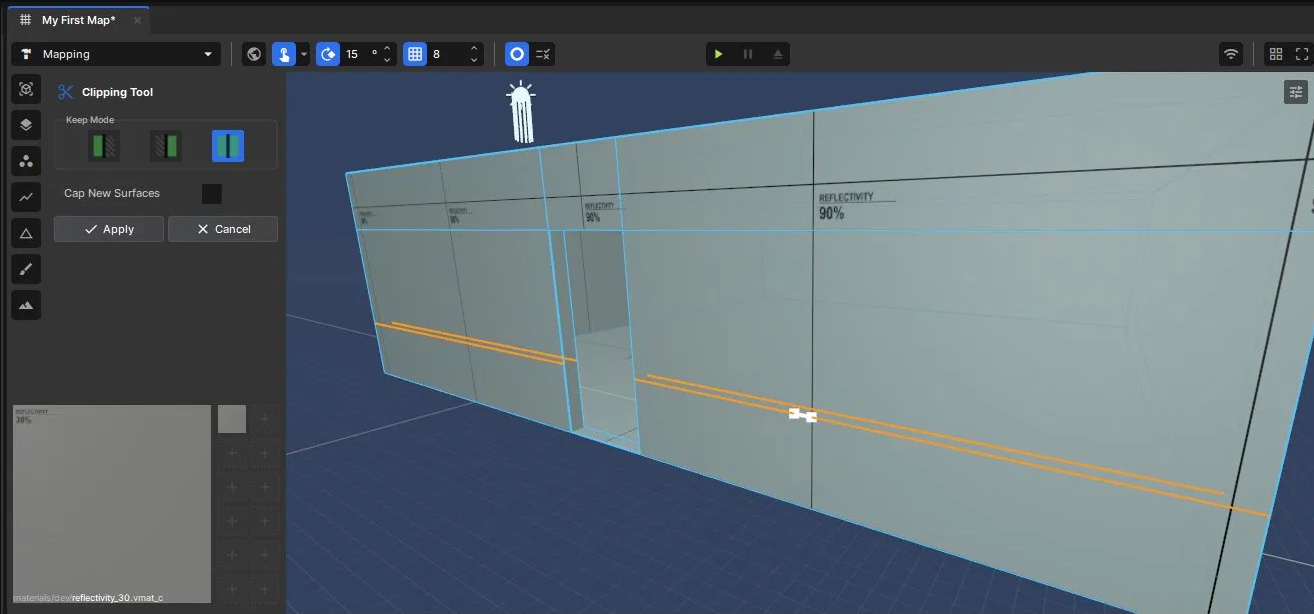
Cut the bottom of the window. Just eyeball it for now — you can adjust it later.
Cut the two sides. Honestly, make them however you want.
Press Enter to commit once the right-side window is cut out.
Cut the second window
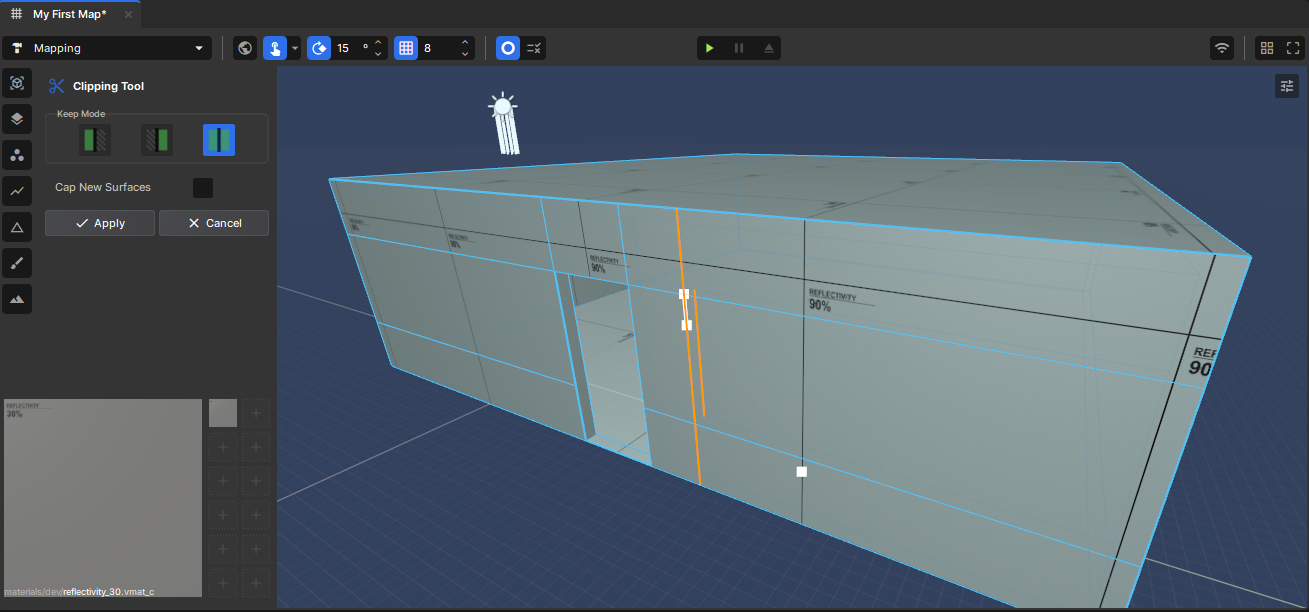
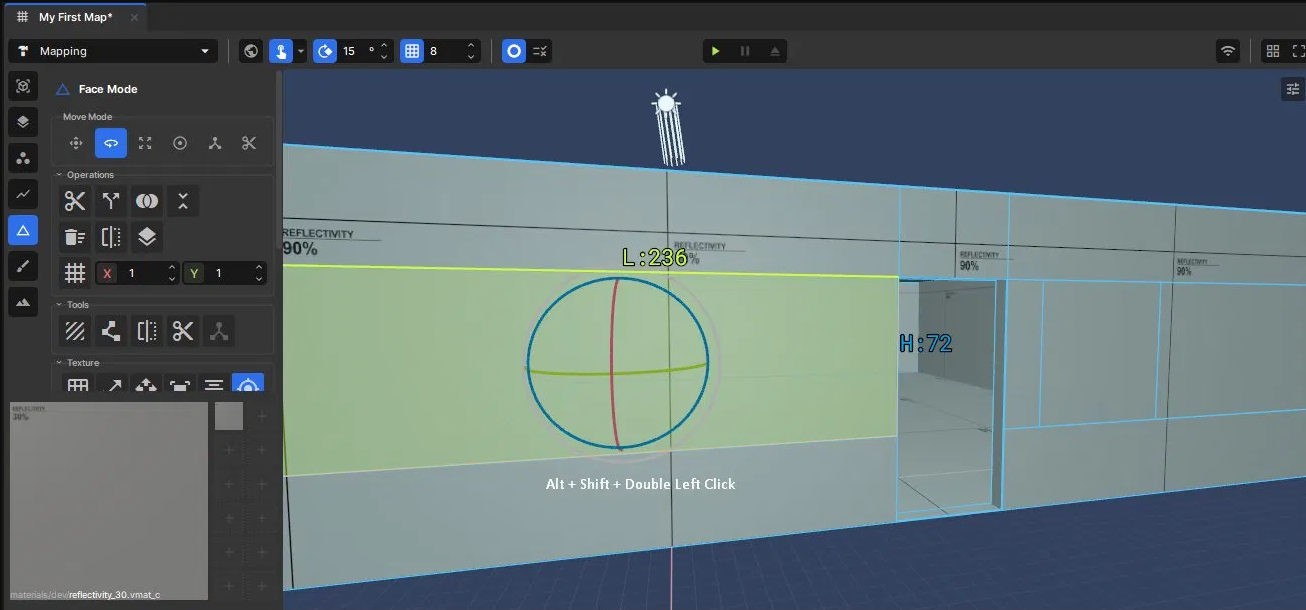
Move to the left window and do the exact same thing.
Tip — Quick trick on the left side: Alt+Shift+Double Left Click on one Face selects all faces on that plane. Do it on the inside and outside, then clip them just like you did the right side.
Open and bridge the reveals
Select all 4 window faces (inside and outside, both windows) and press Del to open them up.
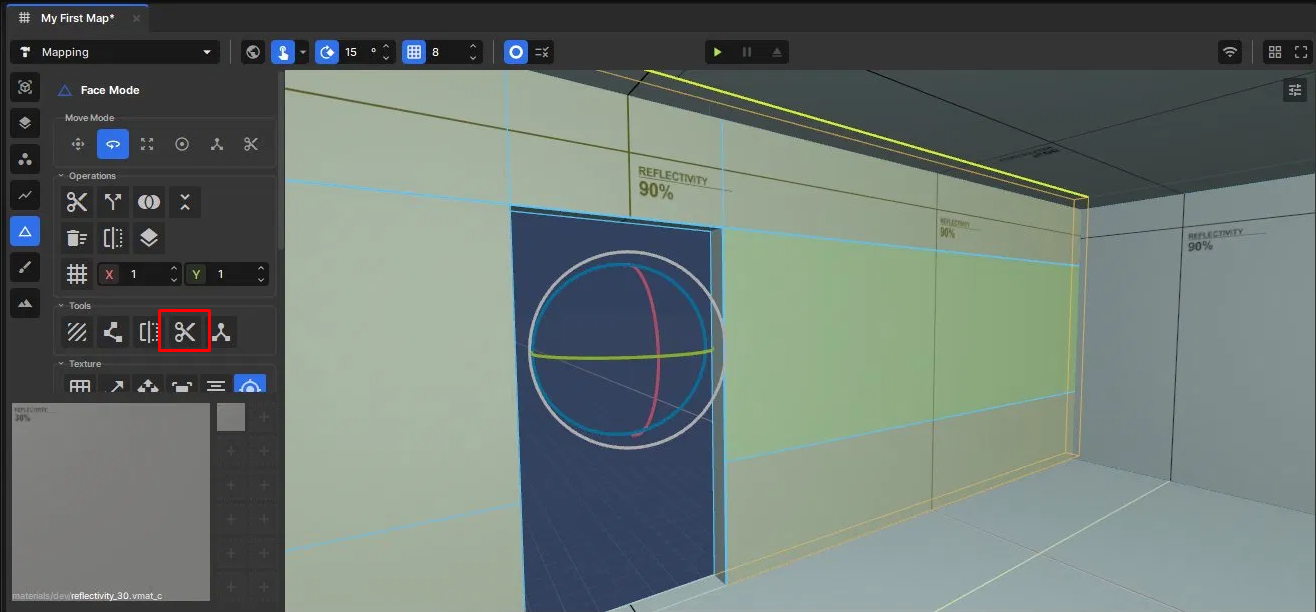
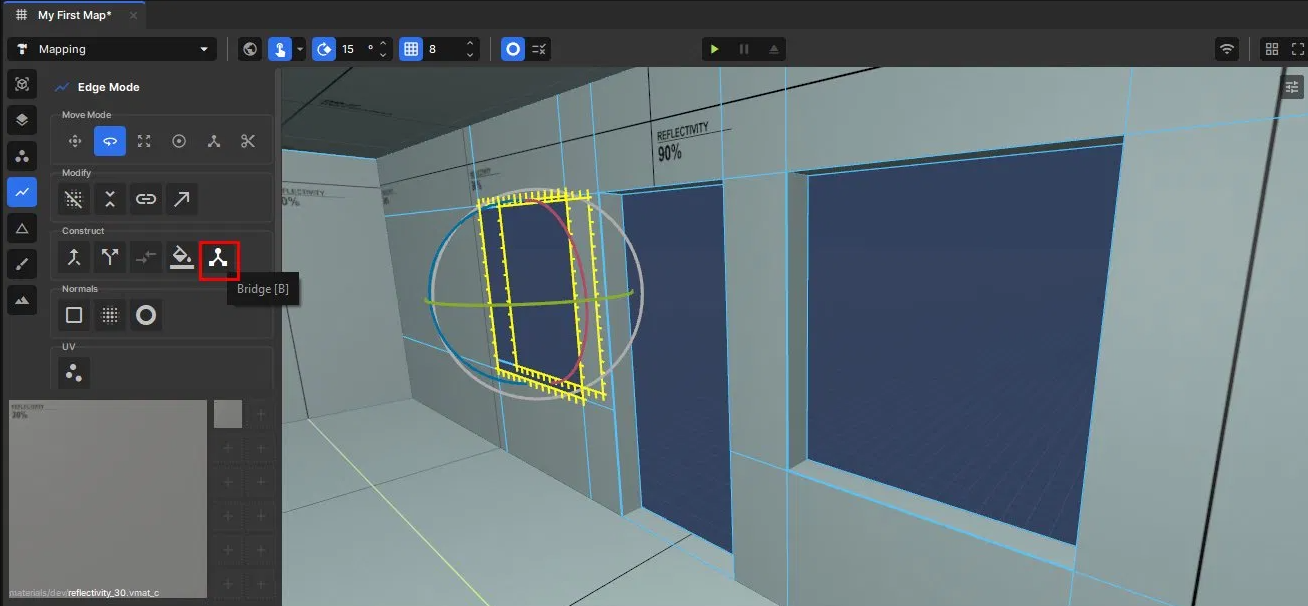
Switch to the Edge Tool (2), double-click the window edges inside and out, and press B to bridge them on both sides connecting both faces together to form the windows.
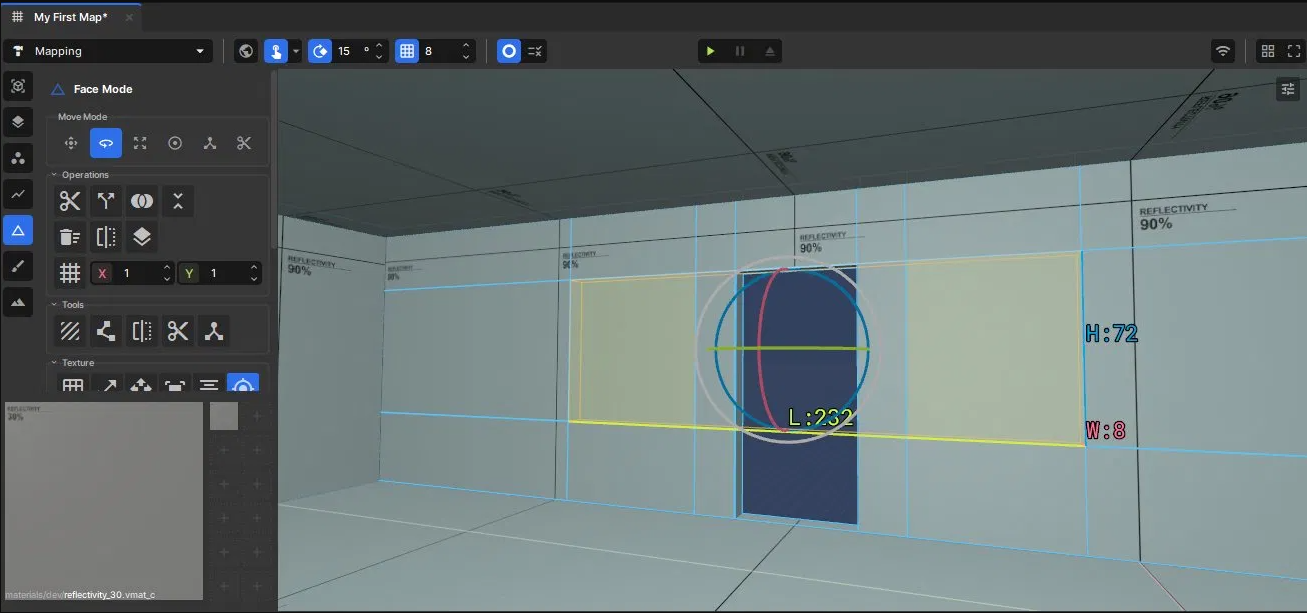
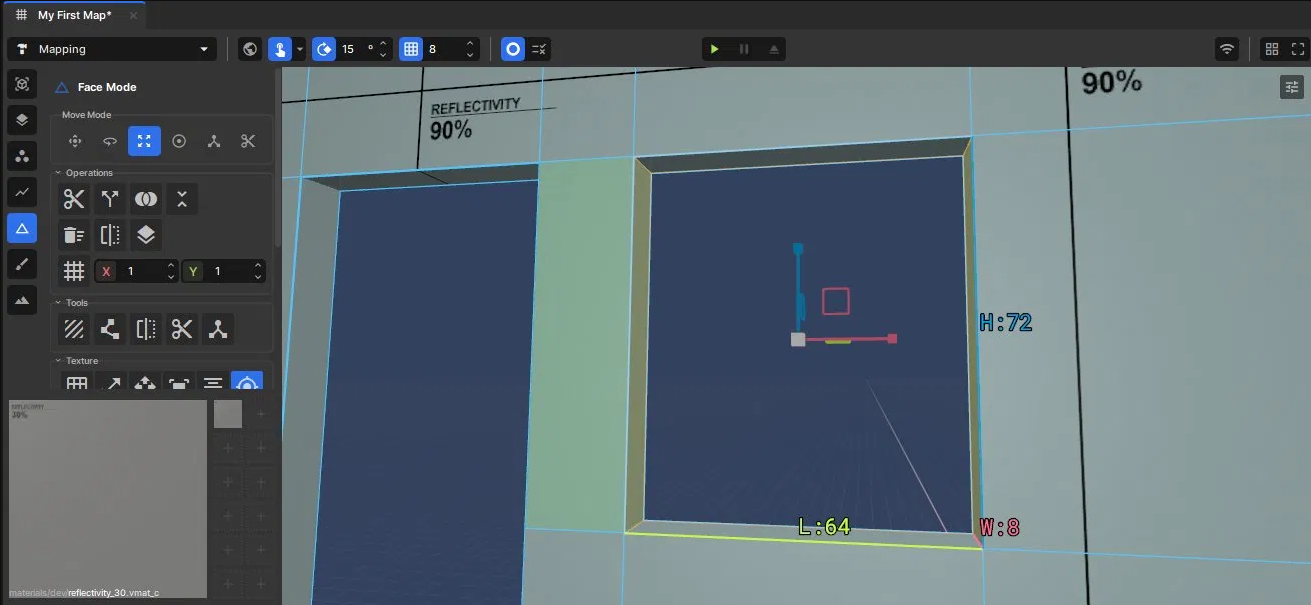
Size the windows to 64 × 8 × 72
Still in the Edge Tool, select the edges shown and press Backspace to Dissolve them — do this on the inside and outside. This cleans up the mesh and makes the window easier to manipulate.
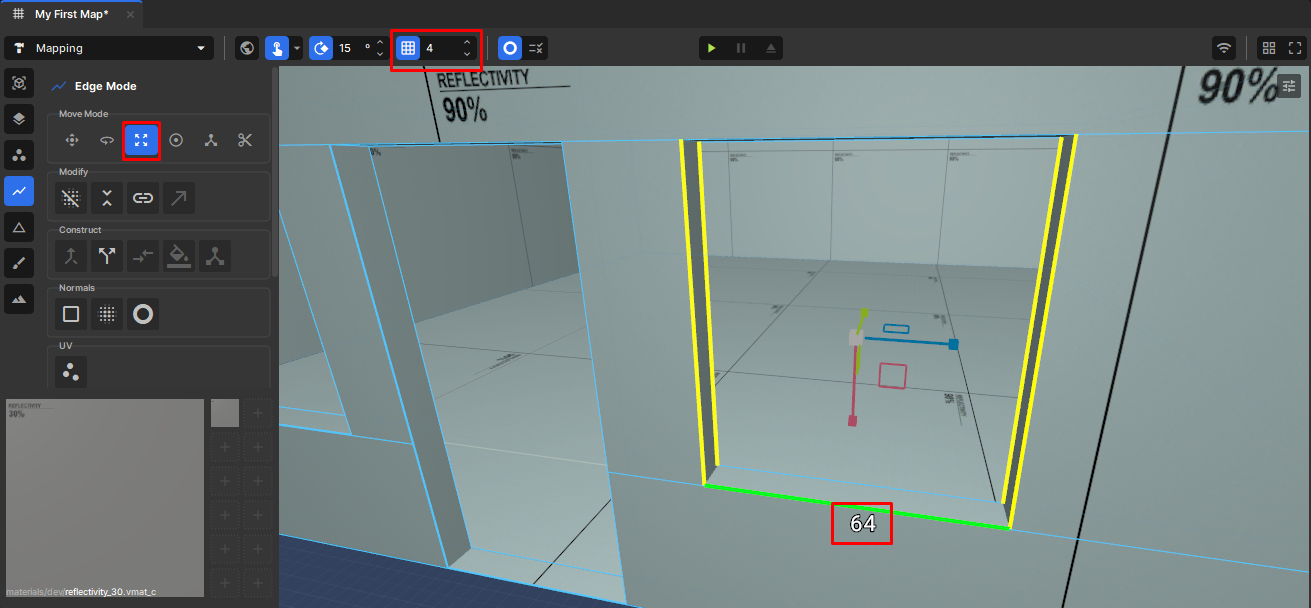
On the exterior right window, select the 4 edges and switch to the Scale move mode. Set the grid to 4 and scale until the window reads 64 wide.
Tip — Hold Shift and drag with left-click held down to quickly multi-select a run of edges at once.
The Right Side Exterior is missing the 4 edges because how we cut it earlier. Oops.
Build the Roof
A simple pitched roof, built straight off the top of the exterior shell.
Cap and split the top
In the Face Tool (3), select the top face of the exterior shell.
Set the grid to 8, then hold Shift and move the face up 8 units to extrude a base slab for the roof.
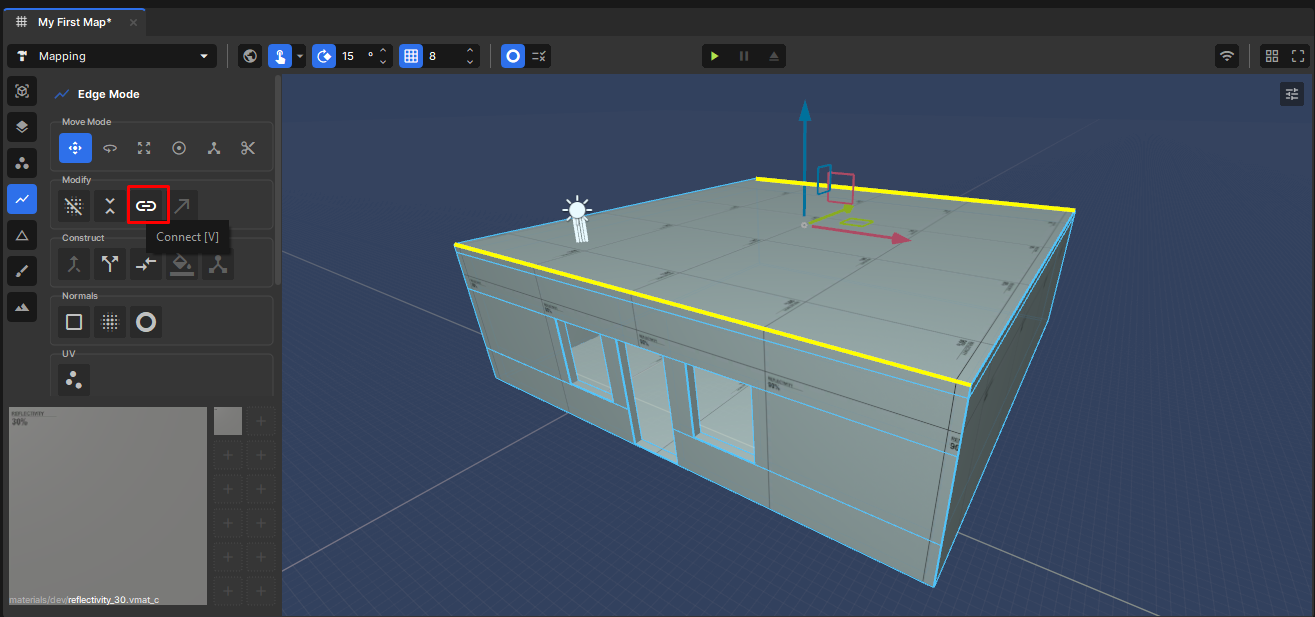
Switch to the Edge Tool (2), select the front roof edge and the rear roof edge, then press V (Connect) to cut a ridge line straight down the middle of the roof.
Tip — You can nudge a selection with the arrow keys instead of dragging the gizmo — handy for clean, grid-sized moves.
Raise the ridge into a pitch
Switch to the Face Tool (3), select the two roof faces, then hold Shift and extrude them up 8 units.
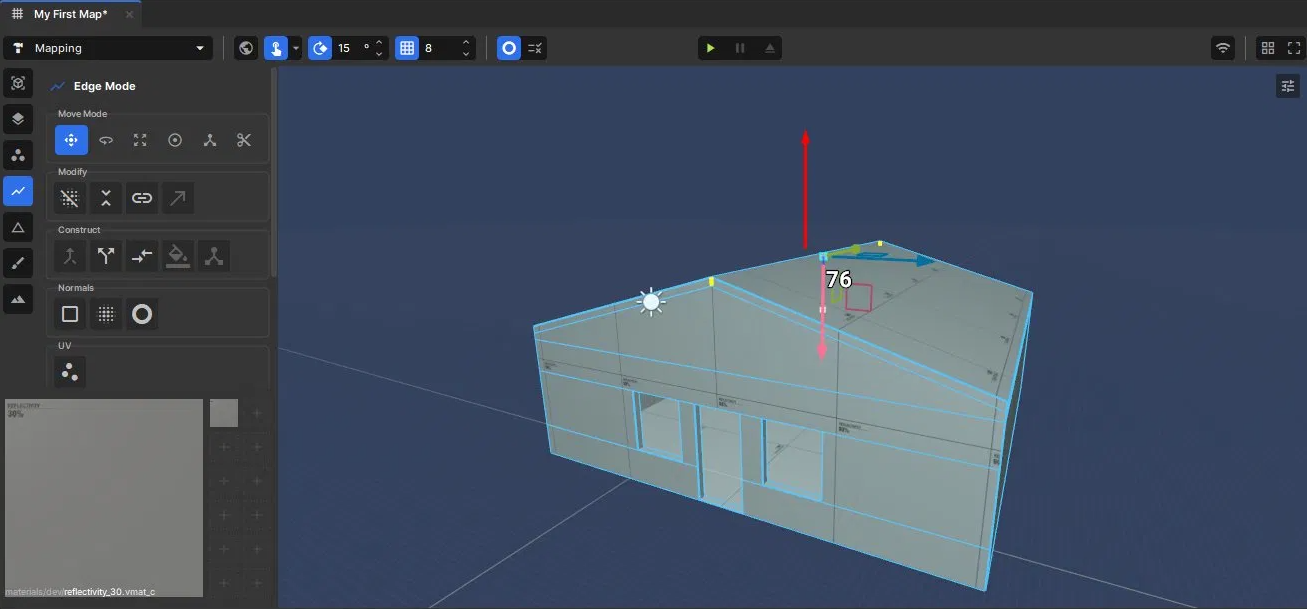
Switch back to the Edge Tool (2), grab the front center edge and the rear center edge, and raise them up about 76 units. That gives you the pitch.
Front and back overhangs
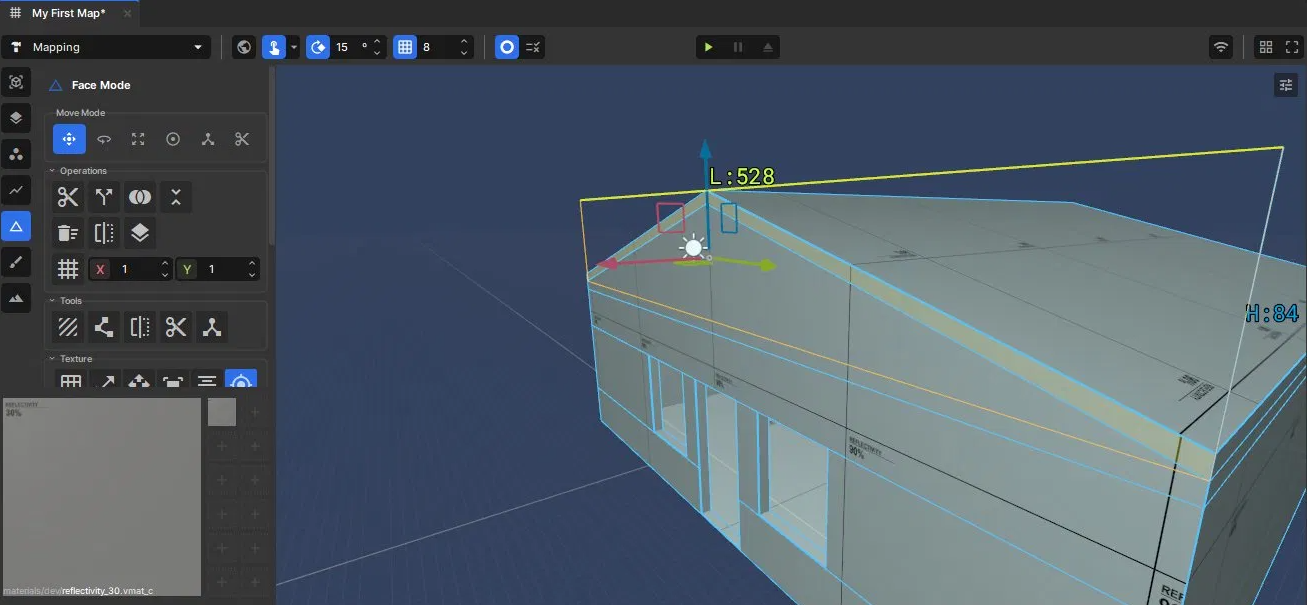
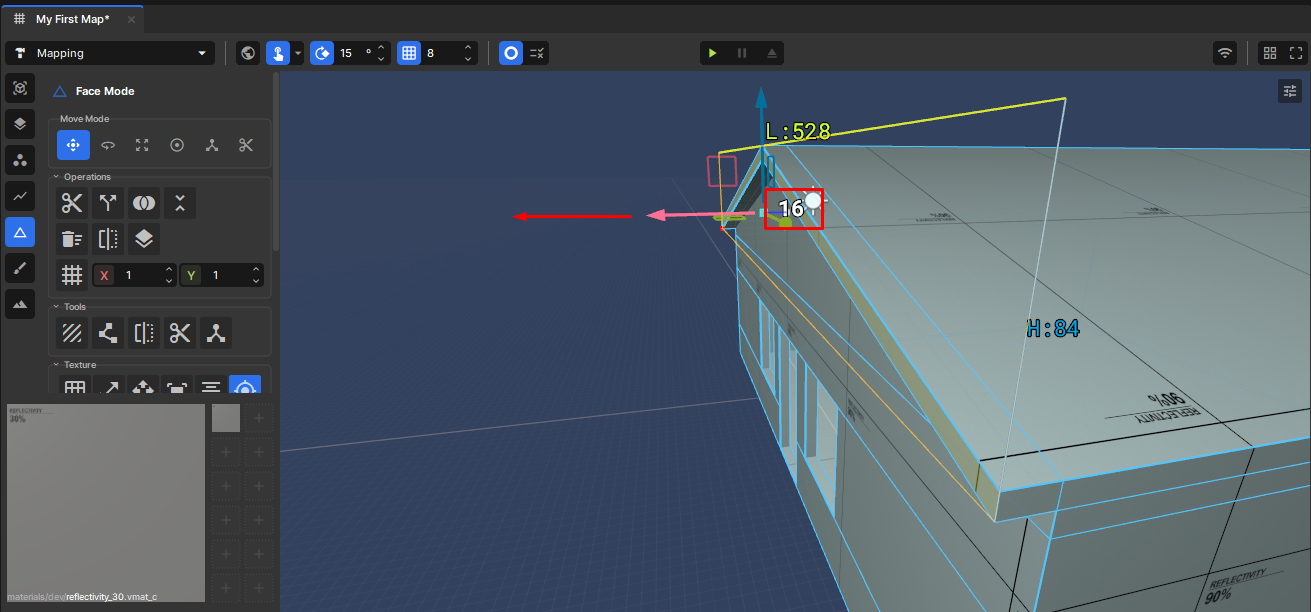
Switch to the Face Tool (3), select the two front slope faces, then hold Shift and extrude them out 16 units to create the overhang.
Repeat for the rear of the house.
Side overhangs
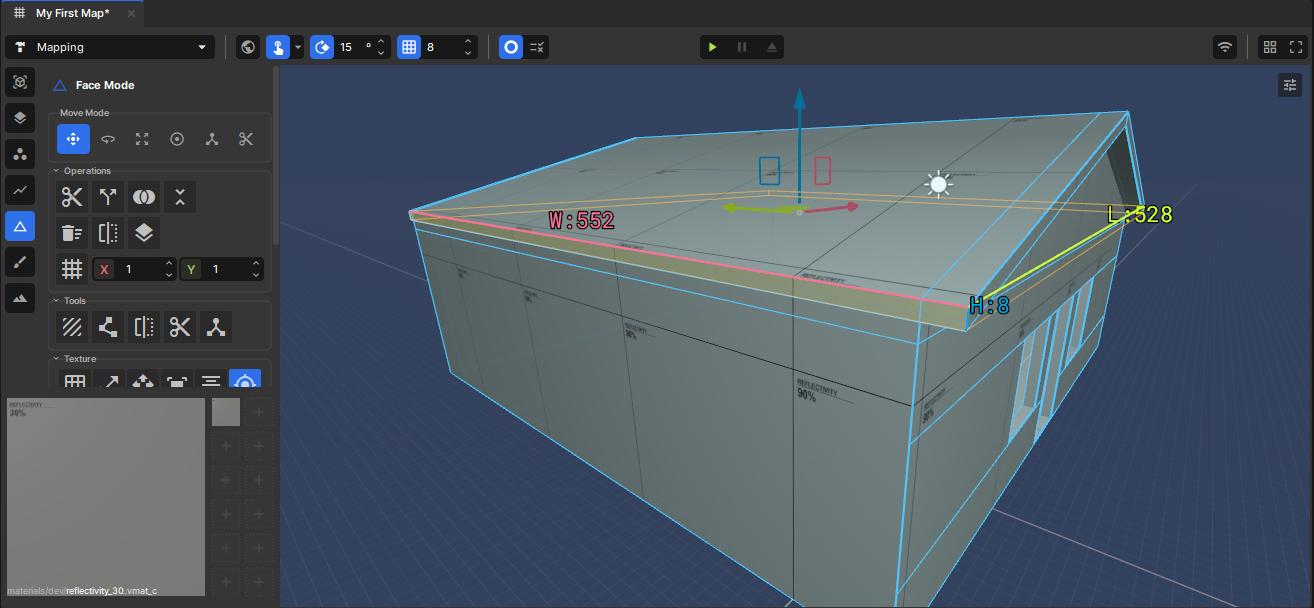
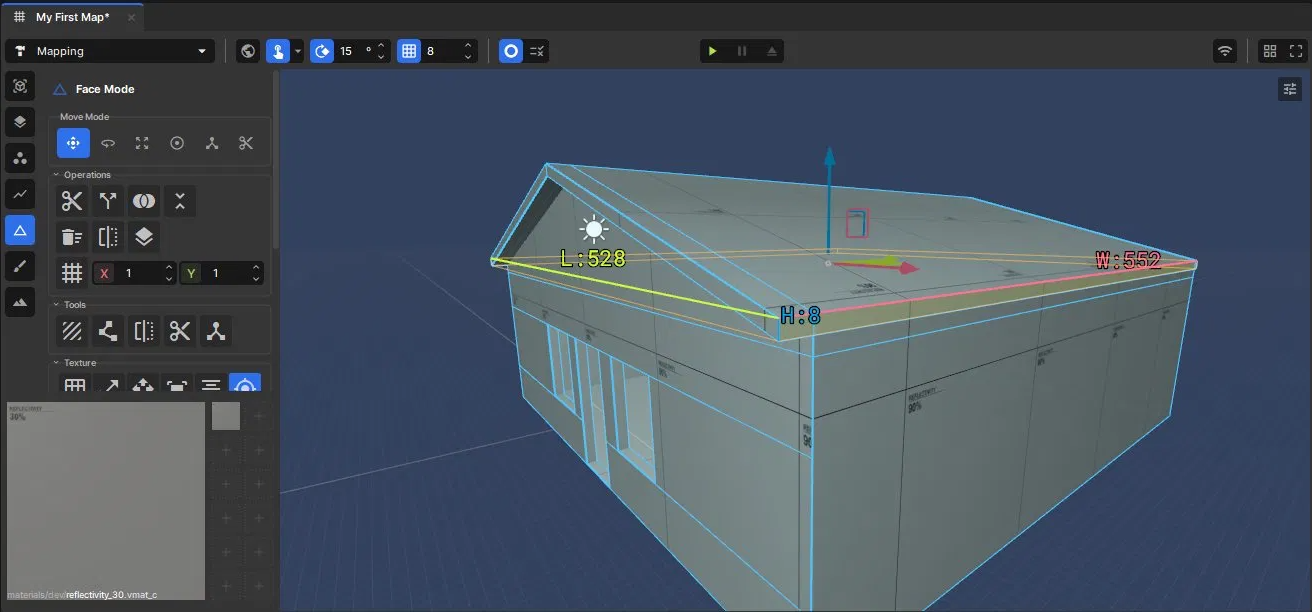
Info — In Hammer you'd rotate the work-plane axis to extrude the side overhangs. The Scene mapping tools don't have that yet, so here's a crap workaround for now.
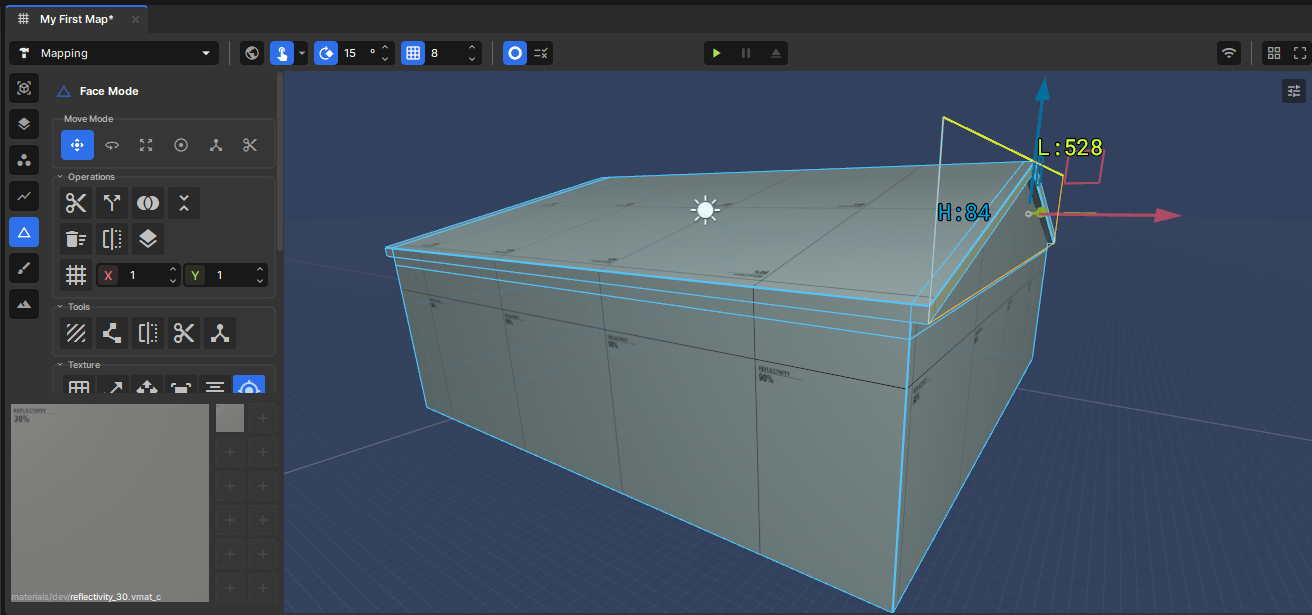
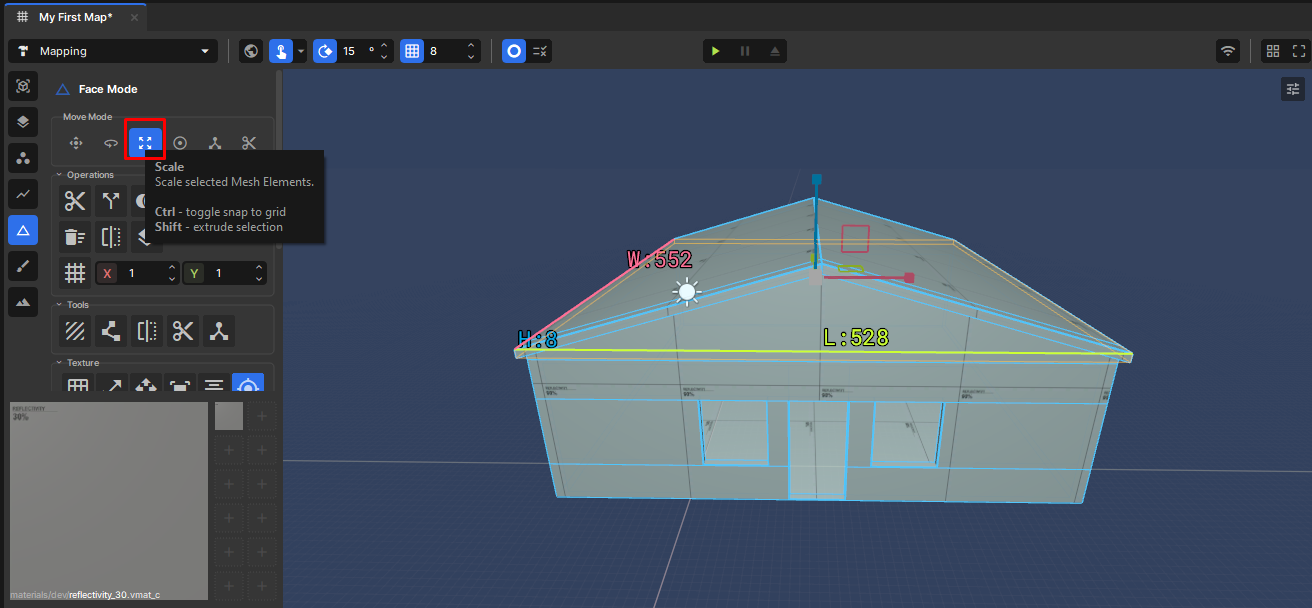
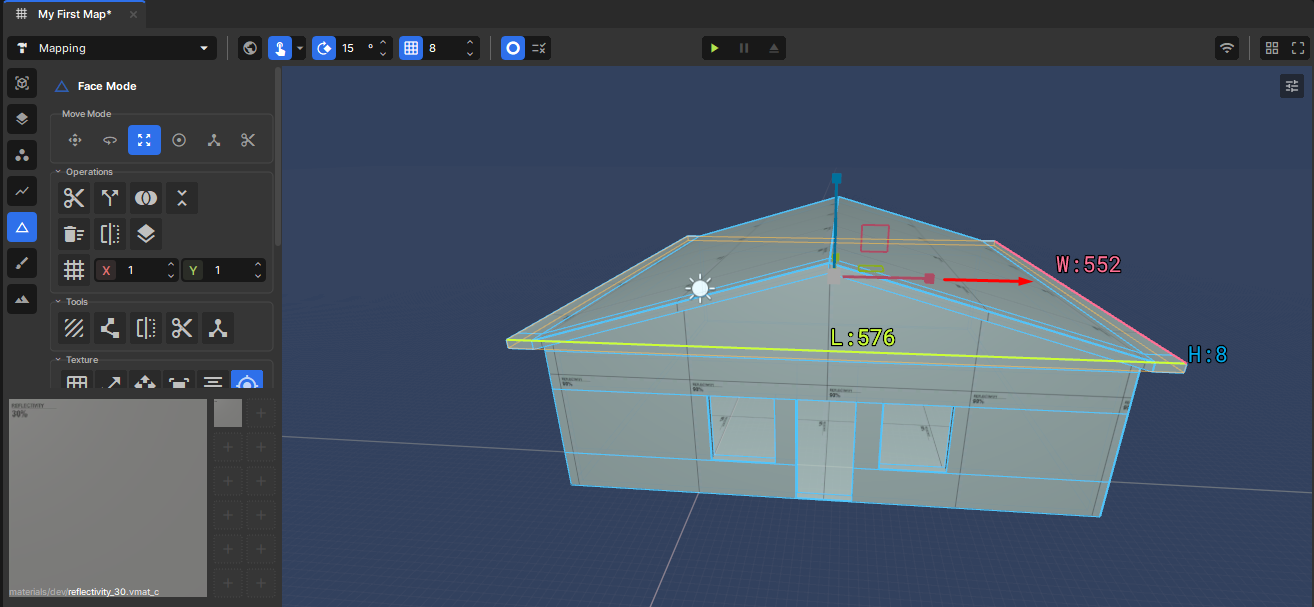
In the Face Tool (3), select the roof's side faces — all 6 of them, as shown.
Switch to the Scale move mode and scale both sides out 24 units (3 grid snaps at grid 8).
Switch to the Move / Position move mode and move those faces down 8 units — drag the transform gizmo, or use the Down arrow key.
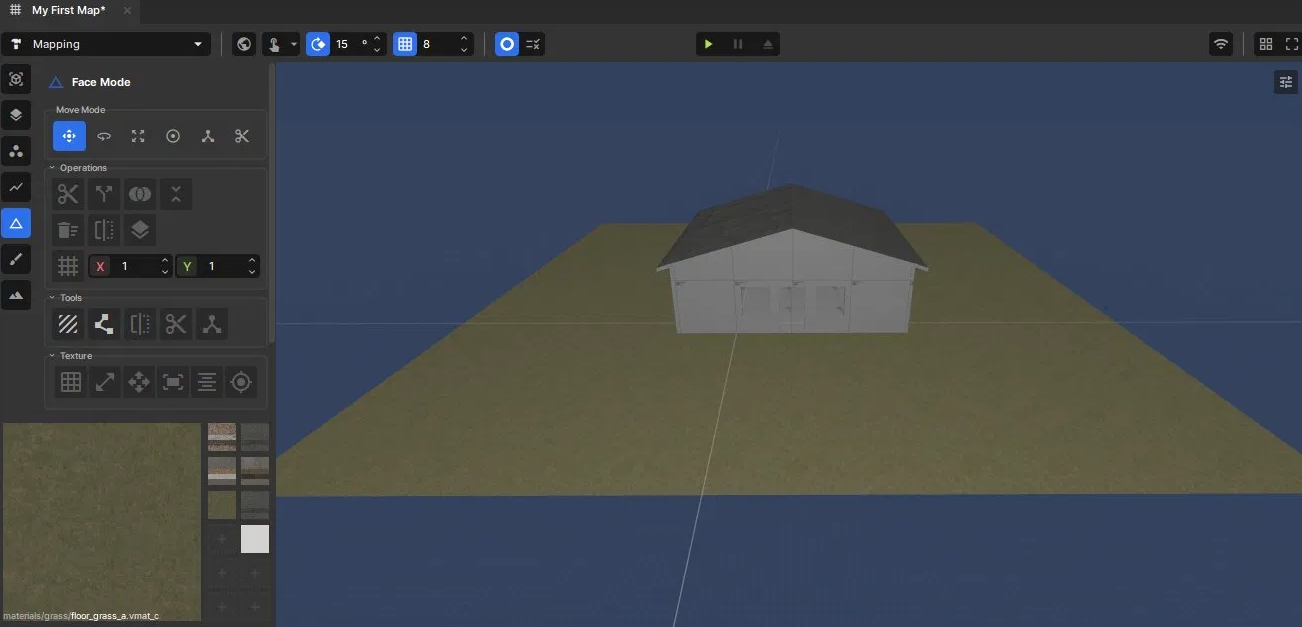
Look at your Beautiful house you've built!
Section 9: Building the Ground
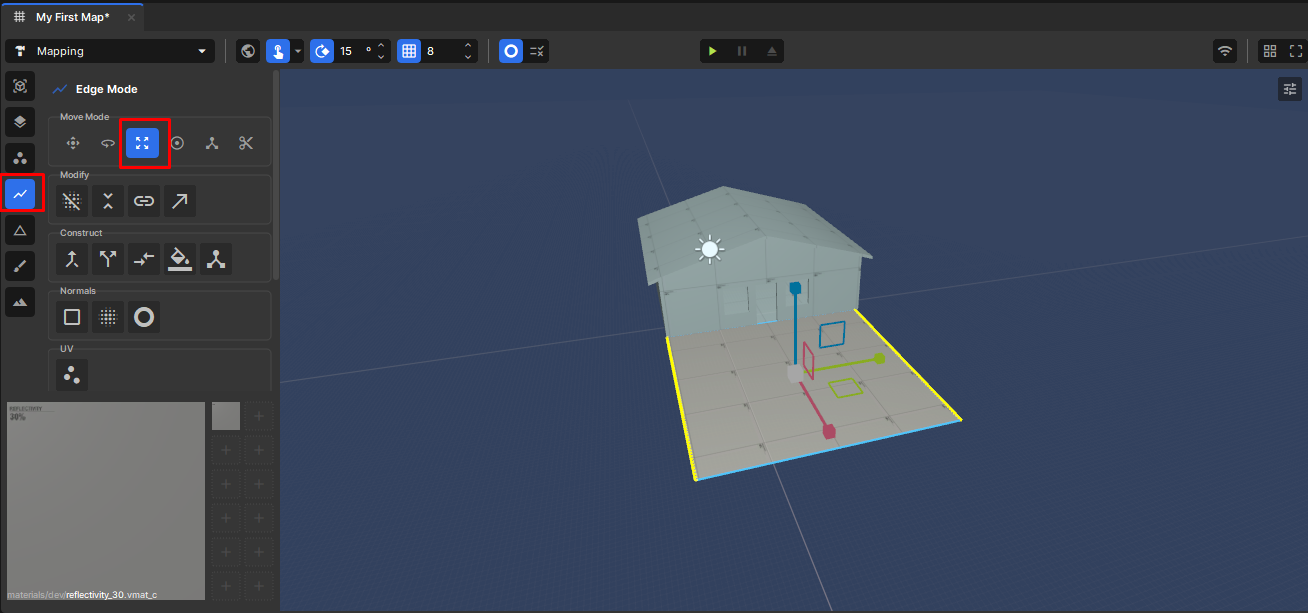
Now we give the house something to sit on. We start with a Quad and stretch it out around the house with the edge tools — same building blocks you already know.
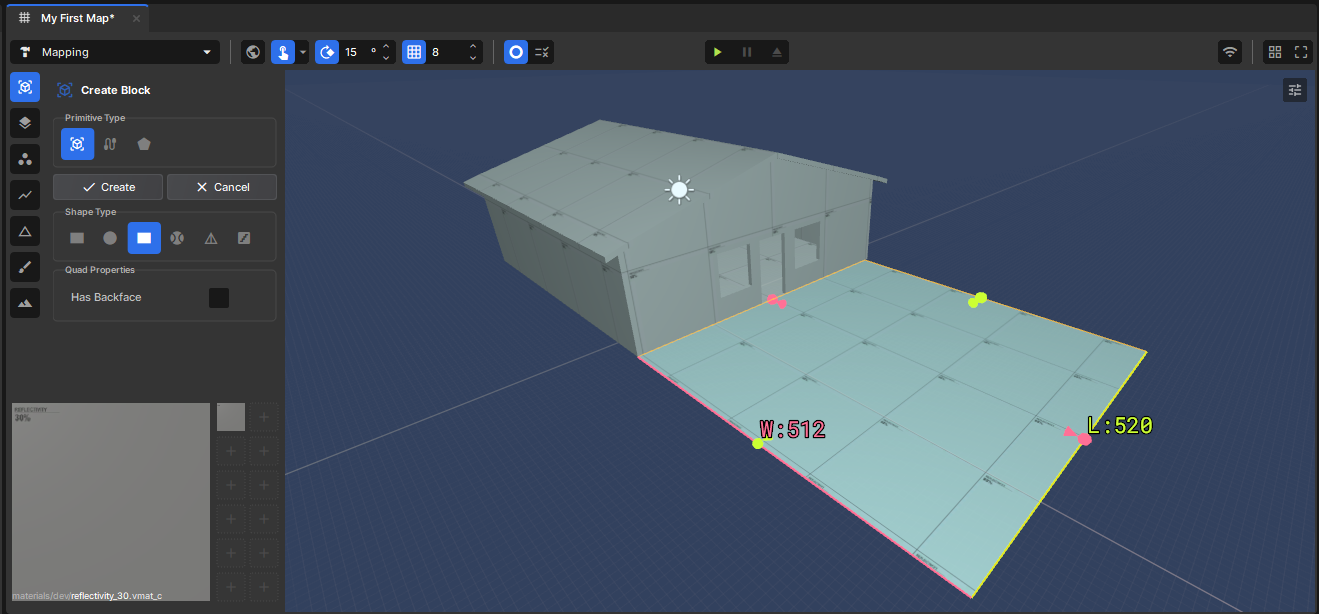
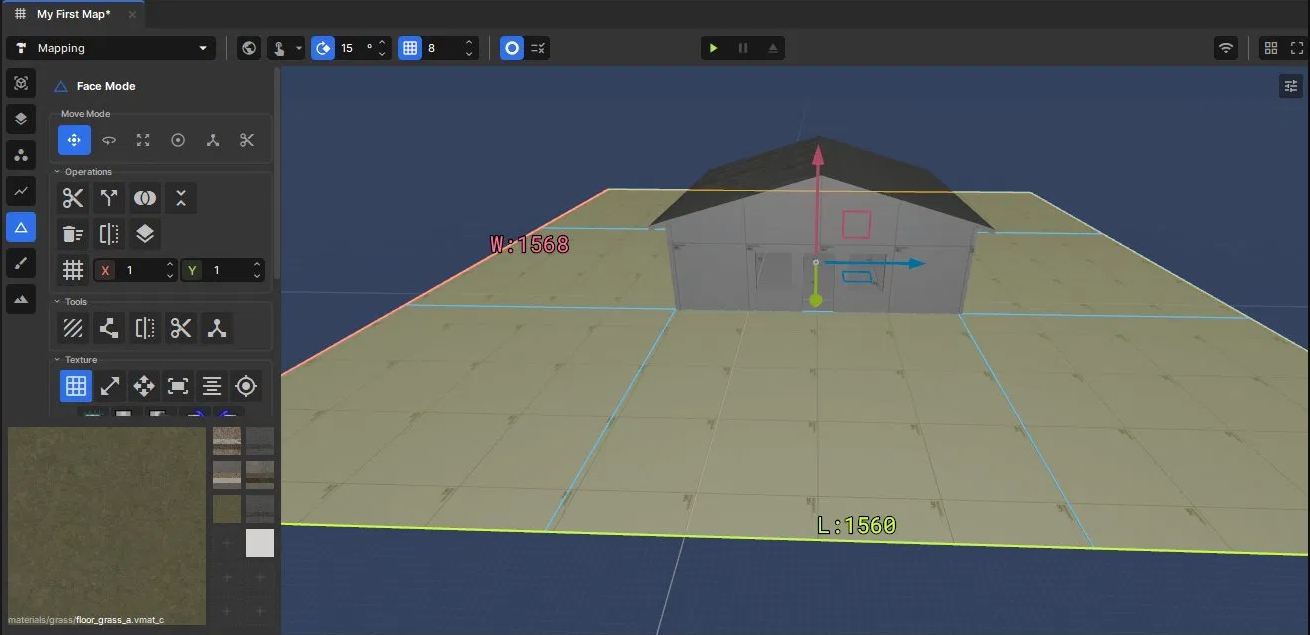
Press Shift+B, select the Quad primitive, and draw out the ground. Size it to about the width of the house (~512) to start.
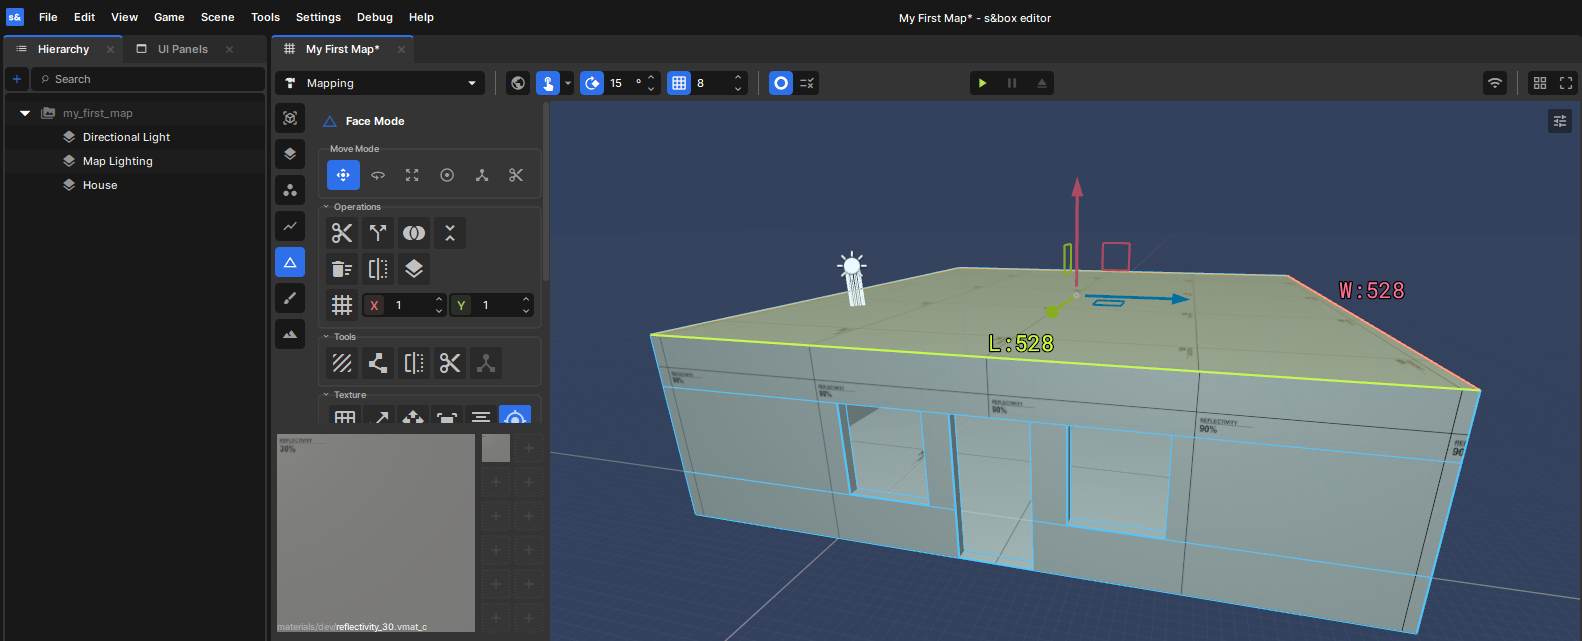
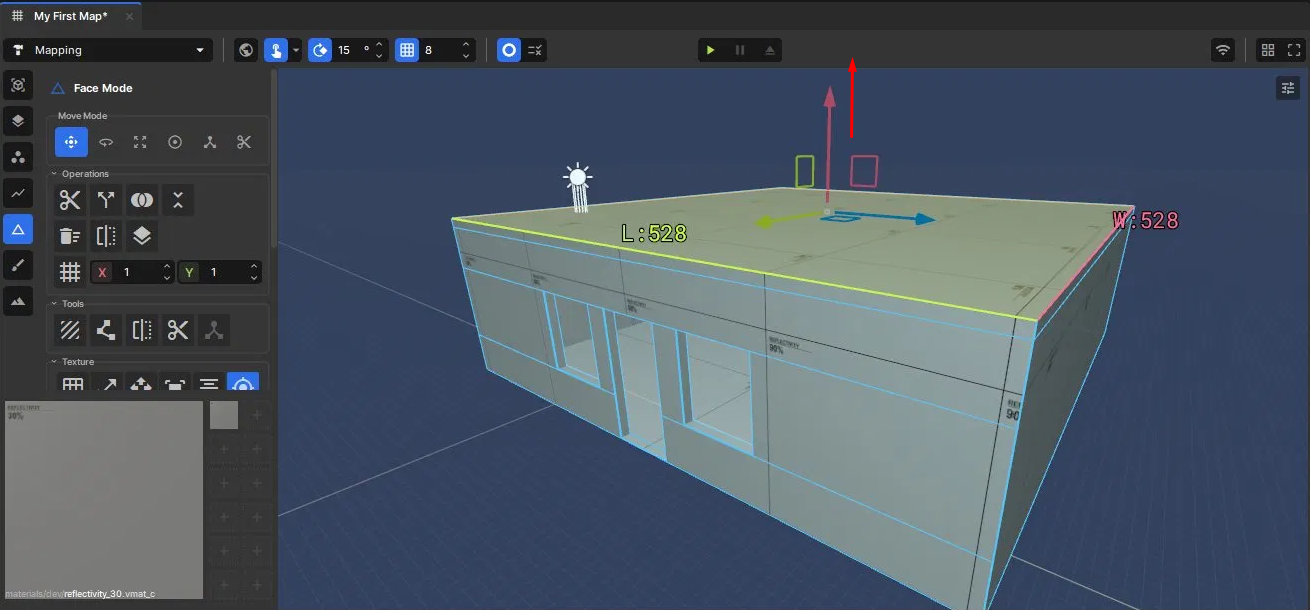
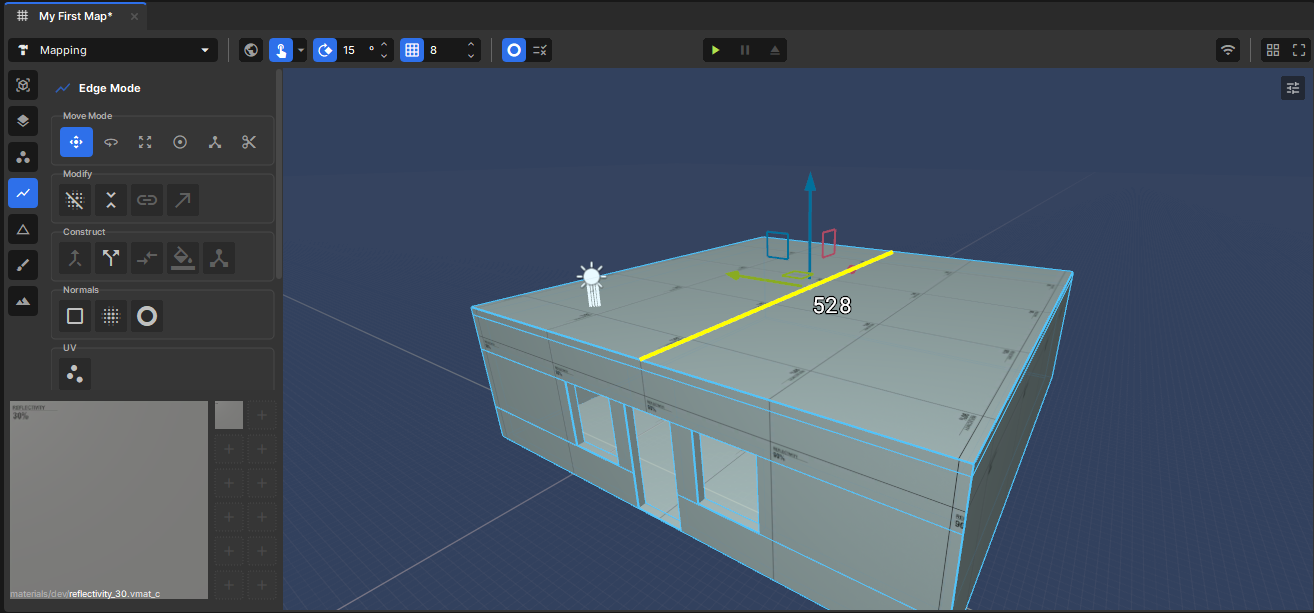
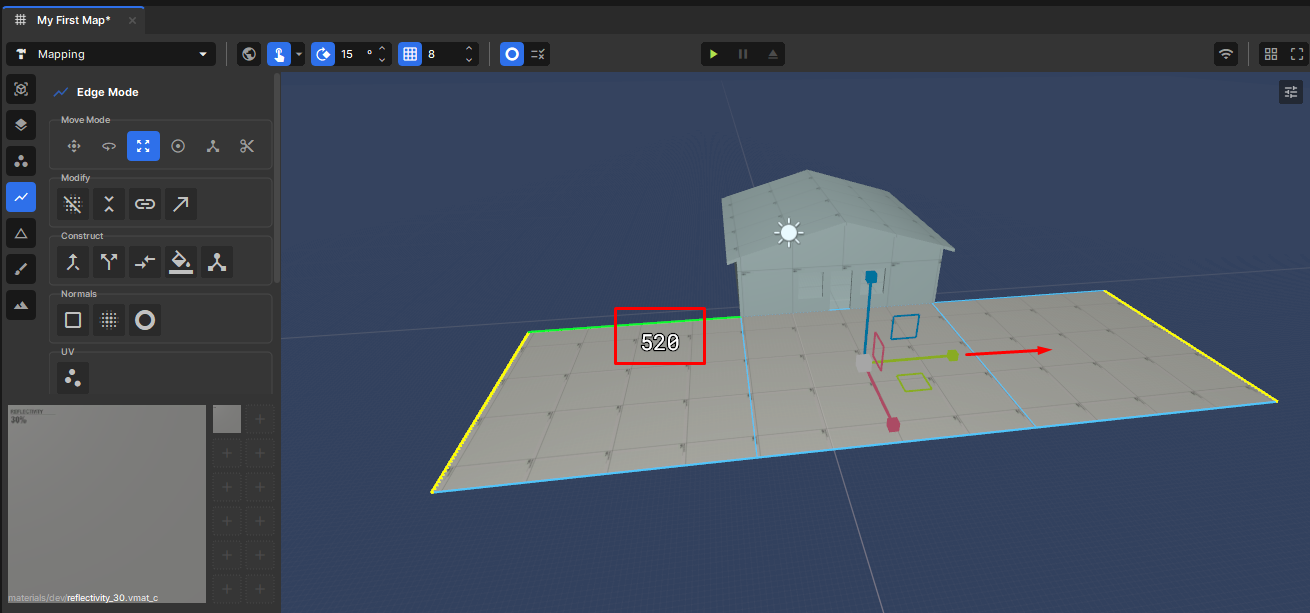
Switch to the Edge Tool (2), select the two edges on the ground mesh, switch to the Scale move mode, then hold Shift and scale the sides out about 520 units.
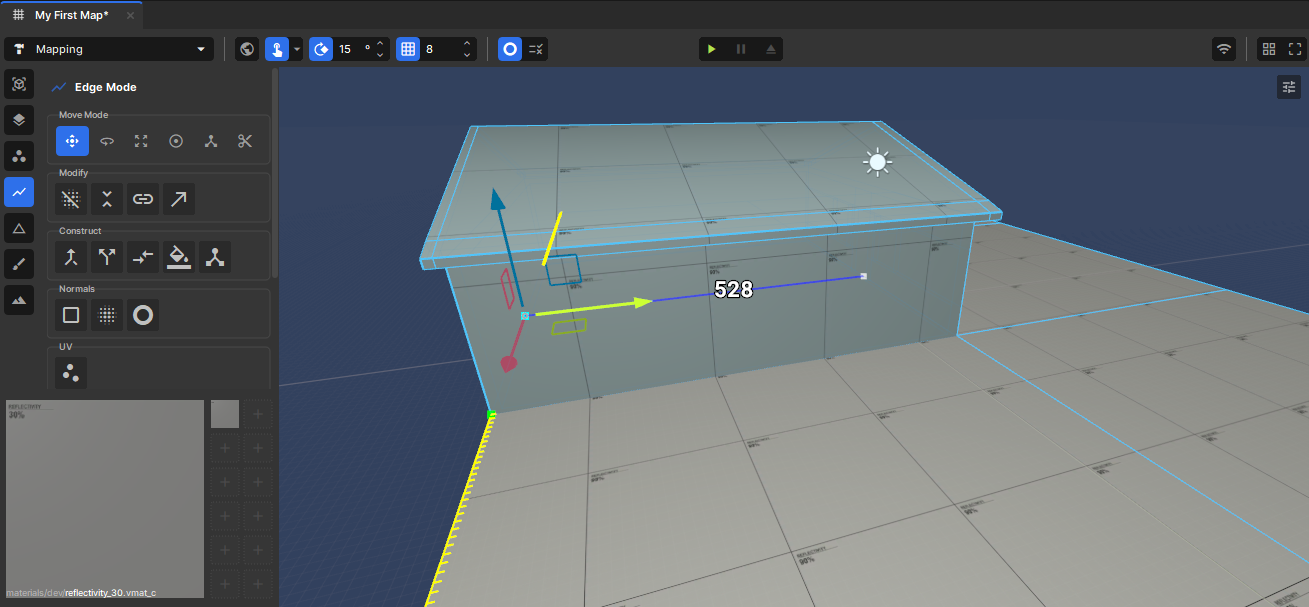
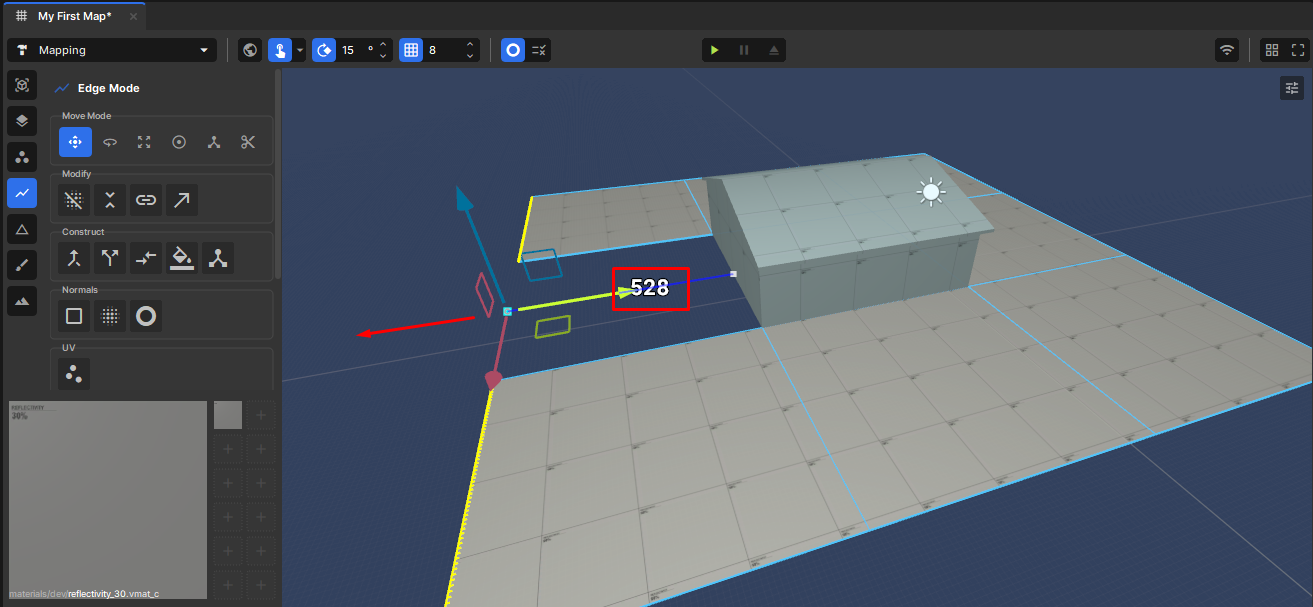
Switch to the Move / Position move mode, select those two edges, and hold Shift to drag them out and fit the length of the house — about 528 units.
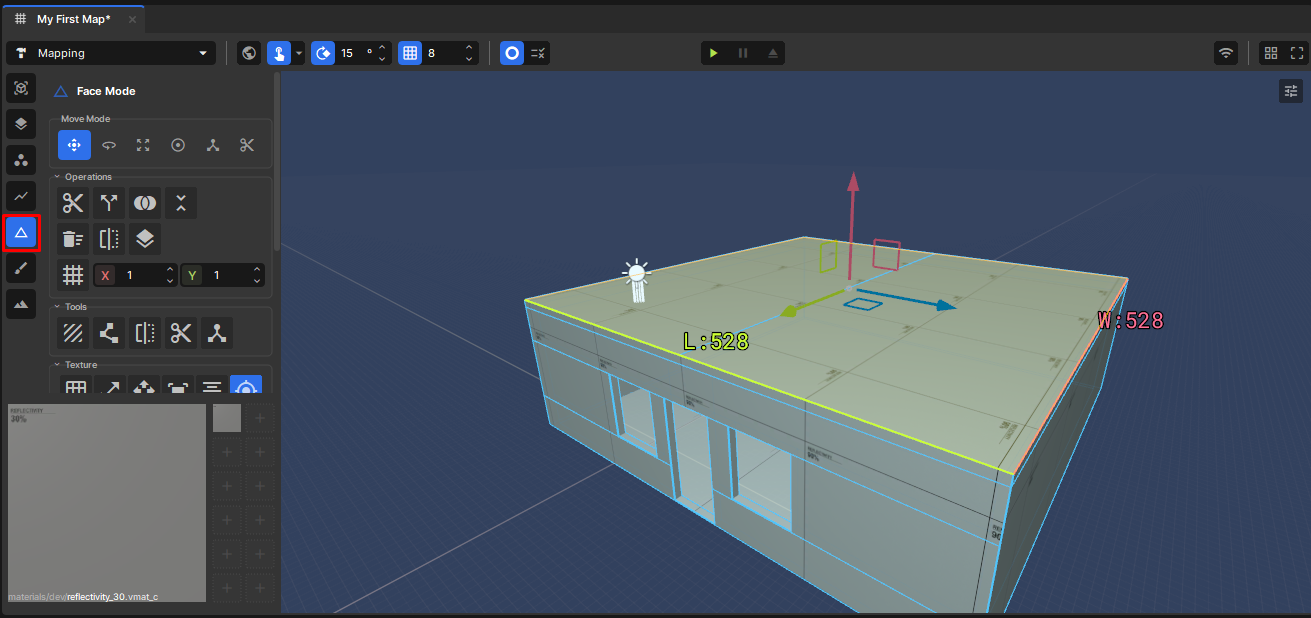
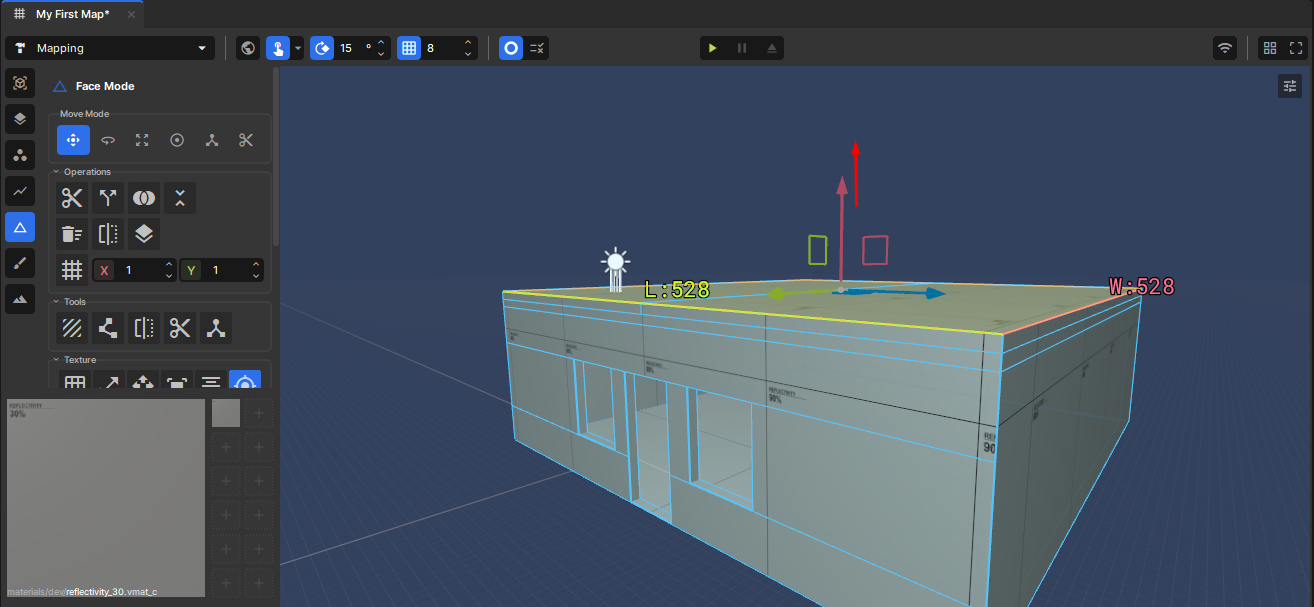
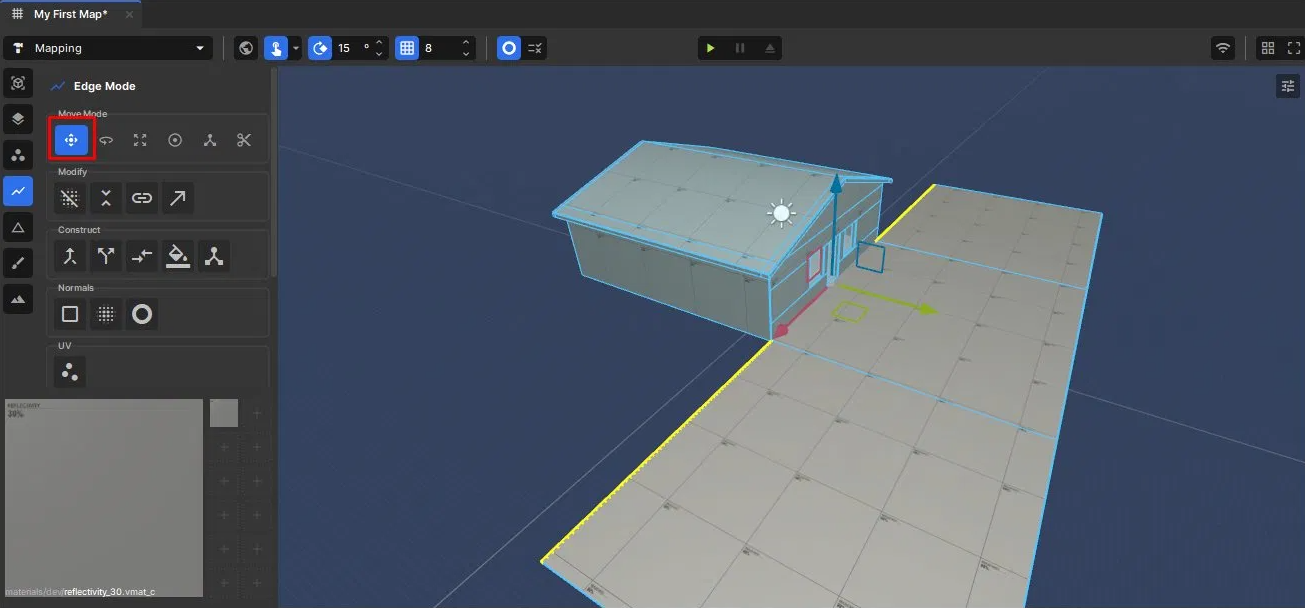
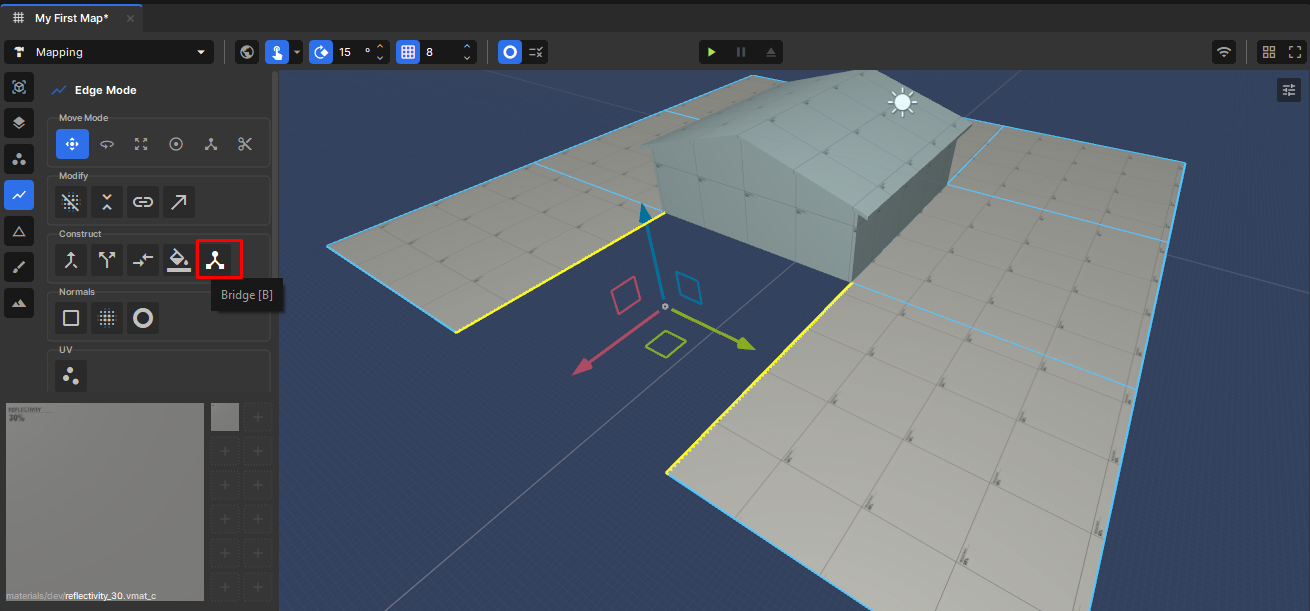
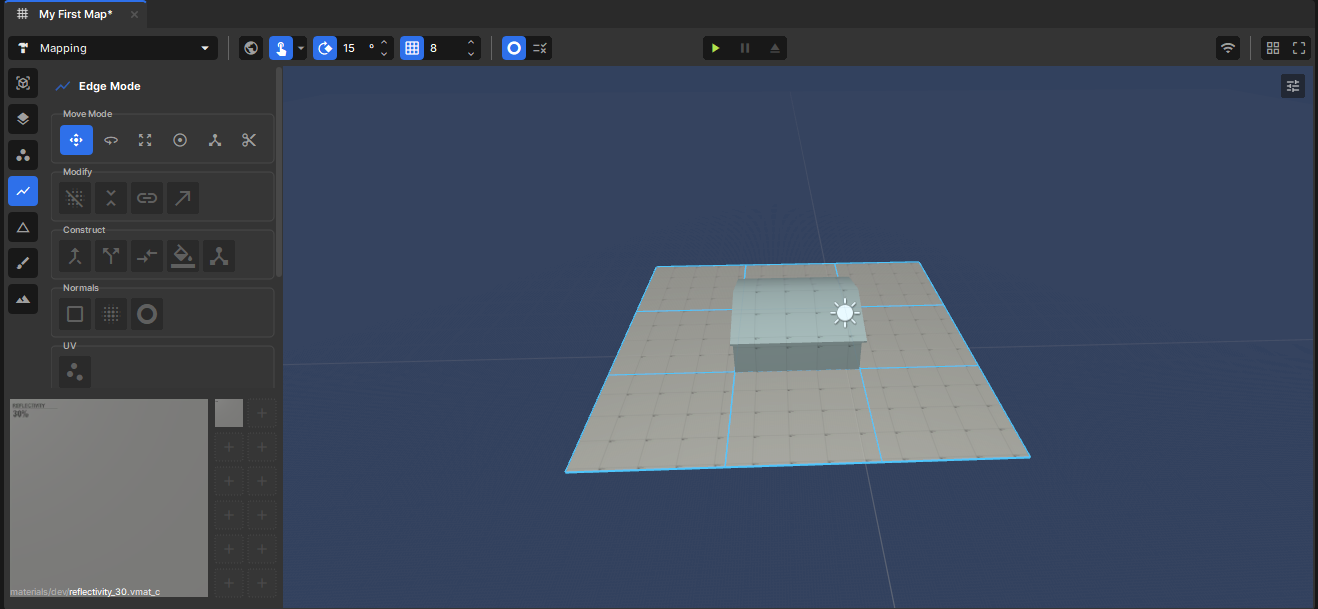
Select the two edges running along the house and press B to bridge them, filling the ground in around the house.
Just like the doorway bridge, this leaves the ground as a generic Block in the Hierarchy. Right-click it and choose Rename (F2), and name it Ground before we move on to texturing.
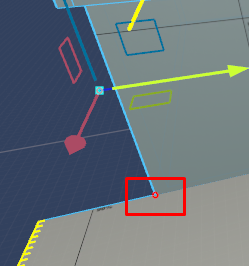
Tip — Faster way to line things up: while you're holding Shift and extending, watch for a red circle that appears on nearby geometry — that's a vertex snap point. Keep left-click held and move your mouse onto it, and your transform snaps right to that vertex. Makes mesh manipulation way quicker!
Section 10: Texturing
Now we make it look like a house. The geometry's done, so this is the fun part — swapping the dev textures for real materials. We'll texture the exterior here, then do the interior next.
Exterior Design
Set up your material palette
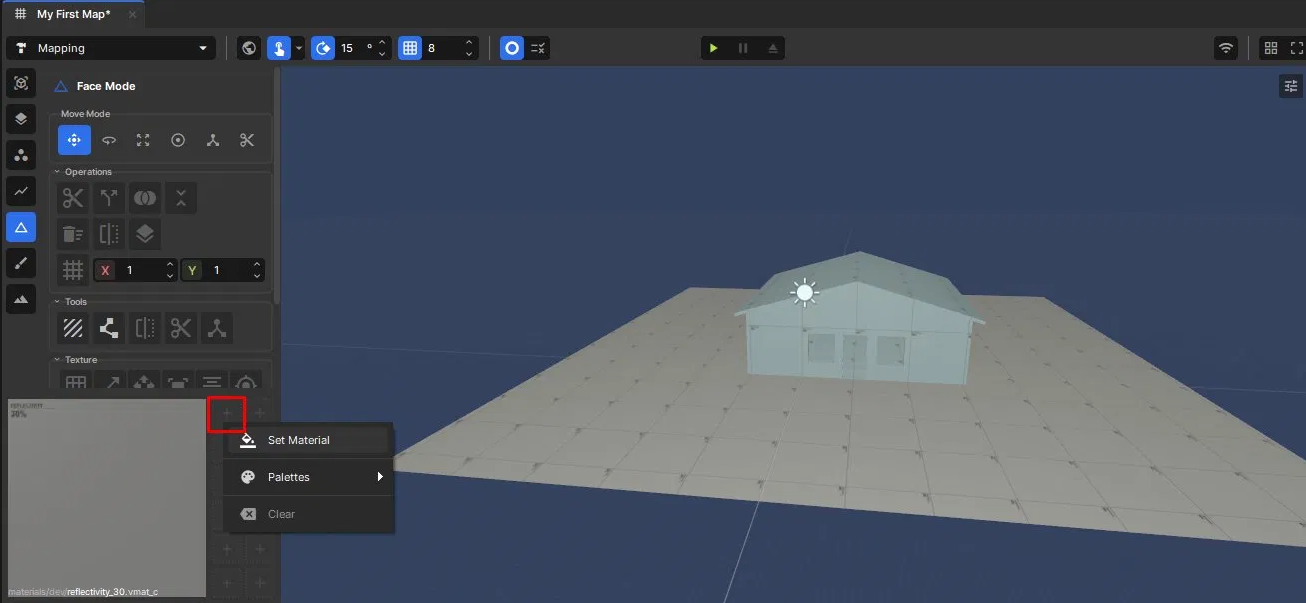
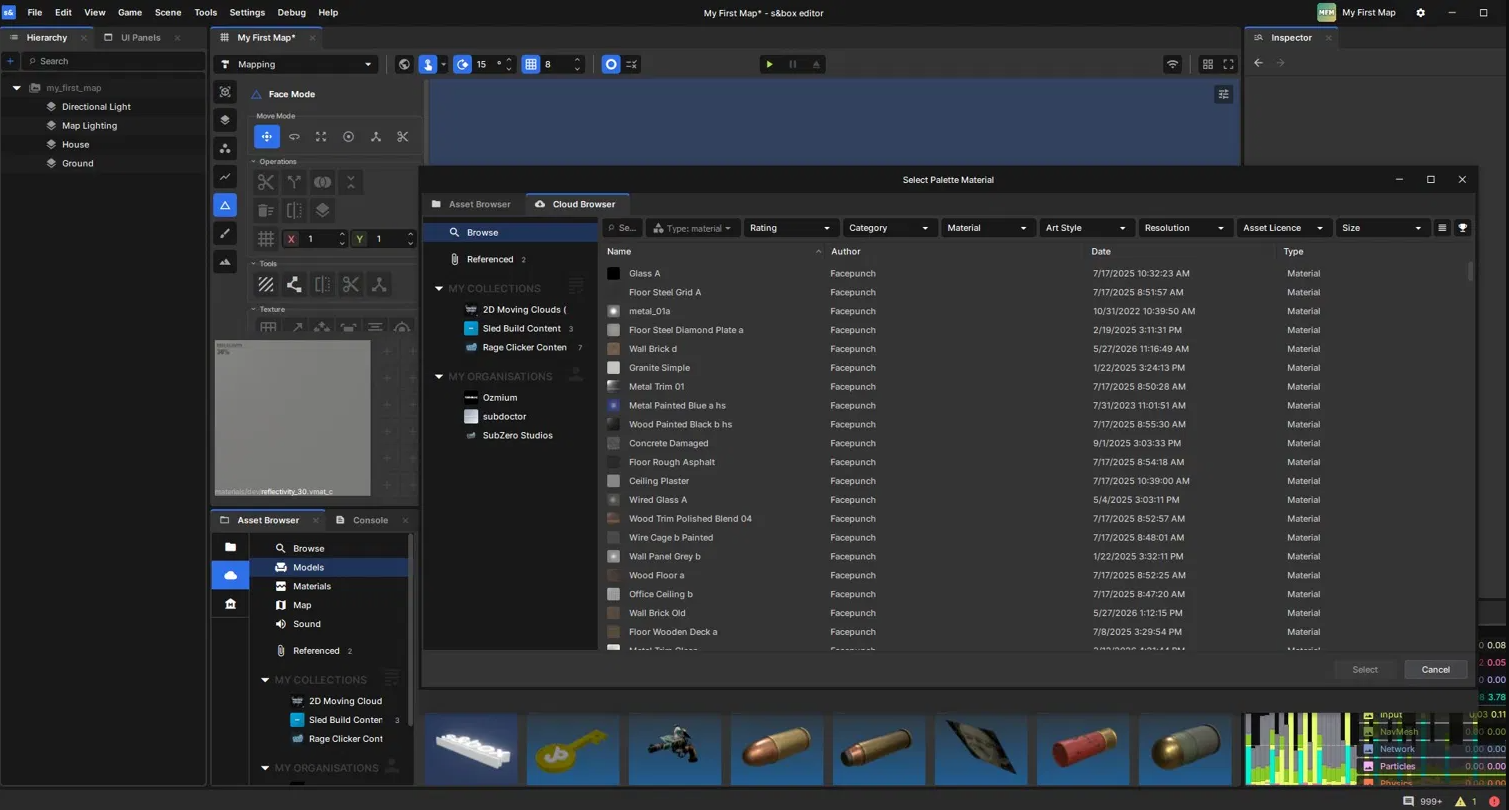
Enter the Face Tool (3). Down in the material palette (bottom-left), right-click the + and choose Set Material. That opens the asset picker, which has an Asset Browser tab and a Cloud Browser tab.
On the Asset Browser tab, select the Everything category. That surfaces all of s&box's default assets — plenty of materials, dev textures included.
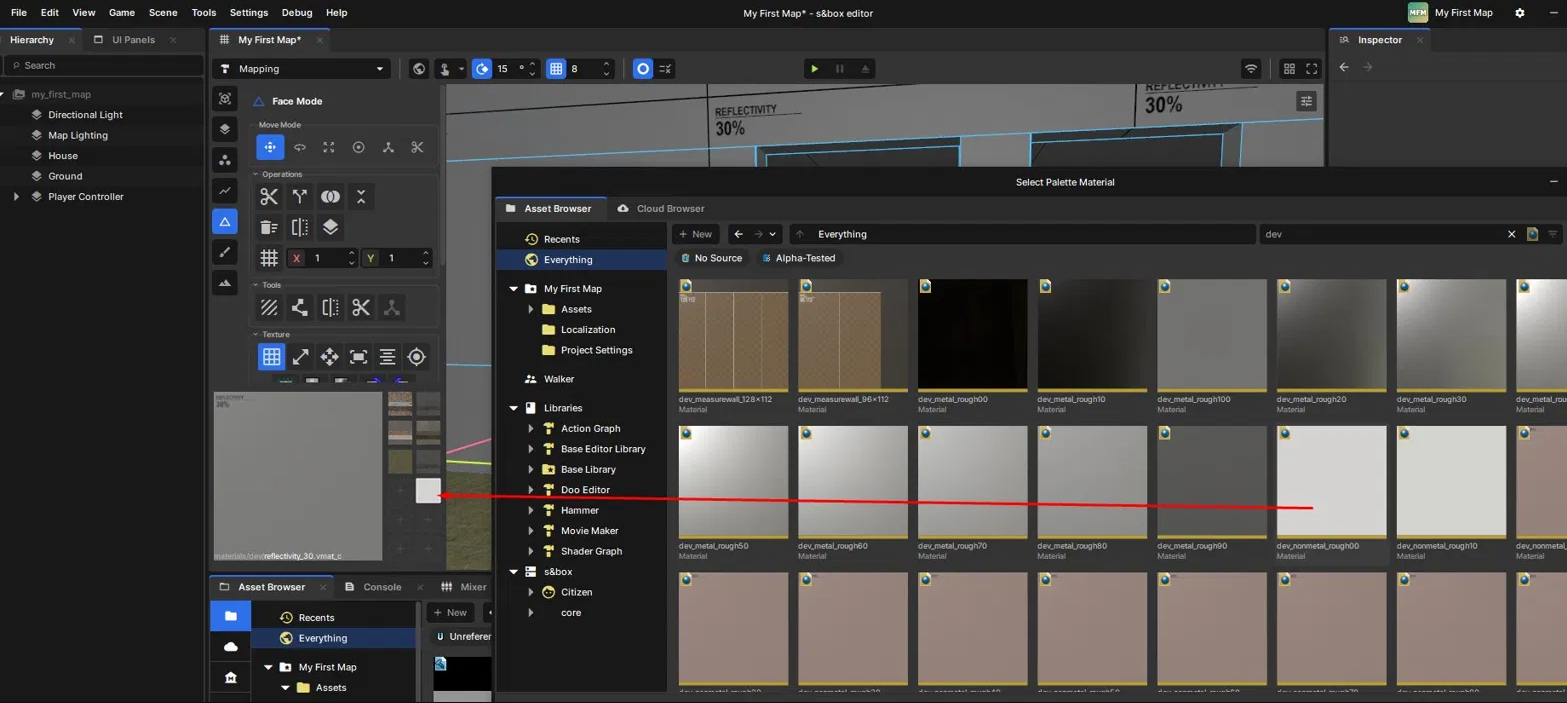
Search Dev in the top-right search box, just so you know where the dev textures live for later. A bunch show up, but the window's stuck in list view.
Click the view button and pick Large Icons so you can actually see the thumbnails.
Now grab a few materials to work with. Keeping it basic, search for and add these:
Tip — You can also drag materials straight in from the Asset Browser at the bottom of the editor — onto the palette, or right onto a face.
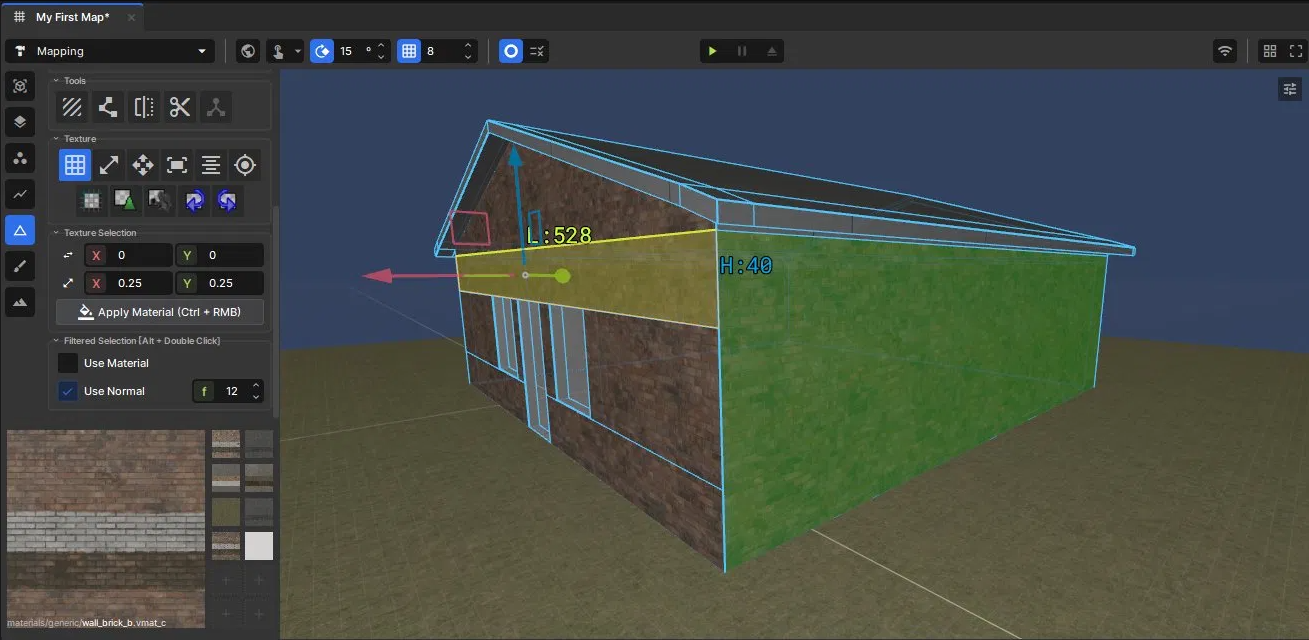
Texture the ground and front wall
First, turn off the Visualize Scene Objects debug view from earlier so you can actually see your materials.
Left-click your grass vmat in the palette to make it the active material.
Double-click a Ground face to select all of its faces, then press Shift+T to apply the grass.
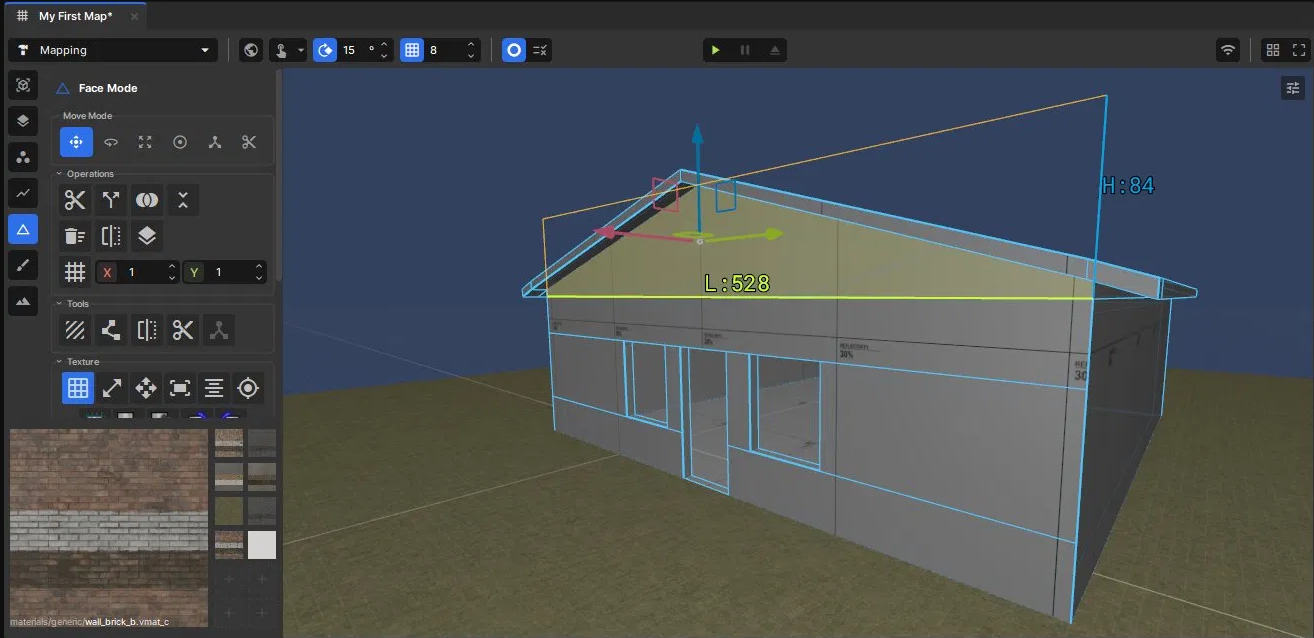
For the front of the house, Alt+Shift+Double-Left-Click a face to grab all the front faces at once, then apply materials/generic/wall_brick_b.vmat_c.
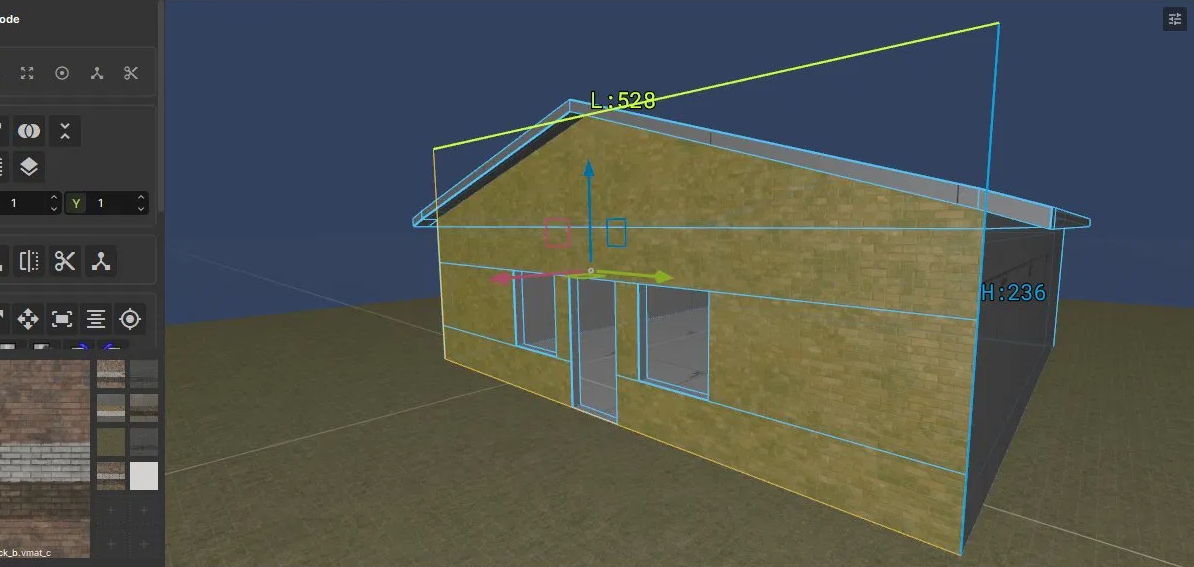
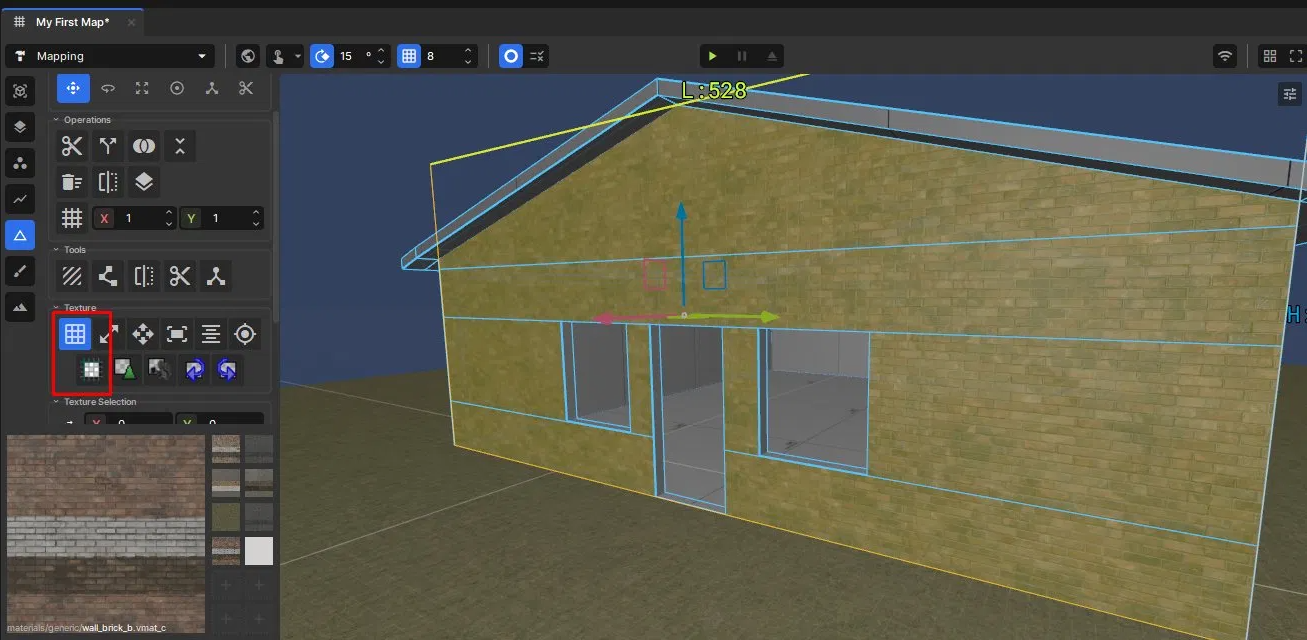
Align the brick to the grid
The brick comes in at the wrong scale. Under the Texture section, use Align → Align to Grid to snap it to a realistic size.
Info — Align to Grid won't fix every material — they're not all authored at the same scale. It's just the first thing to try when a texture looks too big or too small.
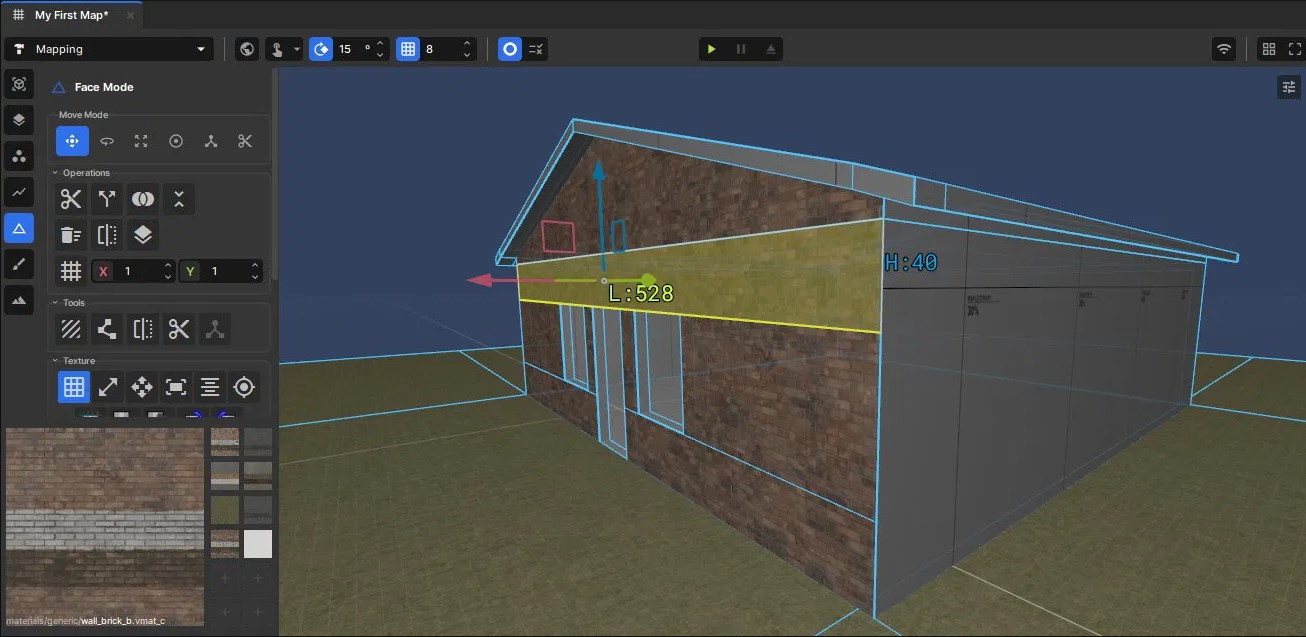
Copy the material to the rest of the walls
Here's a clean way to texture the other walls while keeping your alignment intact:
Left-click a face that already has the brick on it.
Shift+Right-click that face to copy its material and its settings.
Ctrl+Right-click another wall face to apply the same material with the same settings.
Keep Ctrl+Right-clicking the rest of the exterior walls.
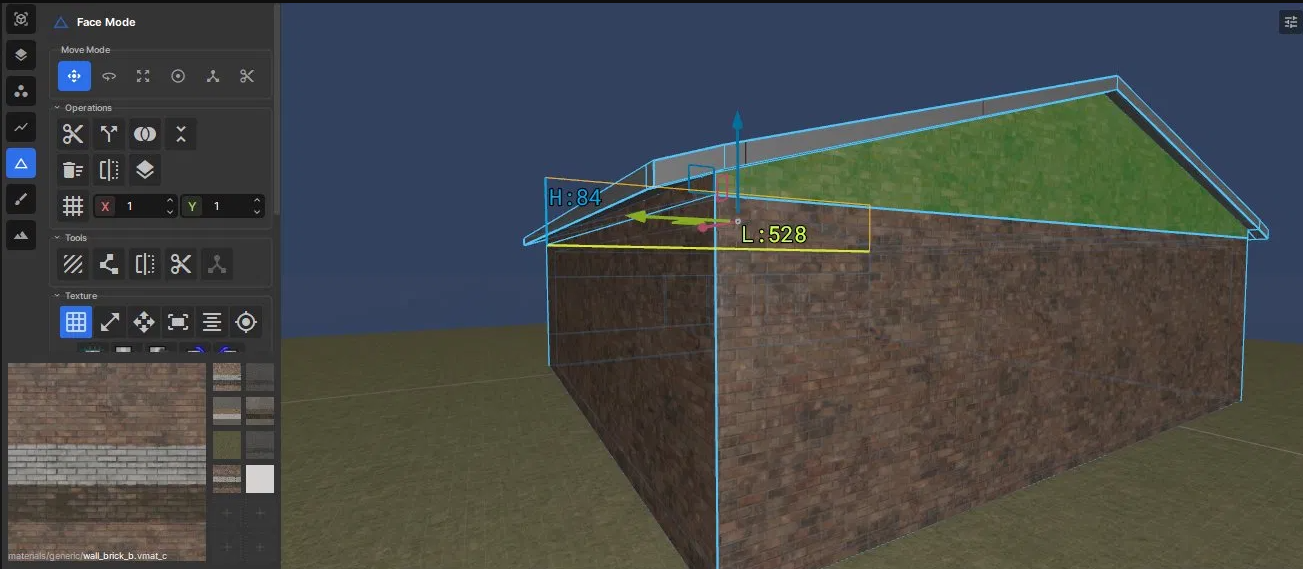
Texture the roof
Make materials/roofing/roof_bitumen_panels.vmat_c your active material.
Alt+Shift+Double-Left-Click both roof slants to grab all their faces, press Shift+T, then Align to Grid again.
Add the metal roof trim
We need a metal material — and here's another way to find one:
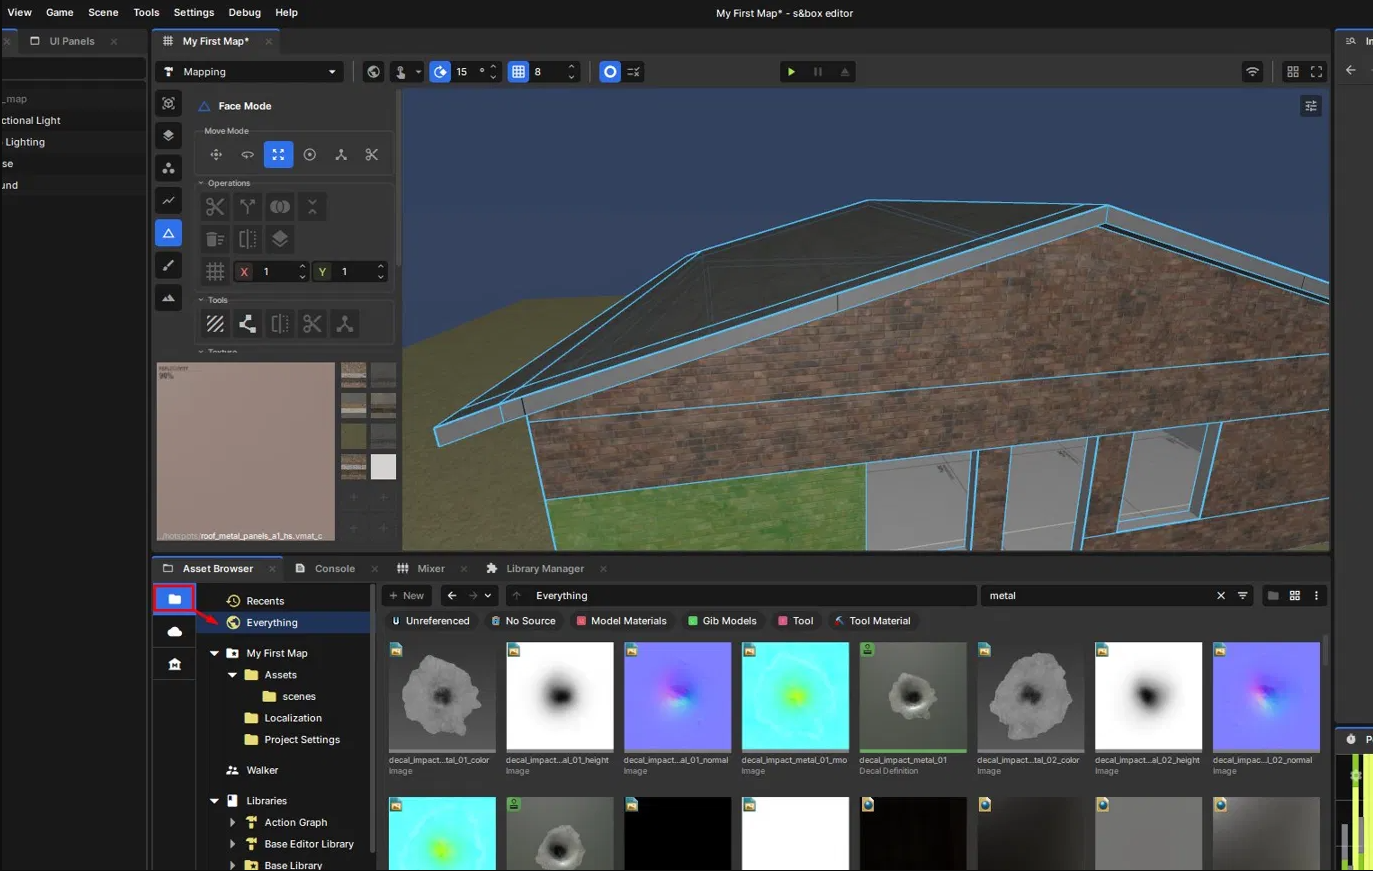
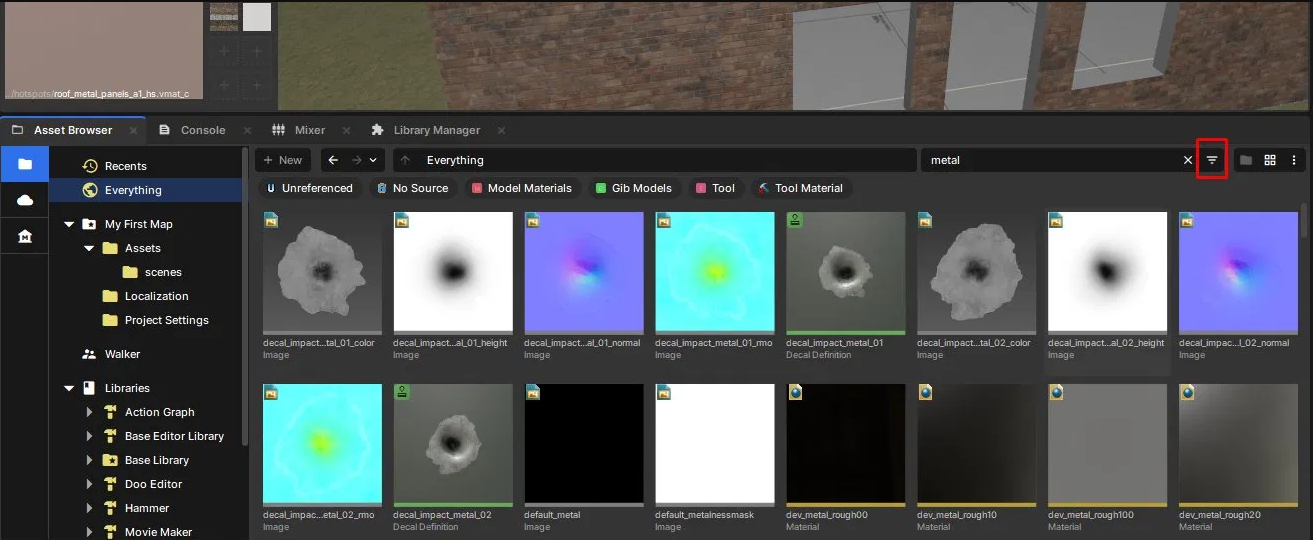
Click the Asset Browser, hit the folder (Local) icon, choose Everything, and search Metal.
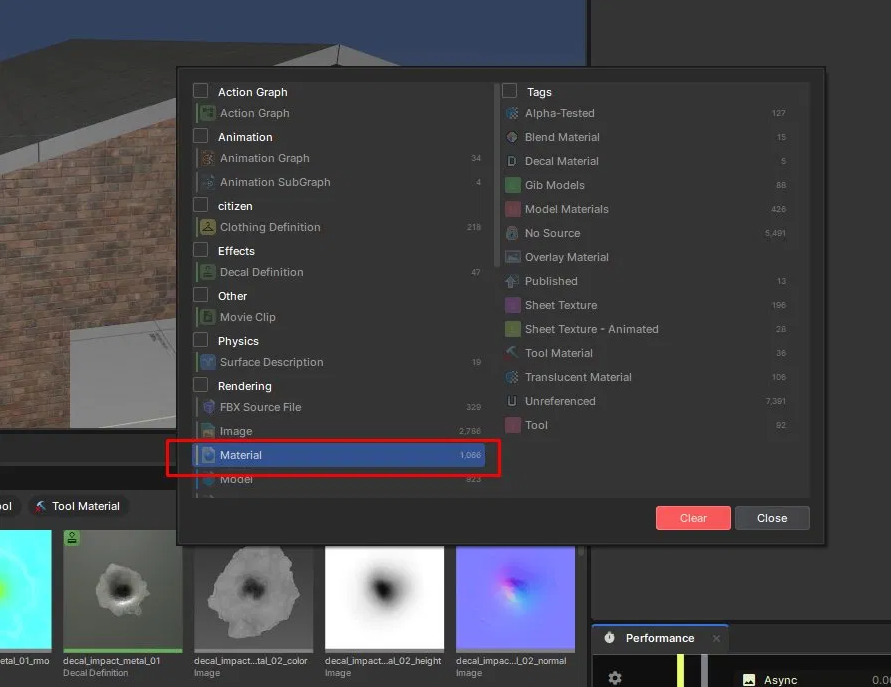
All sorts of things show up, so filter to materials only: click the filter icon to the right of the search box and tick Material — now only vmats show.
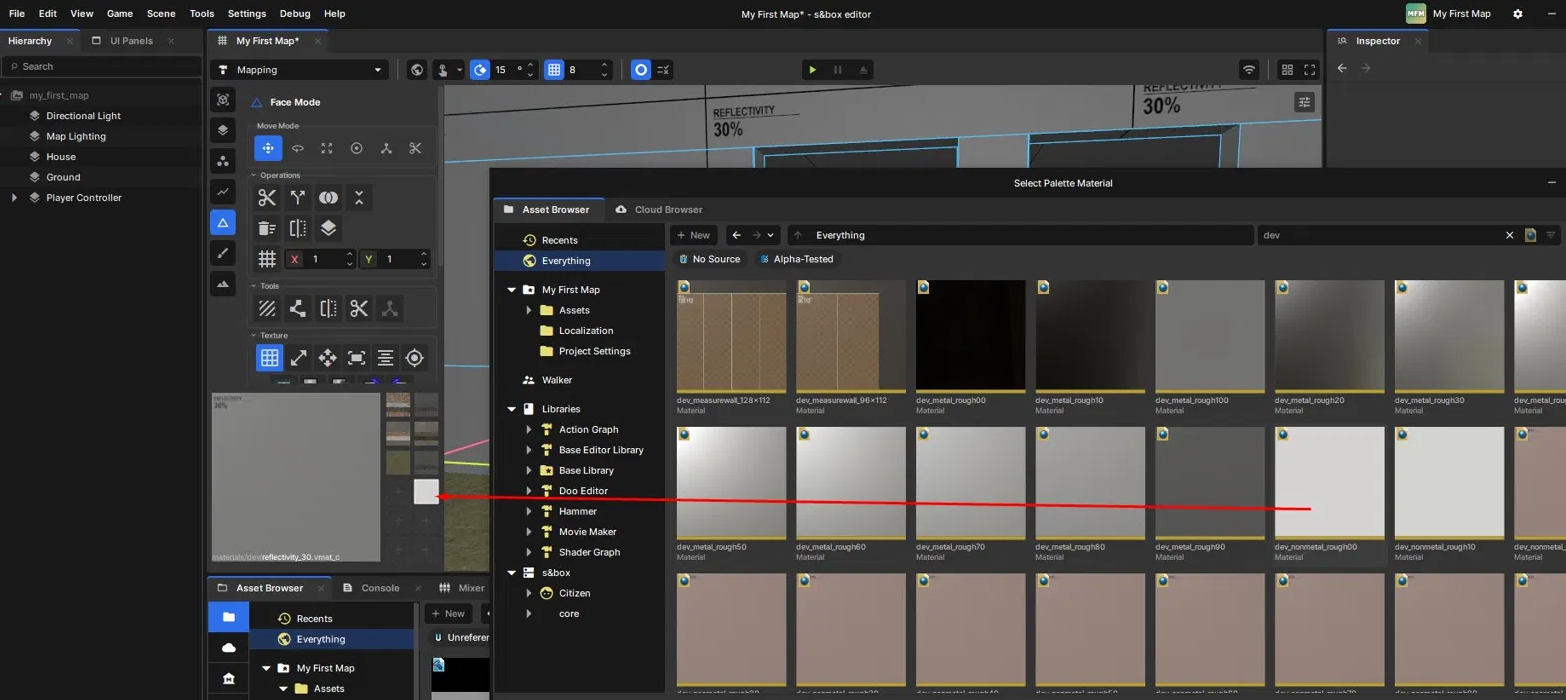
Pick any metal you like (play around with materials as you go). We'll use materials/dev/dev_metal_rough60.vmat_c for the trim.
Drag it into your palette — or straight onto a face, your call.
Alt+Shift+Double-Left-Click the roof's side faces all the way around, plus the bottom — about 8 faces total — and apply dev_metal_rough60.