I know you're here because you hate the sausage characters even I don't. So, this guide is for you. I'll be showing you how to port custom models into S&box for your own game. (Sandbox mode support isn't here yet.)
Anyway, You won't need to re-rig, retarget or do crazy stuff. No need to worry about using Blender. This guide is aimed from Beginners. And, We'll use an automated script for the main part which is very easy. Thanks to Noztik. I’d say porting custom models into S&box is 100 times easier than porting into Garry’s Mod or other Source 1 games.
Just to know, this workflow is very easy than it looks! Just follow the instructions carefully and you'll end up getting a working custom model!“Do what you can, with what you have, where you are.” — Theodore Roosevelt, 26th U.S. President
Alright. Before we start touching anything. We should know if our model is okay to port into ” S&box”. There are no strict rules. Just to let you know what the engine supports and needs for our process.
Let’s start with the "Requirements" for your model. You should make sure that your model meets these requirements.
➜ For model format
You can use models in any format to import into Blender. But, we’ll go through SMD, DMX (both from Source 1), FBX, PMX (From MMD) and VRM (from VRoid) in this guide. There might also be .blend files in some models. You can open them inside Blender by dragging the .blend file into Blender.
• .unitypackage files can be extracted to get FBX. This will be covered in the "Import (FBX)" section.
• MMD and VRM models require additional Blender add-ons and a few extra steps.
• Other formats such as GLTF/GLB, DAE are straightforward as FBX. So, I’ll skip them in the guide. You can find addons to import more complex formats that Blender doesn’t support.
➜ For texture format
Model’s textures can be .PNG, .PSD, .JPEG, .TGA, .BMP, .JPG, .DDS.
• In some models, only .PSD is used. You can open/convert these using GIMP, Photoshop, or any image editing tool.
➜ For your model
Model must be rigged properly with a good rig. • It should have proper human bones set up. There can be extra spine bones in some models, such as UE5 models. You should use an add-on to merge them into 4 or 3 spine bones. For custom models from MMD, VRC, VRoid, and many more. They only use 2 spine bones. Don’t worry. The script can handle that.
Model shouldn't have more than 200K of vertices/poly. • Can't confirm and still unknown, but mesh stretching occurs at a higher level. Same for bone count. Having a lot of bones doesn't seem to make problems tho. I don't really know the exact limit for Source 2 yet..
Model's bones shouldn't have weird characters, symbols and foreign languages. • It's kinda weird but if you see them in your bones' names. either translate them or name it something better!.
There shouldn't be any bones before the "Hips/Pelvis" bone and it has to be the main root bone of your model before the spine bone. • The animations will have a laggy effect when switching animations if your model has bones before the "Hips/Pelvis" bone. Such as extra root bones. If there are any, remove them by deleting them in Blender in the upcoming sections when you import your model. • Or, if extra root bones functions as root bones while pelvis bone doesn't. S&box's animations won't work for those root bones which will result in stretching out for your model in-game/engine.
Fingers are optional. • The model can have fewer than 5 fingers or even none at all.
These are the basic requirements your model should have. You’re good to go if your model meets all of these!
We'll need these tools and software before start porting your model into S&box. Most of them are Essential. But some are Optional. Download them first, and we'll set them up in the next section. We'll also need to install add-ons to use in Blender to help with the processes of working with other model formats. But, only if you're working with those formats.
📙Blender Source Tools (For Source 1 to S&box): A Blender add-on to import, export, and work with the Source 1 formats. You only need it if you're going to port a model from Source 1/Gmod into S&box. ➜ Link: http://steamreview.org/BlenderSourceTools/archives/
😺Blender CATS add-on (Optional): An addon to import & fix MMD models, merge the same materials, and many more useful features. We'll be only using this addon for MMD models but there are many useful features in this addon. So, grab it if you want. ➜ Link: https://github.com/teamneoneko/Cats-Blender-Plugin-Unofficial-
So.. I assume you have installed the required files. Let's start with installing the Blender addons.
• Installing Blender Add-ons
Alright, here's how to install Blender add-ons. Scroll down a bit if you know how to install add-ons. Nothing hard, It's very easy.
First, open Blender. If you're opening it for the first time, a "Quick Setup" window will pop up. Set it up however you like—though I recommend "Blender Dark" to save your eyes lol. Then save it.
Now press "Ctrl + ," to open the Preferences window. Go to the "Add-ons" tab. Click the small arrow in the upper right corner and choose "Install from Disk..." Find your add-on ZIP file, select it, and click "Install from Disk". Repeat the same for every add-on you want to install. That's all for installing the Blender add-ons. Let's continue.
• Set up scene
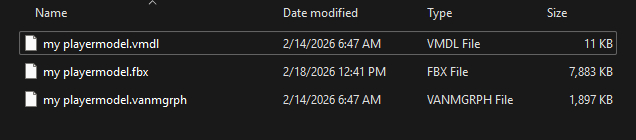
I know you've installed Custom Models 2 S&box file. Extract it, and you'll see four files. Which are.
convert_playermodel.py : Blender script we'll use for converting our custom model to S&box playermodel and export it as FBX.
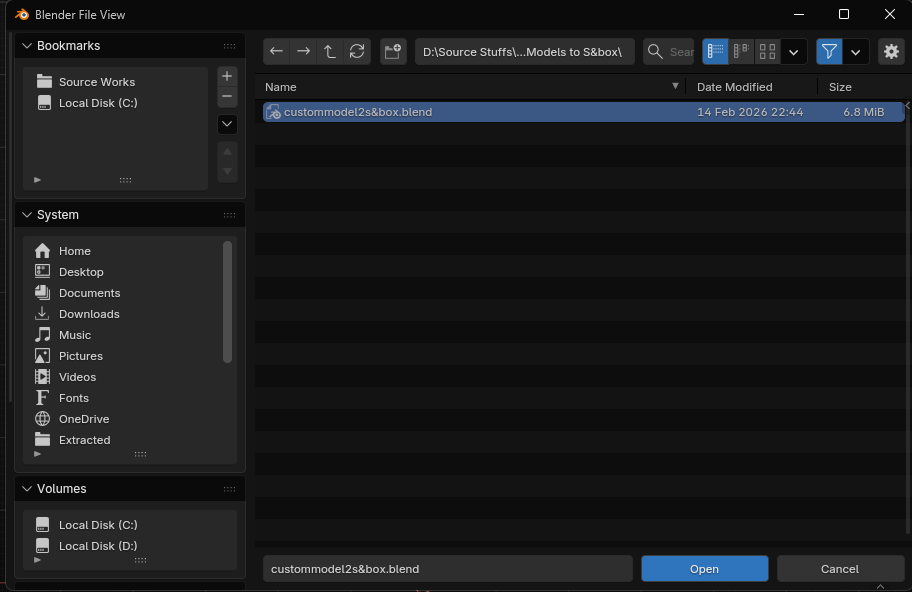
custommodel2s&box.blend : Blender scene file to work inside. I've set up the scene to make your workflow easier.
playermodel.vmdl : Model file that stores the data of the model. If you're a modder from Source 1. You'll instantly familiar the name MDL. Except there's an extra "V" at the start for being Source 2 format.
playermodel.vanmgrph : Animation file that stores animation of the model, including Proportion Trick set up. In Source 1. MDL does the job of storing animations, but in Source 2, this one took his work.
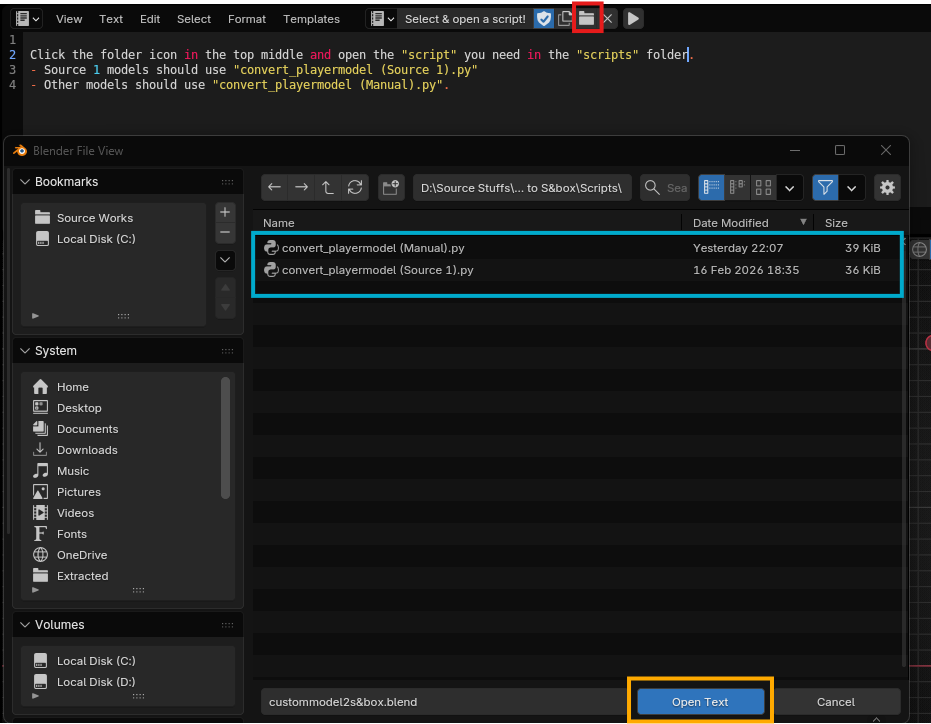
So, those four will do the work for you to convert your model. Open Blender. Drag and drop the ".blend" file into Blender. or press Ctrl + O, browse to the scene file and open it. If you set the ".blend" to always open with Blender. You just need to double-click the .blend file.When you're in. You'll see the texts saying this.Yes, let's do exactly what it says. I'm sure you see the folder icon in the top middle. Click it, browse to the script file in the "scripts" folder. Select a script depending on what model you're porting. "Source 1" script for models from Gmod or other Source 1 games. And, "Manual" for every other custom model.And that's it. You're done with this section! You'll be selecting one section from the next four to import your model into the scene.
Ok, importing an "FBX" file into Blender is super easy. Let me show you how you can import FBX and .Unitypackage. Just to know, I copied almost everything from my last guide and rewrote some stuff.
• Importing FBX into Blender
This is child's play, all you gotta do is: Click "File" in the top left corner and then hover your cursor on the “Import”, and you’ll see a bunch of options pop up beside it. Click “FBX (.fbx)” and browse to the location where your model’s FBX is located. Select it and click ”Import FBX”Wait, and there you go!. You just successfully imported the model into the scene. That's all for importing the FBX. It's very easy, right? What about models that only come with .unitypackage, from Unity. I'll show you how. Skip if you don't have one.
• Extracting Unitypackage
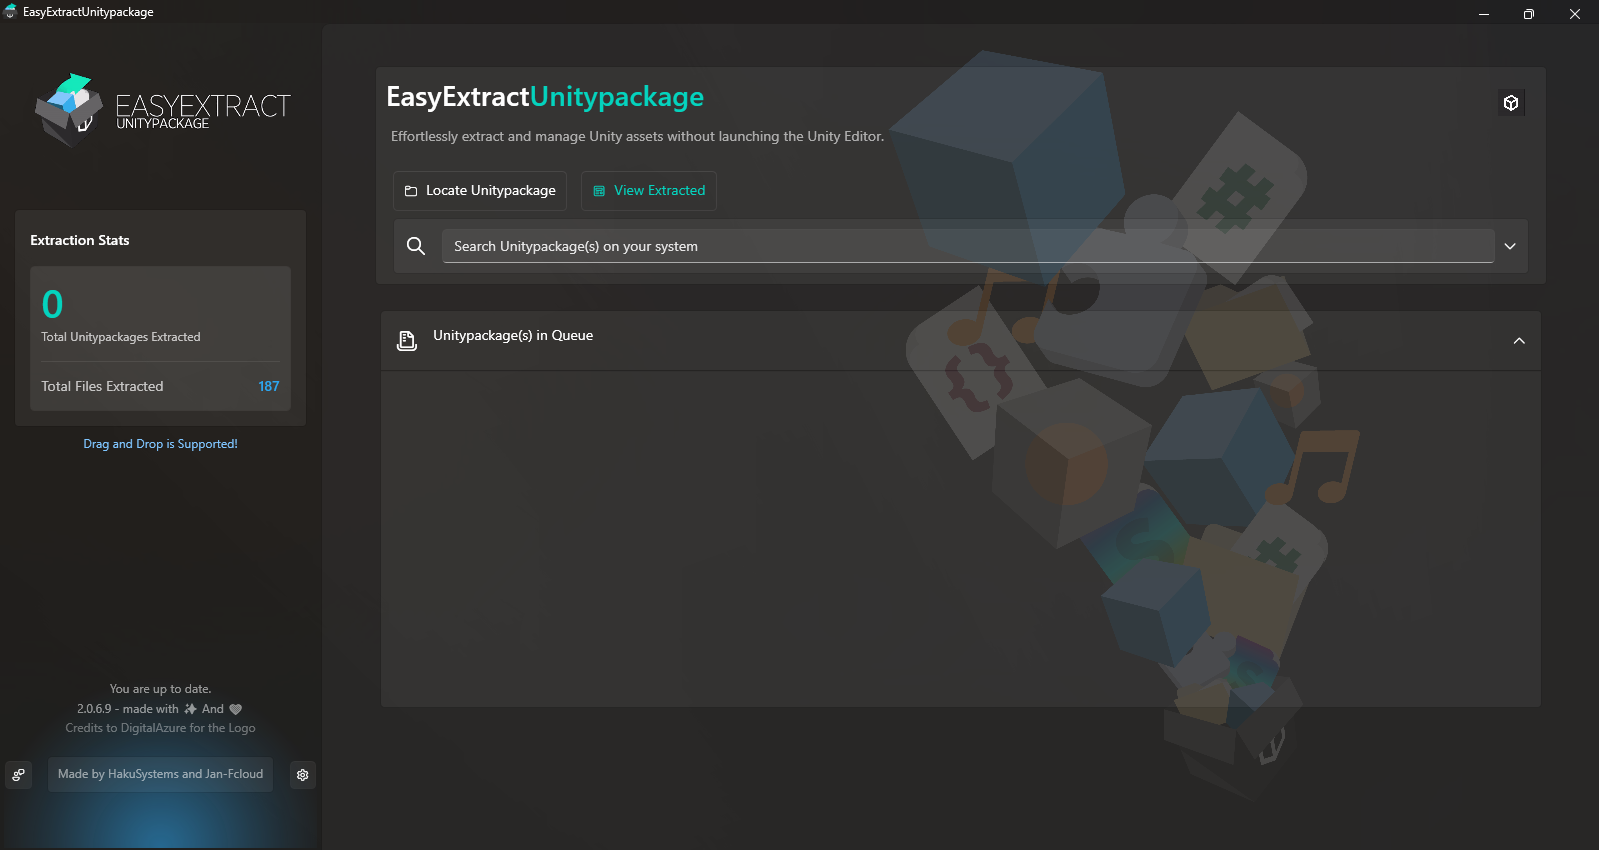
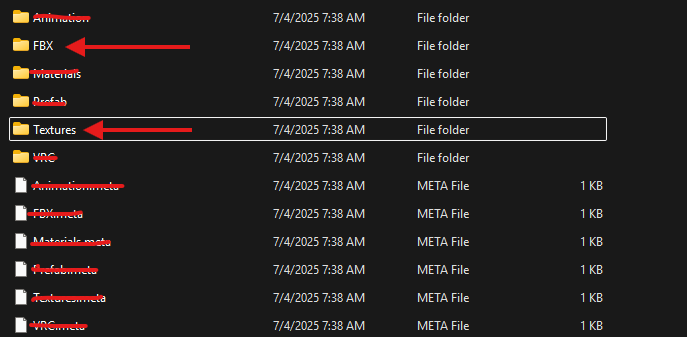
I assume you already have the tool I linked above. Go get it if you haven't. Let's start. Firstly, you're going to open that tool. This is the homepage. Nothing special to see. But hey, it's a useful tool to extract ".Unitypackage" files.Then, click "Locate Unitypackage", browse for your file, select it, and hit "Open". Now click "Start extraction" and wait — it’s usually quick (depends on your system). Once done, hit "View extracted", then the button next to your package’s name, and choose "Open (Selected) Directory". That’s where your extracted ".Unitypackage" folder will be.Go inside, and you’ll see a bunch of folders. The "FBX" files are usually inside "FBX" or "Models" folders. Grab them and paste them into your main model folder (where the .Unitypackage is), or just make a new folder for them.
But we’re not done yet — when you only have a ".Unitypackage", it often doesn’t include textures (in very rare cases). You’ll need to copy the textures as well, which are usually found in the "Textures" or "Tex" folder. If you don’t see those, check inside "Materials" — that’s where they sometimes hide. Alright, that's how you can extract Unity's package files. You'll have to use this tool every time you need to extract the package file that comes with the model files.
Alright, this is something new. We're going to import Source 1 models into S&box. If you're going to port a model from the Garry's Mod's workshop. Make sure you have permission from the creator first. After that, you can download the addon as GMA file. Extract it using the good ol' Crowbar[github.com] tool and then decompile the MDL file to get the model files, which are SMD that store the model.
If you're going to port your own ported models or probably used my Gmod guide. I'm sure you have your own files. SMD or DMX files. Much better if you used DMX. Because it's supported natively in Source 2. And, I'm sure you know how to import them, too. But here for people who don't know.
• Importing SMD & DMX
Let's kick start with the SMD. Cuz' that's what you get from decompiling the MDL file. Make sure you have the Blender Source Toolsinstalled. To import them. Click "File" from the top-left corner, then hover your cursor on the “Import”, and you’ll see a bunch of options pop up beside it. Click Source Engine.....
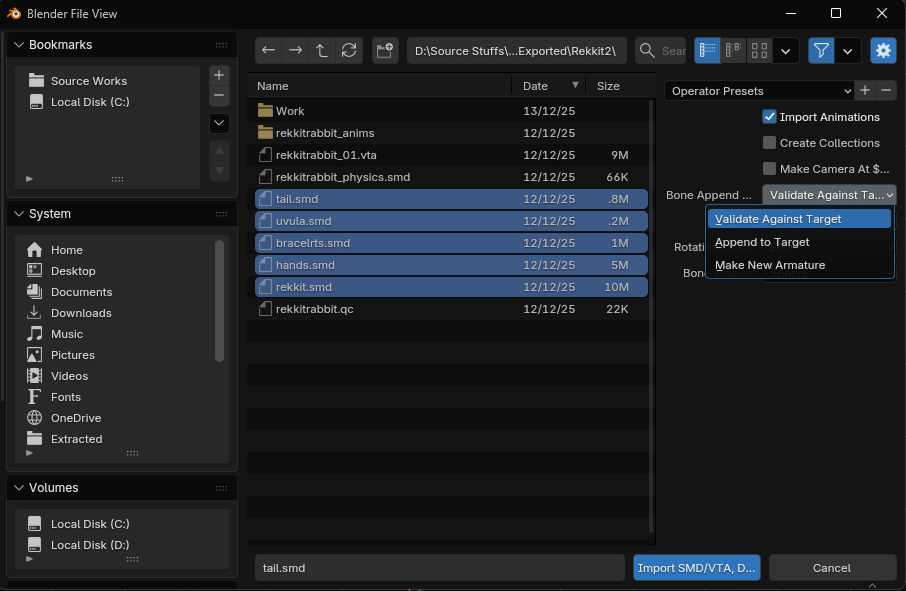
A window will pop up. First thing you have to do is to browse to your SMD/DMX files. And then, select one of the files. And then, click the Bone Append dropdown. Select Make New Armature. Untick Create collections as it can cause errors. And click Import.....One of the meshes will be imported with an armature. We'll import the rest by doing the same steps again, but this time. Select all the other meshes except the physics.smd. We'll set Validate Against Target this time. So, our meshes will use the imported armature.For the DMX files. You're done with importing here. But for SMD. They store shapekeys in a separate file called VTA, which is a disadvantage of SMD over DMX. We'll handle that.
• Importing VTA (Shapekeys) - Optional
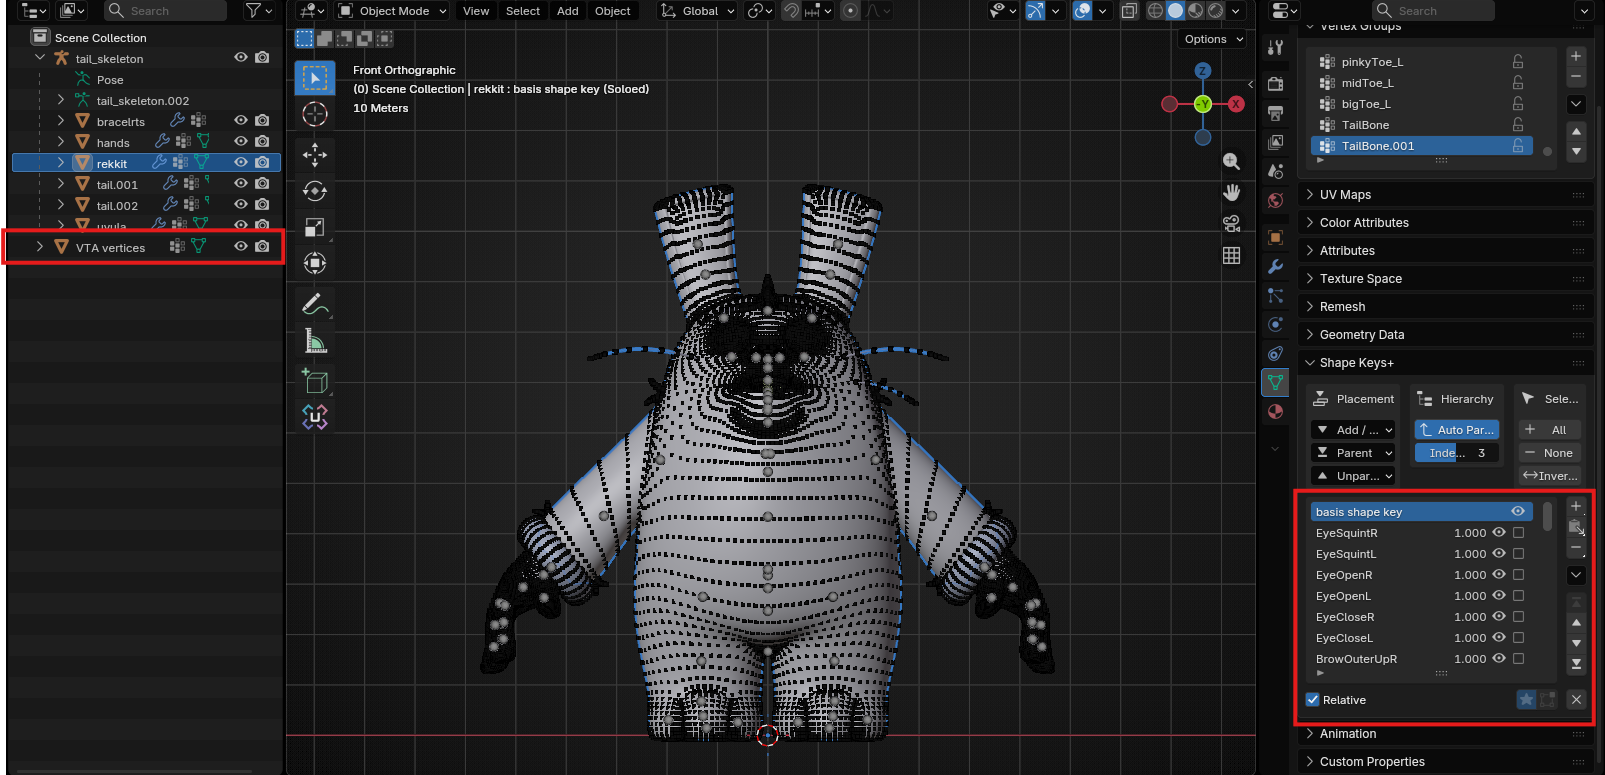
Most of the models have shapekeys which are used for Flexes which are stored in VTA. If your model don't have it after you decompiled the model. Skip this section. So, to import the VTA correctly. Select the mesh that the shapekeys belong to in Blender. Mostly, the head/face of the model. And then, import the VTA file with Validate Against Target.Wait a few seconds, and it'll be imported with an error, and it'll create a thing called "VTA vertices". Ignore the error and delete the VTA vertices, and you're done with importing the Source 1 models into Blender. Last step, we'll only select our model, drag it, and drop it in the "Input" collection. So, the script can find your model inside there and work properly.
This is also a section for "Source 1" models. If you don't know. S1 models uses a different texture format called "VTF (Valve Texture File)" and "VMT (Valve Material File)". We don't care about "VMT" here. That stores the material parameters and info. VTF has what we want.
We'll convert those VTF files to "PNG" in this section. It's not very hard. Just open and export. Make sure you have VTFEditinstalled which is also listed in the 《 🛠️ Required tools 》.
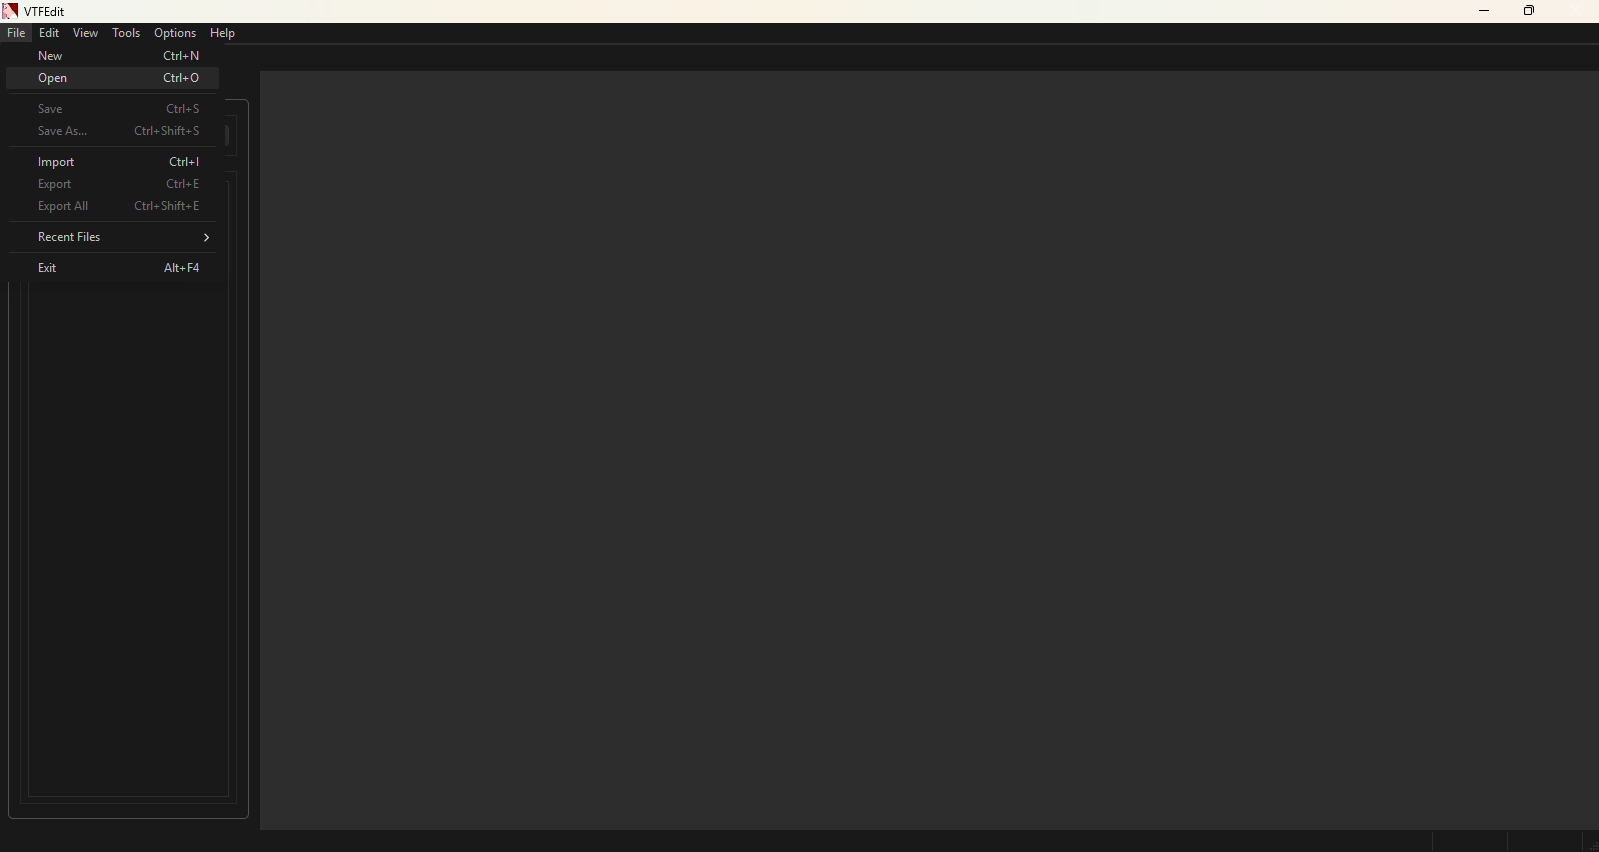
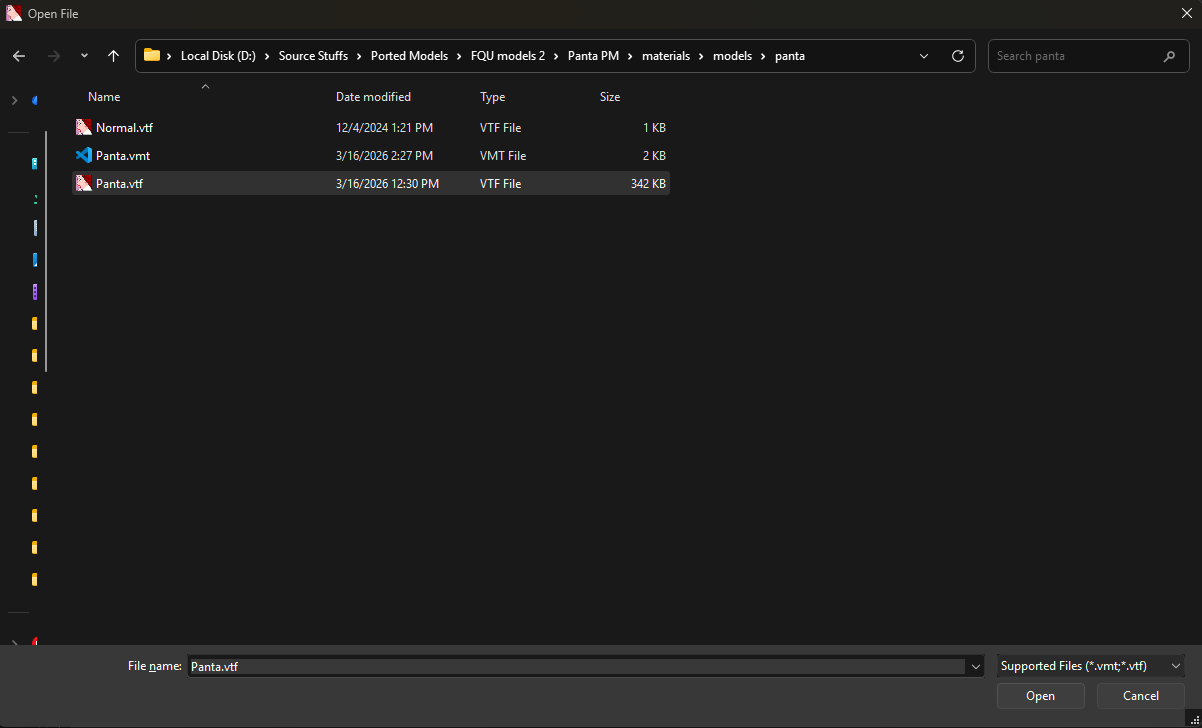
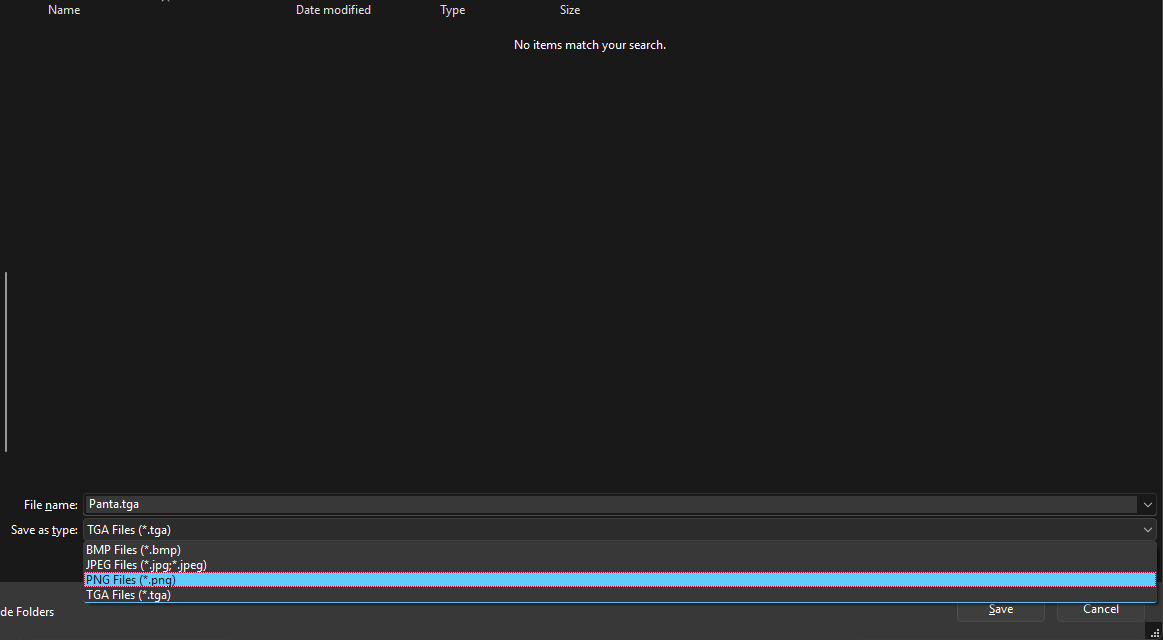
First of all, open "VTFEdit". or open the "VTF" file of the texture you want to convert. Keep in mind that you need to convert every VTF that the model uses. Includes Basecolor/Main color and Bumpmap. If you've ported models into S1 like me. You know what to convert. When you opened VTFEdit. Click "File" from the left-upper corner. Or, you can press "Ctrl + O". A window will pop up. Open the "VTF" file you want to convert. For modders, I'm sure you already have those files to open with VTFEdit for always by default which you can click and open the VTF file instantly. After that. Press "Ctrl + E" to export. A window will pop up. You can select the export file type from "Save as Type". Select "TGA" or "PNG". Others works too. But, those twos are recommended. When you're done with that, Make a folder inside your decompiled folder (or somewhere you want to keep them) and click "Save" and the texture will be exported. Repeat that for every VTF files your S1 model use. When you're done with it. Proceed to next section which should be 《 📏 Scaling 》.
Yeah, importing MMD models. It’s easy—only the fixing part can be a bit frustrating, but it’s mostly one-click stuff. Anyway, make sure you installed this add-on[github.com]. That add-on helps you fix some issues and even assists in other situations. Don't worry. I'll guide you through.
• Importing PMX
Importing every model format is just child's play if you know how. Open "Blender". Yes, you're going to work inside Blender. That’s why I keep repeating this in every import section.
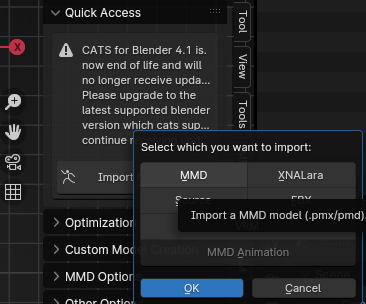
Press "N" on your keyboard. A panel will pop out from the right side. Click "CATS", then "Quick Access", and then click the small button beside "Import Model".A small panel will appear asking you to choose a model type... click "MMD". Ignore the others. and, Browse to your ".PMX" file.Before you import, Set "Internal Dictionary" under the "Rename Bones" option if you don’t wanna deal with foreign language bone names :). Once that’s done, click "Import Model File". Your model will be imported. Now let’s clean + fix it using the add-on we installed. It’s a one-click fix—no stress, no complicated steps.
• Fixing the model
Alright, let’s start fixing the model. It’s super easy. First, Zoom in till you can see your model, and then we need to make the model a "Single User". No clue what it does exactly, but it’s required before the fix by default.
To do that, press "A" on your keyboard to select everything. Then press "F3", type "Make Single User", and click on "Make Single User ‣ Object & Data".
Now, we’ll fix the model. In the "CATS" panel, you'll see "MMD Options". Click the dropdown. There it is—"Fix MMD Model" button!. Press A to select everything before clicking that and then click that "Fix MMD Model".
A warning will pop up—click "OK". It just says to only use this on MMD models. You'll have to wait a bit until it's done.So, what does it fix? It’ll reparent some bones, remove unnecessary bones, translate and rename bones, merge some weights, correct the hips bone, convert morphs into shapekeys, and more.
And that’s it. Your model is now fixed and ready.────────────────────────────────────────────────────────────────────────
📥 Importing - VRM
Importing VRM models is pretty straightforward too. The only thing you'll need is the "Blender VRM add-on" here!. So, make sure you have already installed the add-on. So, let's start.
This part is just as easy as importing an FBX as it is. Open Blender, click File on the top-left corner, hover over Import, and you’ll see a list of options.
If you’ve installed the VRM add-on, you’ll see VRM (.vrm) and VRMA (.vrma). Click VRM (.vrm), then browse to your model’s .VRM file, select it, tick ✓ "Extract texture images into the folder", and hit Open.
After import, the textures will show up inside your model’s folder. Keep in mind: extracting textures takes a bit longer. Skip it if your model already includes textures.After importing the model, you're going to see messy stuff. mostly, "Colliders".. They might be useful in "VRoid". But again, not in S&box :). Maybe if someone made a direct VRM import addon for S&box, as it's a game engine.
Anyway, to remove them, right-click the collection with a white box icon named "Colliders" and then click "Delete Hierarchy". And you might want to hide the armature to get a better view of your model in Blender. Just click the eye icon beside the camera icon of your model's armature.There we go, now. I can see the model in clear view. cough.. Lads, I don't like Vtubers. My friend gave me this VRM model for the tutorial 💀... Okay, so. This is how we import VRM.────────────────────────────────────────────────────────────────────────
📏 Scaling
Good work, now we can continue to use the script. But we will have to scale up/down our model to match the armature we have in the scene file. But, how much? It's very easy. The scale may be different depending on the model type. It seems like MMD and VRM models have the same scale. I'm not sure if it depends on the model author. FBX doesn't have a fixed scale. So, it can be random. For Source 1 formats. It'll be very huge compared to the reference armature given in the scene. But our goal is the same.
• Scaling the model
First, we'll only select our imported model's armature and its meshes. We'll see the differences between scaling for each format below. But, before that. I'll explain what we'll do. We'll scale down our model by selecting the model and its armature. Press "S" and move the cursor up/down depending on what we'll do. We can hold Shift while scaling for more precise scaling!
For Source 1. We'll scale the model down as it's very huge compared to the reference armature. For the others, it depends on your model's size. Most of the time, the model will be perfectly fitted or shorter.
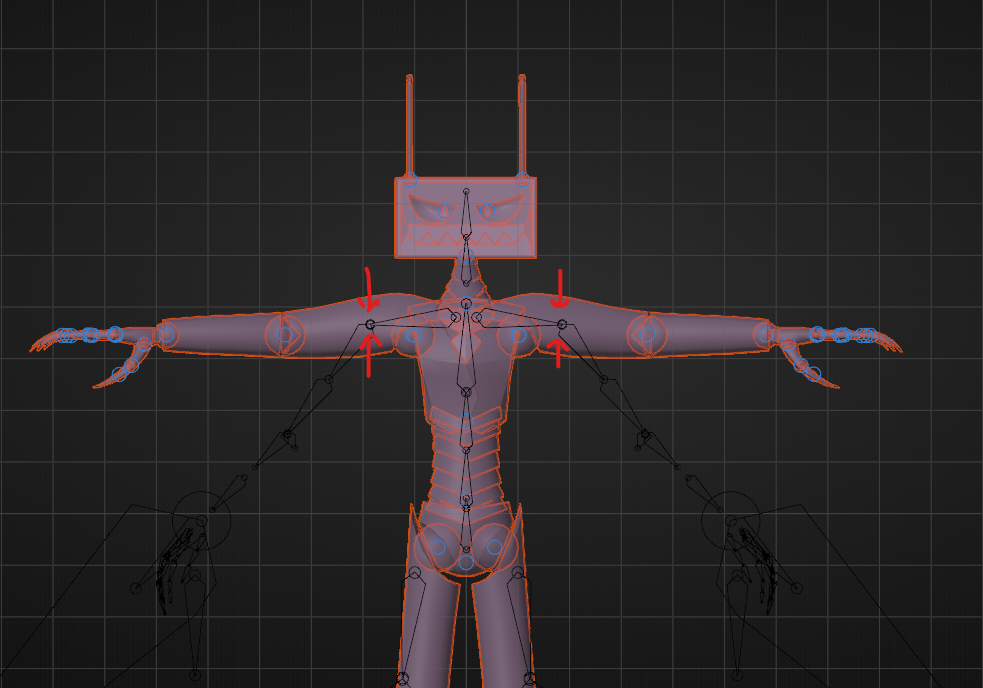
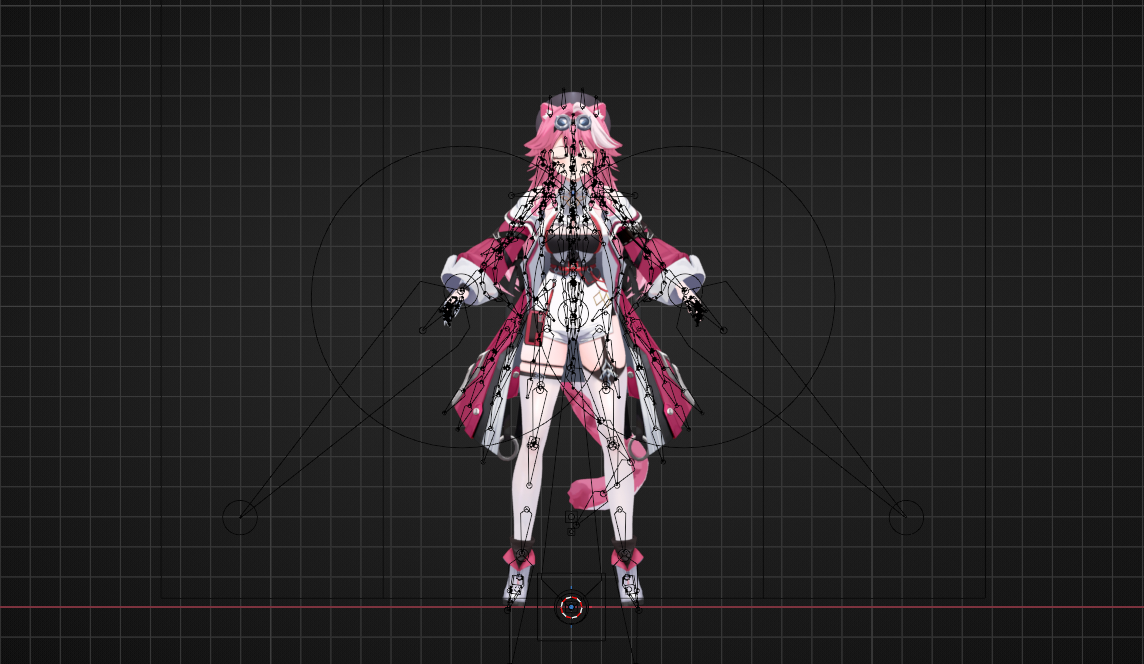
So, when we scale. We will keep our eyes on the shoulder/clavicle bones of the reference armature, and we'll scale down our model until our model's shoulder/clavicle is fitted to the reference armature shoulder/clavicle bone in the middle. Just like humans' bones are in the middle.Just like this. After it's fitted. We'll press "Ctrl + A" and click "All transforms". So, the scale will be applied. Now, have a look!.
• Source 1 model
As you can see, I scaled the model down until the model's shoulder is fitted with the reference's shoulder bones in the middle. Let's see how we can do for the other ones.
• Other models
For this VRM model. I only had to scale up a little bit to fit the shoulder in the middle. So, I hope you get the concept of what you're going to do. But what about very small models?
• Very small models
For very small models like this one. Just scale it up until it matches. We'll handle the size problem in the ModelDoc later.
So, that's all for scaling the model. We'll proceed to the next section :)
Just like good ol' Source 1. We'll have to rename the bones in the script to make the script work properly with our custom model's bones. For Source 1 models, you can just skip this section, as you might've already loaded the Source 1 version of the script. Which already has the correct bone mapping for your model.
For other models, scroll down to line 48. You'll see a bone mapping table for renaming your model. Let's start with the "Core" bones. We have seven bones for that. But, only five if you don't want the moving eyes.
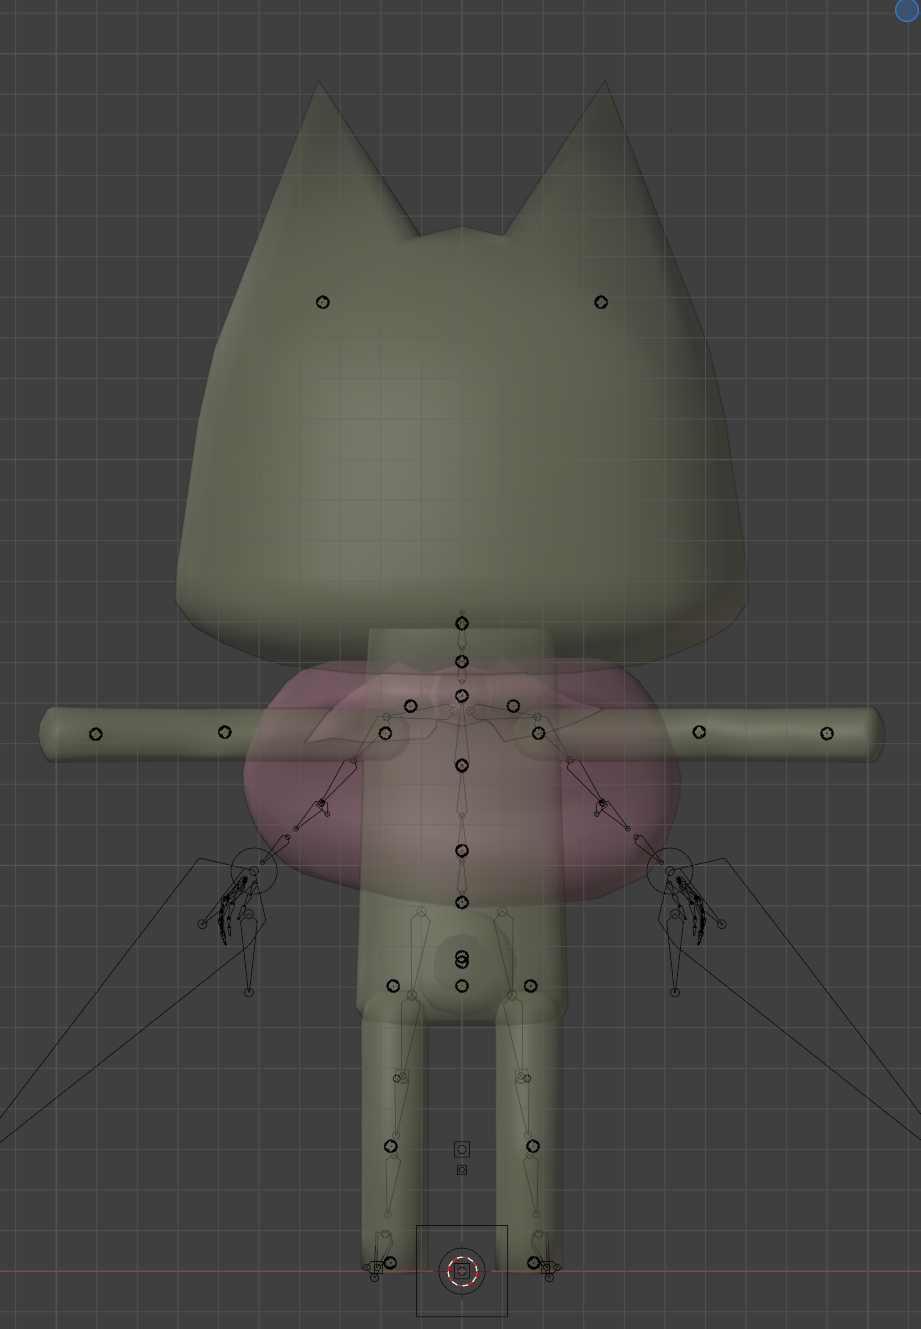
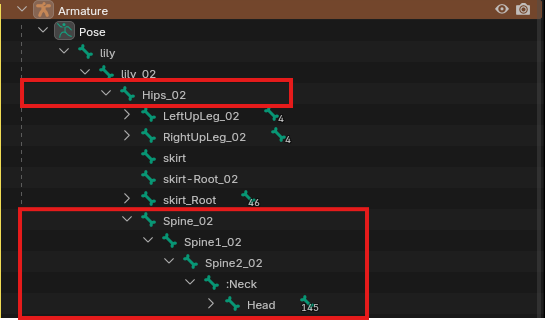
So, I already mapped a set of bone names to get you what bones you're going to find. Click the small arrow beside your model's armature. Find the "Hips" bone and then keep expanding it by clicking the small arrow beside it, and you'll see more bones. Find five bones which are Hips, Spine, Chest, Neck, and Head bones. Names may be different, but there are always the names of core bones at the end of the bone. See below.
So, I got six core bones instead of five because my model has three spine bones. It's better. Most of the models these days only have two spine bones. But we can still use the script, as the script will handle the third one even if your model doesn't have three spine bones.
By default, spine_2 one will be commented out. If your model has three spine bones. Remove the hash (#). To set our model's bones in the script. Double-click the bone name in the outliner and press "Ctrl + C" and then paste it in the correct place inside the script. Repeat the same for every core bone like that. After that, you'll see two eye bones. It's commented out because not every models has eye bones. If you found eye bones in your model. You can have your model's eyes animated, but you will need extra work later for that.
If you want. Remove the hashes (#) from the eye bone lines, copy the eye bones' names from your model, and paste them in the correct place in the script. and then go to line 38 and edit "false" to "true". So, the script will handle the eye bones.
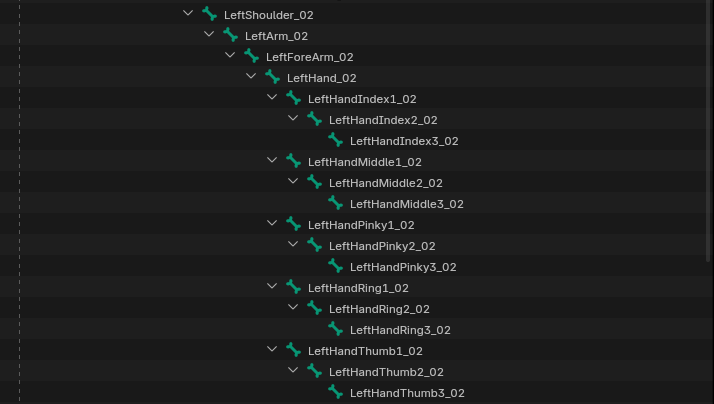
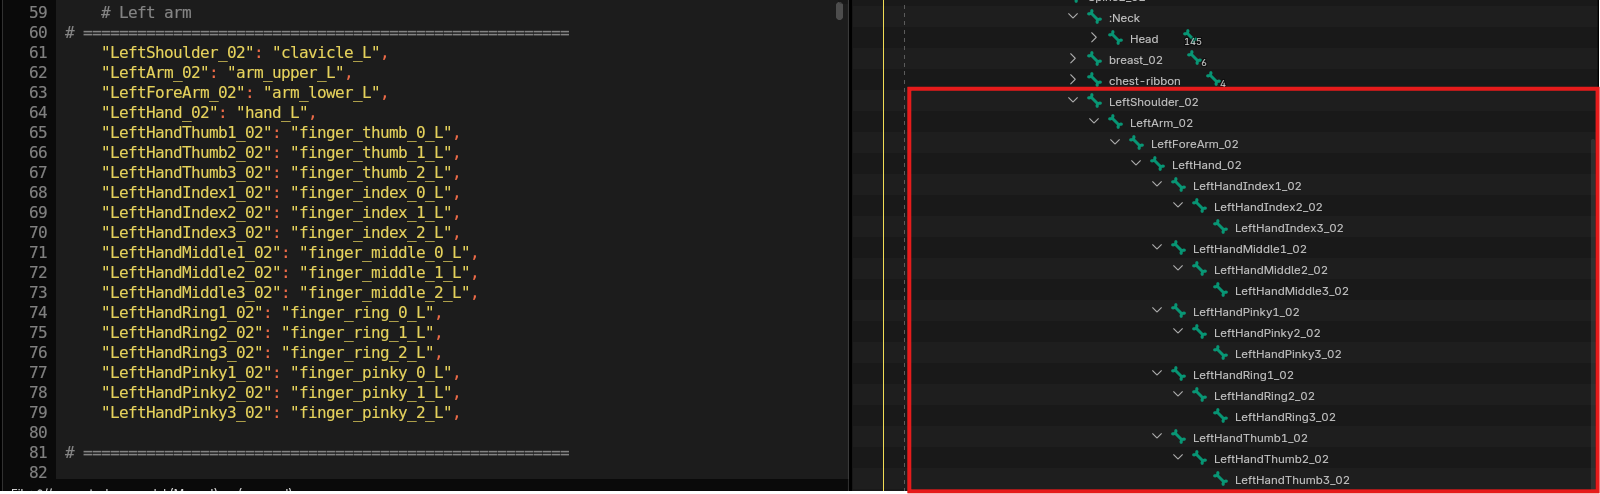
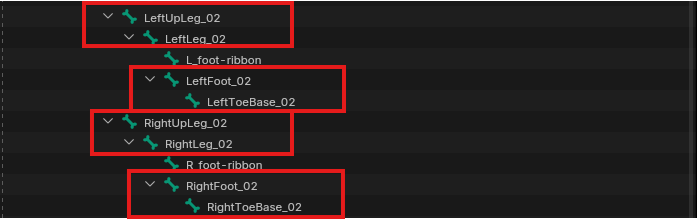
And then, we'll go for the "Left arm/Right arm" bones. For those bones, find the shoulder/clavicle bone in the outliner first. and then expand the bone structure until you find the finger bones. Here's what I need to find for my model. Names might be tricky, but no. It's actually not. Ignore the twist, helper, and extra bones! Just like before. We'll put them in the proper places inside the script like that. Do the same for the Right arm. If your model has "meta" bones in fingers. You'll also need to map them in the script. They're located at line 81 for the left side and at line 109 for the right side. They'll be commented out by default. Remove the hashes if you're going to use them and map your meta bones there. After that, scroll down in the script, and you'll see "Left leg/Right leg". Only four bones are in this section. You're going to find the "Upperleg/Thigh" bone in the outliner and then expand it until you find the toe bone. Ignore the twist, helper, and extra bones. We're done with setting up bone names for the script. Please proceed to the next section. Will ya? ────────────────────────────────────────────────────────────────────────
😶 Shapekeys Cleanup
Unlike my Gmod one, we won't talk much about shapekeys, as S&box seems to have a very high shapekey/morph limit. I don't know the exact limit. But I recommend keeping it under 700. You shouldn’t worry about this unless your model is a very customizable model with hundreds of shapekeys..
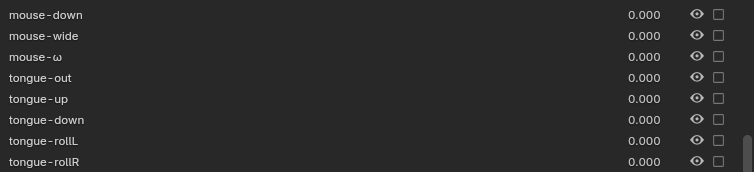
Anyway, we should check some stuff about shapekeys before getting our model into ModelDoc. It seems to be more strict than the StudioMDL from Source 1. It doesn't allow special symbols in the shapekey names and seems to break the shapekey/morph with spaces in the name. So, we have to do some preparation for that.
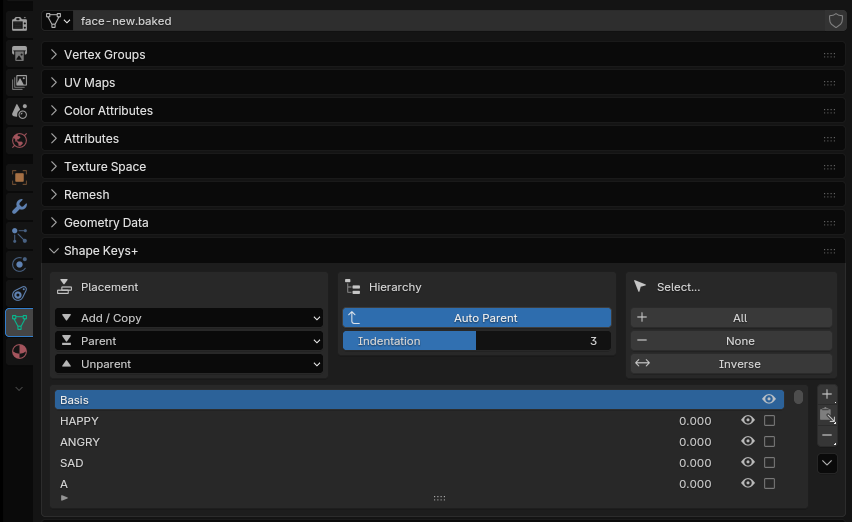
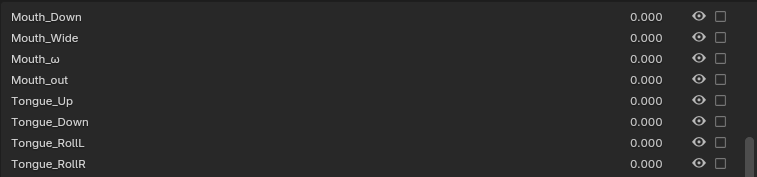
This is very simple. First, you will have to click the "Data" tab with a green triangle. Scroll down a bit, and you'll see your model's shapekeys there.And then, you're going to remove spaces & special characters from the names. Double-click the shapekey's name and then replace spaces with underscores( _ ). And, just give a name for the special character ones. Example as Mouth ω. I'll just rename it to Mouth_Cat for that. Here's how I do. It's kinda funny, but I'm going to hate ModelDoc a lot for that. Keep doing that for all shapekeys until all of them are renamed properly. That's all for this section. There's nothing special for this section. ────────────────────────────────────────────────────────────────────────
📜 Convert script
This section will be very short. I just want you to double-check the bone names, the size scale, and the shapekey names if everything is okay. Having a typo in the bone name mapping will destroy the pose! So, make sure you double-check :)
We'll save the file as a backup before running the script. Press Ctrl + Alt + S to save the file as incremental. So, it won't overwrite the original scene file. After that, let's run the script.
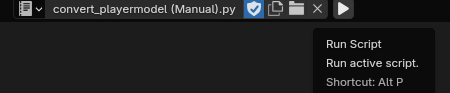
• Running the script
It's very simple. Click the "▶" at the top to run the script or you can hover your cursor into the scripting tab and press "Alt + P.Wait a bit, and it'll do everything to make the model compatible with S&box citizen's rig. Here's what it does.
Get the armatures and meshes from the Input collection
Handle the different number of possible spine bones
Rename the input armature's bones and vertex groups to Human Citizen bones and vertex groups
Create metacarpal bones in the input armature
Create missing joint helper bones in the input armature
Create twist bones in arms and legs in the input armature
Create any missing bones in the Human Citizen armature
Move the Human Citizen armature's bones to match the Input armature in edit mode
Move the Input meshes to the Human Citizen armature
Weight paint the metacarpals in the Human Citizen armature
Pose the Human Citizen armature to match the reference armature shape
Realign miscellaneous bones in the Human Citizen armature
Export the Human Citizen armature and meshes
Cleanup
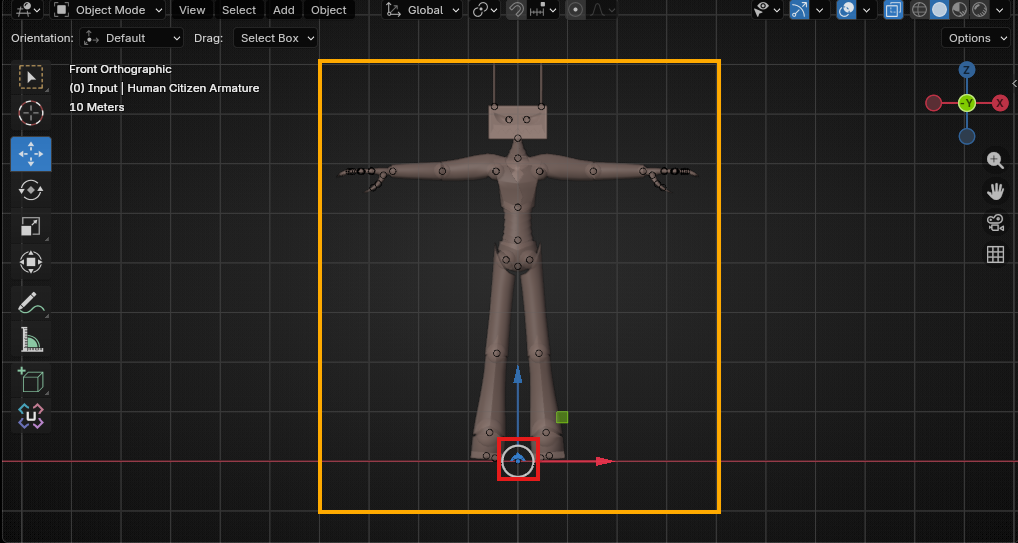
Yes, it'll pose your model into A-pose after the process because the reference armature is posed in A-pose. As you can see, my model is now ready and compatible with S&box armature. That's all. and it'll export a FBX file into the file where the script file is located. We're done with the Phase 1, where we prepare our model.
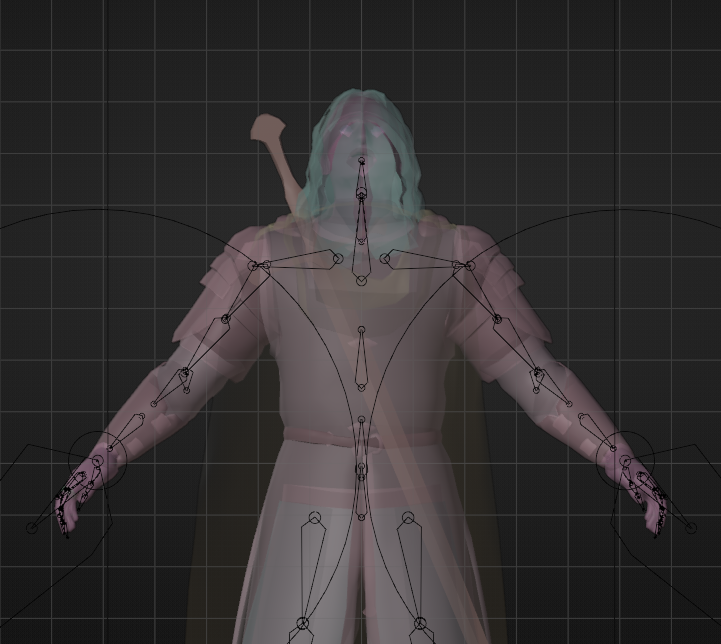
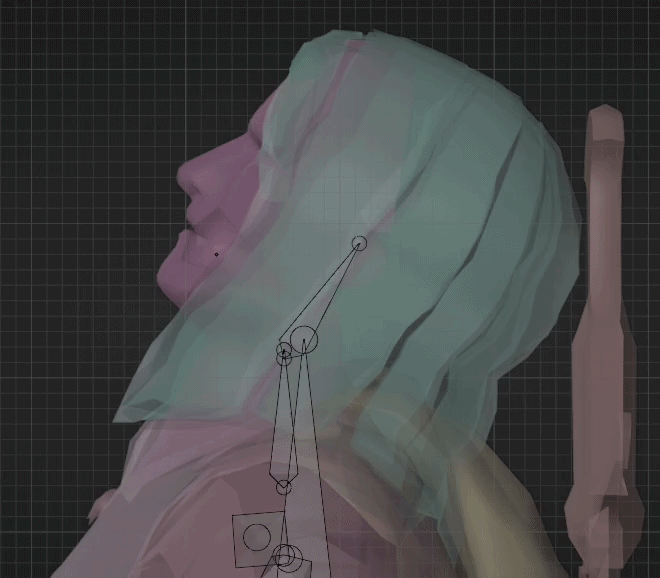
• Fixing the head pose [Optional]
But, sometimes. your model's head might be a little bit off. We can fix it easily by using this addon. Install it. As I said above. This addon has many useful features including applying pose without having to do many crazy stuff.
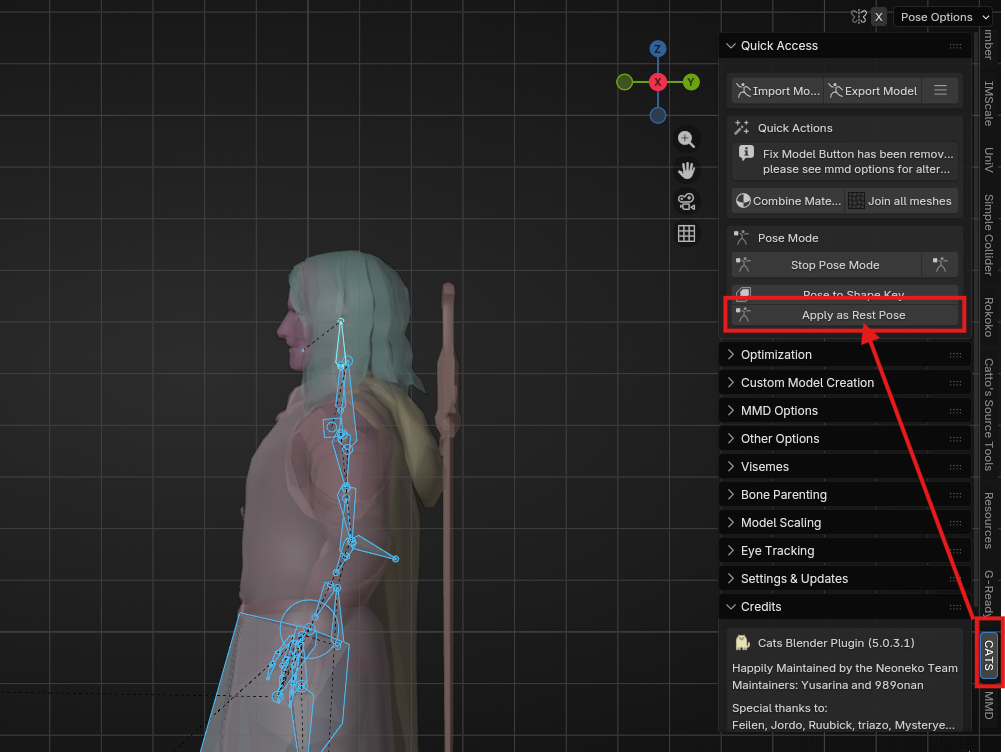
So, as you can see here. We have a problem like this and I'll show you how to fix it.We will need a better view. Press "Num 3" from your keyboard's numpad. It'll rotate your camera to a viewpoint where you can see the neck bone clearly to pose it correctly. So, First step is to select the model's head bone. Press "Ctrl + Tab" to switch to "Pose Mode". And then, rotate it until it looks okay.After that, Click the "CATS" from the sidebar. Make sure you installed and enabled the addon! And there'll be many categories. But, the one we'll use is very obvious. It's in "Pose Mode". You can see a button called "Apply as Rest Pose".Click it and you're done. It'll apply the armature pose we just posed without having to do the tedious process where you have to apply armature modifiers first, Apply the pose and re-add armature modifiers.
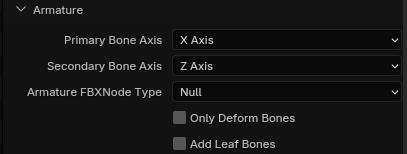
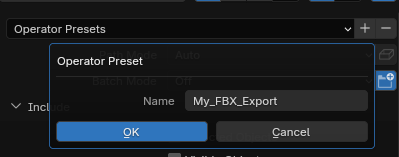
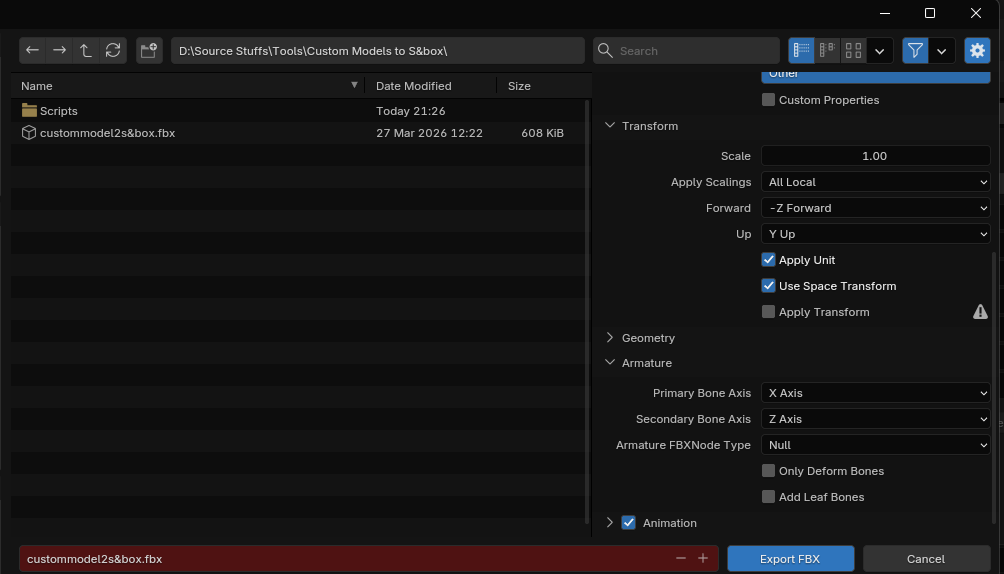
And then, you'll have to export your model as FBX in a correct settings. What you have to do is click "Files" and then hover on "Export" and then click "FBX (.fbx)".When export window pops up. Look to the right where the settings for your export are located. You'll have to adjust some settings. Firstly, click the "Armature" and then you'll see armature settings. Click "Primary Bone Axis" and set it to "X" from "Y". And then, click "Secondary Bone Axis" to "Z" from "X". Lastly, untick "Add leaf bones" to avoid adding extra end bones. Here's the correct settings you should see.After that, you might want to save it as a preset. So, you don't have to redo the thing when you export another model. Scroll up in the settings. You'll see two small buttons beside "Operator Presets". Click the plus button. Give it a name and then click "OK".And then select the path into the same folder where your firstly exported "FBX" is located. Remember that the convert script does the export automatically when you run it. You're going to overwrite the exported one with your current fixed one. And then, click "Export FBX".That'd be all for this section and phase 1.──────────────────────────────────────────────────────────────────────── ────────────────────────────────────────────────────────────────────────
📑 ModelDoc Setup
Welcome from Phase 2. We'll be going to import our model. So, open "S&box editor" and open a project or create one if you want to work on a fresh project. I'll work on my own one. We'll wait until the project is launched.
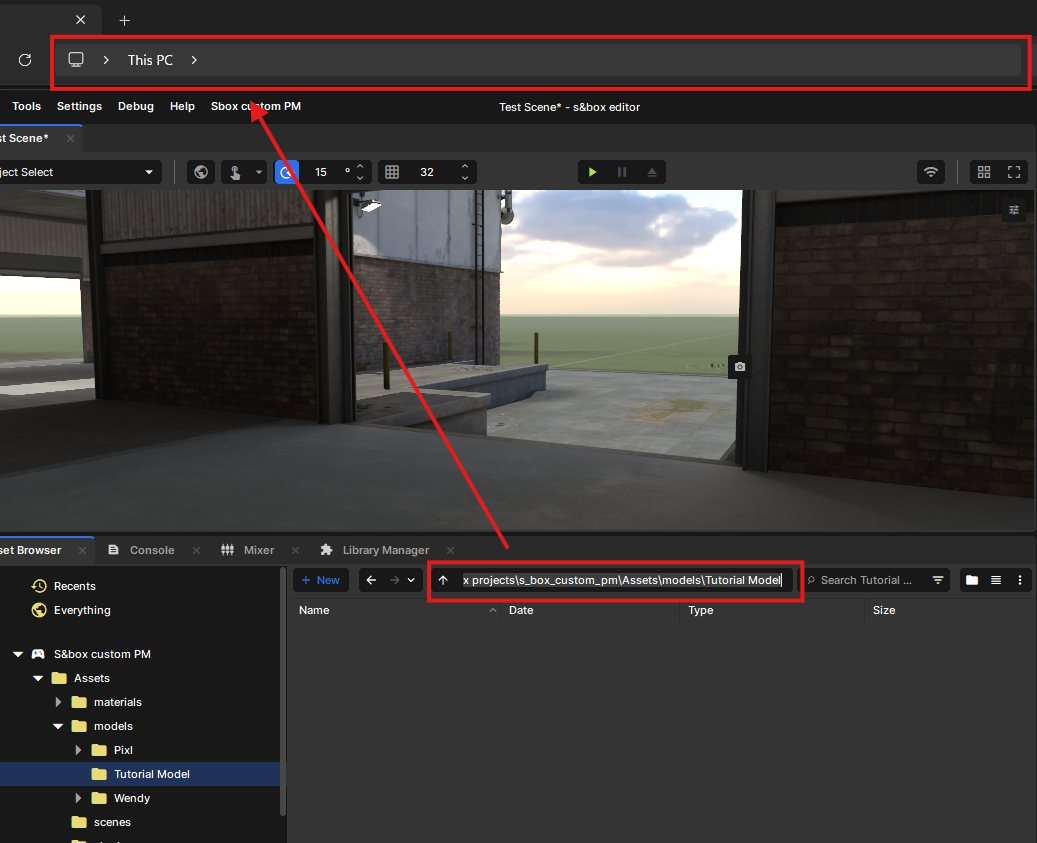
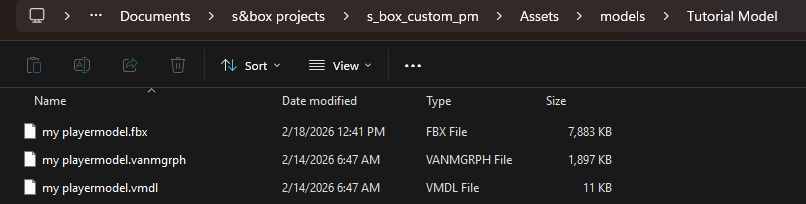
When you're in, click "Assets folder from the "Asset browser". and then, click "New". click "Folder". Name it "models". And, create another folder and name it whatever you like for your model folder. I'll just name it "Tutorial Model" for my model's folder.Alright, after that, we'll return to the folder where our custom model's FBX file is located. When you're in. Rename the FBX, VMDL, and Vanmgrph to your model's name or anything you want. I'll just name it "My playermodel". And then, go back to the editor. Click the file path box, and then it'll select the entire path to your model folder. Press "Ctrl + C" and open another file explorer. Paste the path in the path box, and it'll open the model folder in your file explorer. Copy your FBX, VMDL, Vanmgrph files into that folder. Don't cut them. especially the VMDL and Vanmgrph. They serve as base files for your model. So, you can use them when you port more models.
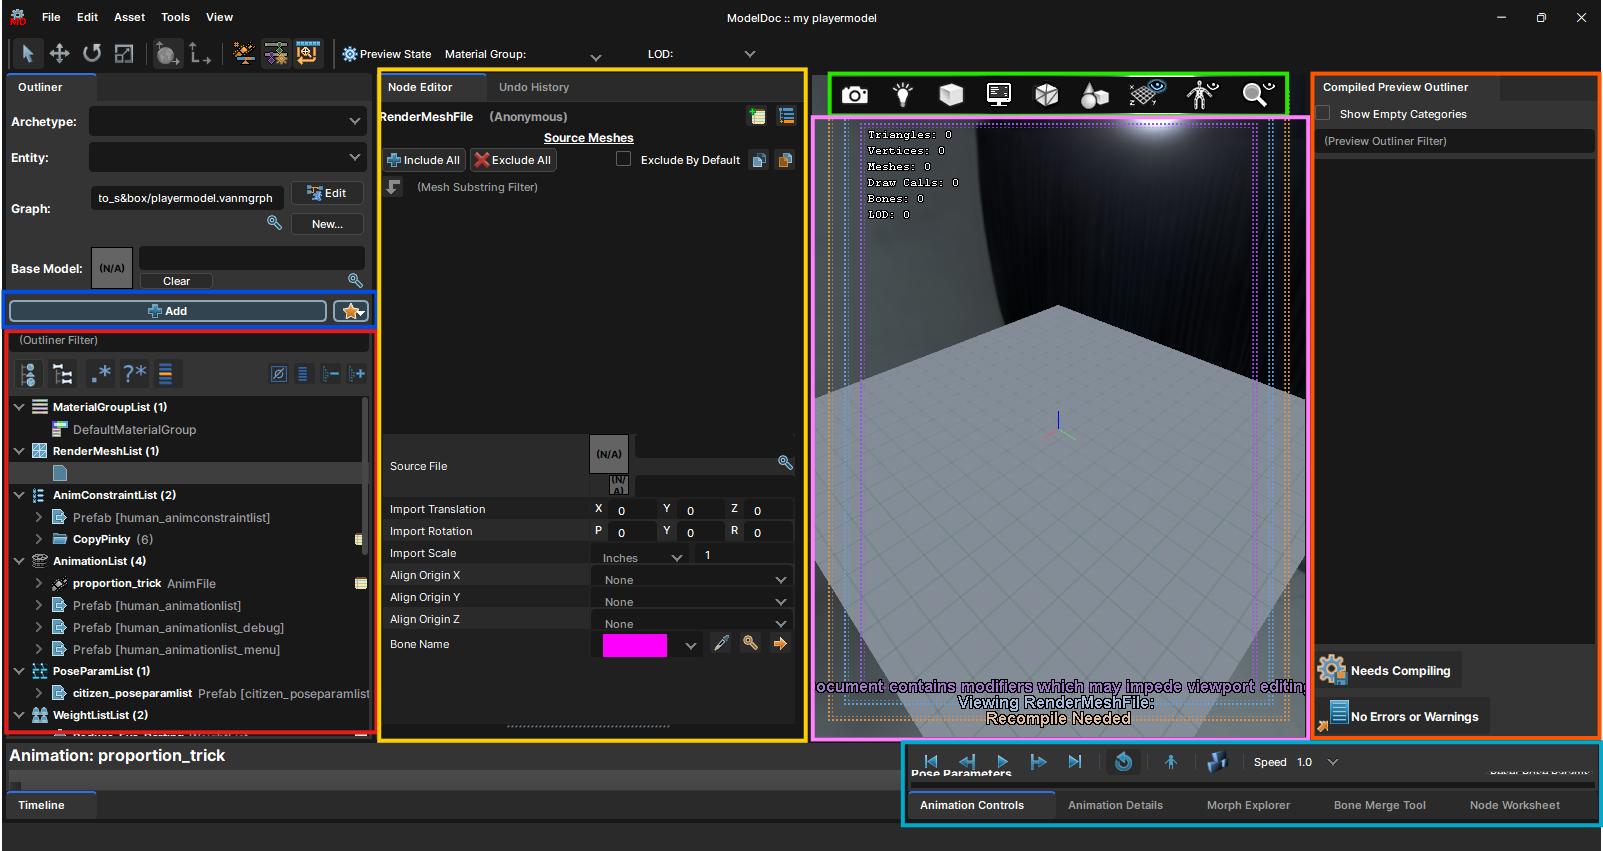
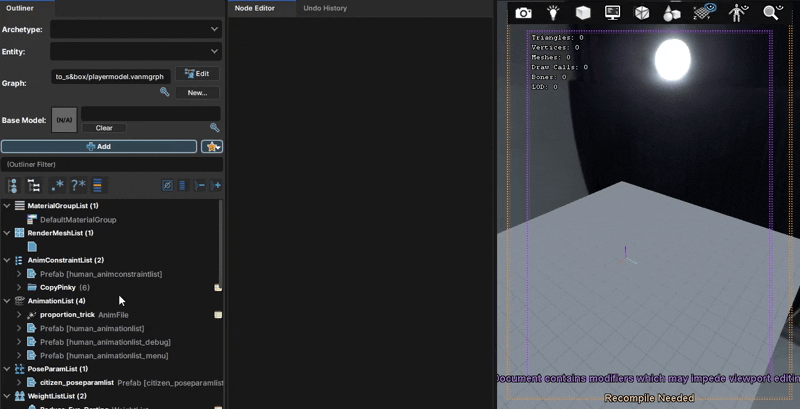
After that, you'll see your model files in the editor. What you have to do is open the VMDL by clicking it. And ModelDoc will open. In this guide, I won't be teaching you to use the ModelDoc until I master it myself, and the tool is most likely going to be replaced sooner. But I'll give you a quick rundown to get you comfortable with the tool.
Red area : Where you can see and select to edit the nodes of the model. - If you're a modder from Source 1. Just think of it like QC commands. We use nodes in S2 instead of writing commands.
Blue area : Where you can add nodes for your model. - For this one. I recommend that you click each node and read what it does. You can click the "Star" for quick access to the most used nodes.
Yellow area ; Where you can edit the nodes. - When you select one node from the outliner. You'll be able to edit the node's properties there by adjusting, providing files, and more.
Green area : Where you can edit "View Settings, Lighting Mode, Visualization Mode, HUD settings, Mesh Display, Component Display and more.. - Just mess around with it if needed. It's just for the viewport anyway.
Purple area : Where you can preview your model, and is also called "Viewport". - Hold "RMB" while your cursor is in the viewport to move around. And, you can also hold "Ctrl + RMB" to rotate the model when you want to preview the lighting from different angles.
Orange area : Where you can see your compiled model's bones, meshes, and more listed in there. - Nothing special.
Cyan area : Where you can control animations, morphs, and more. - You will need to pull the edge of that window to see the full view of the area. When you wanna preview the morphs. Click "Enable Manual Slider Control", and you'll be able to edit and preview your shapekeys.
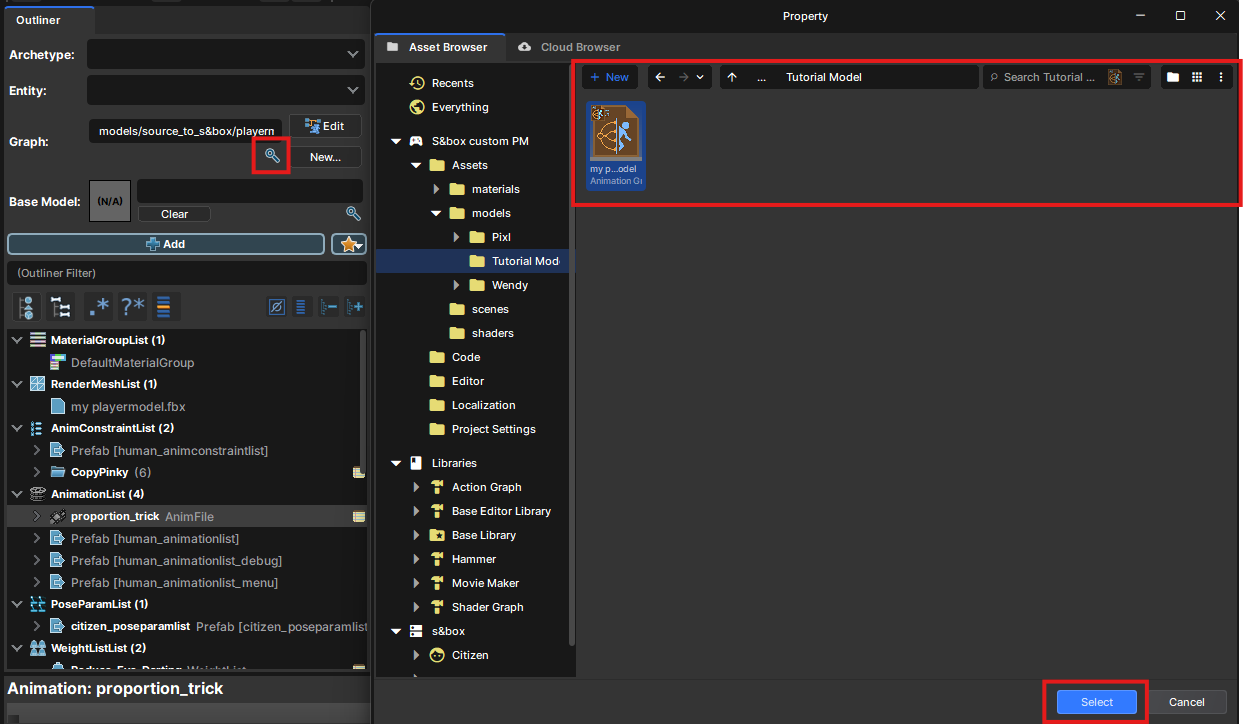
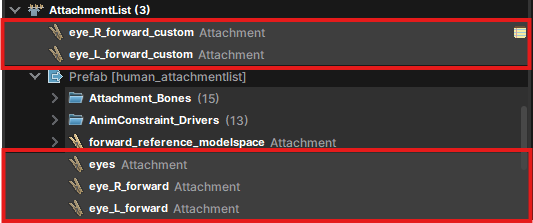
Anyway, we're done with the quick rundown. Let's continue. First thing you have to do is click the small blue sheet icon under "RenderMeshList". And there'll be many properties, but you'll see "Source File". Click the small magnifying glass icon to open the local browser. Browse into the "models" folder and your model's folder, and then open your model's FBX file.Your model will show up without any textures. We got red missing textures in S2. And then, if you look a little bit lower. You'll see "proportion_trick" in the "AnimationList". Click it and open your model's FBX there by doing the same thing you did to import your model's FBX.One last thing, if you look up. You'll see "Graph" with a "Vanmgrph" imported. But we'll have to import ours there. Click the small magnifying glass icon below the box and then open the "Vanmgrph" file of your model or the model won't have any playermodel animations!After that, last thing we want to do is to disable eye attachments if our model doesn't use eye bones. Or, warnings will show up in the compile log and console. You're going to find the "AttachmentLists". Click the dropdown and then you'll see "Prefab [....]". Click the dropdown of that too. After that, you'll have to disable five nodes shown below. Hold "Ctrl" and click all five. Right-click and click "Disable".And that's all for this section. We'll set up materials and textures for your model in the next section. ────────────────────────────────────────────────────────────────────────
🎨 Material Setup
Alright, we don't want our model without any textures. In S&box. Might be weird but your model won't work properly without having materials assigned. But, It's very easy to set them up. I'd say it's much easier than Source 1.
• Material Editor
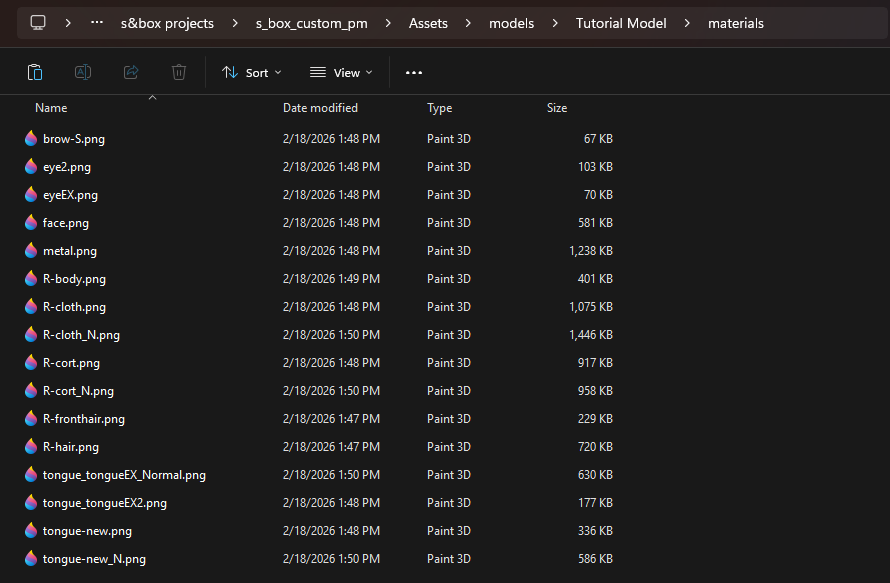
So, the first thing to do is create another folder inside your model's folder. Name it "materials" or something. You don't need to do this, but staying organized is a good habit. And, copy all of your model's texture files into that folder. Texture files will show up in the editor. After that, you will have to right-click a texture and click "Create Material". It'll ask you where you want to save your material file, but just click "Save" as it'll point to your material folder by default. You can have a name for your material, too. But I'll leave it as it is.Wait!. For the models with "PBR" textures. You can add prefixes at the end of the normal map and other masks' names to set them up automatically for you. See : https://sbox.game/dev/doc/assets/naming-conventionsSo, you can rename the end prefixes of your PBR textures to set them up automatically by the "Material Editor" when you create a material of the color texture. If you're lazy. You can also set them up in the editor later.
Anyway, you gotta have to repeat and keep creating the materials for every texture except for "Normal maps and mask textures" or any textures that serve as secondary texture. After that, we'll need to edit our material as necessary. For example, a texture that needs an alpha mask to work properly.
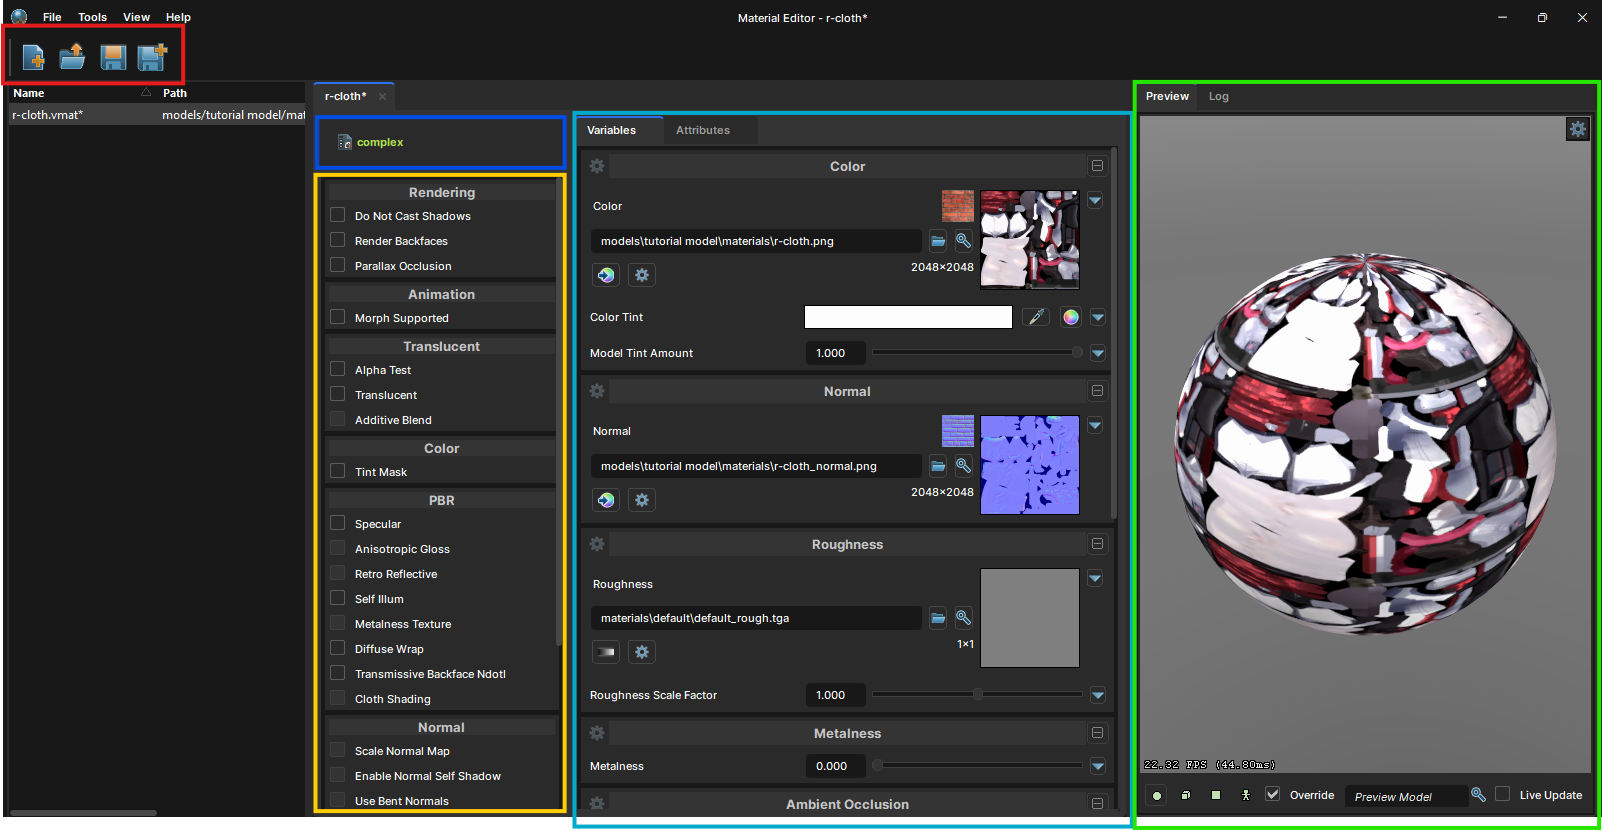
Open the "VMAT" of the texture that needs to be edited. "Material Editor" will be opened. I'll give you a quick rundown to get you comfortable with the tool.
Red area : Where you can create a new material, open an existing material through the material browser, save the material, and lastly, save all the materials. - Create a new material : "Ctrl + N" - Open a material file from the material browser : "Ctrl + O" - Open a material file from the file browser : "Ctrl + Shift + O" - Save current material : "Ctrl + S" - Save all edited materials : "Ctrl + Shift + S"
Blue area : Where you can select shaders through local or cloud. - By default, it'll always be "Complex" shader. For simple materials, you can also use "Generic" or "Simple" for simple PBR and many more.
Yellow area : Where you can turn on/off features of the shader you're using. - Features can be different depending on the shader, and some features can't be used together. You just need to tick the ones you want to use and provide the textures, or have to adjust what is needed.
Cyan area : Where you can adjust the settings and textures of the shader. - You can open/import textures and adjust settings for what is needed there. The magnifying glass icon buttons or folder icon buttons can be clicked to import textures through the texture browser or file browser.
Green area : Where you can preview the material you're editing. You can hold "RMB" while your cursor is in the viewport to move the camera around. You can also switch between "Sphere, Cube, Plane, or Model" to preview your material. Untick "Overwrite" if viewing as a model is preferred.
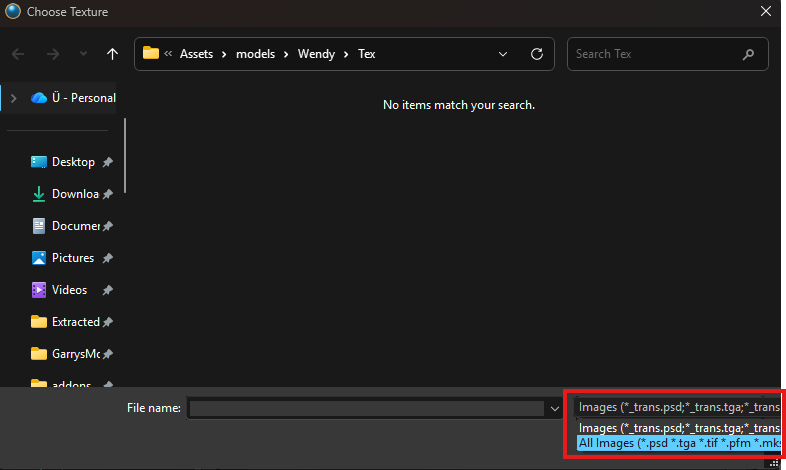
For editing the material. Here's what you need to know for editing. When finding the opening in the mask/texture file. Change "Images" to "All Images" every time you import a mask texture. Therefore, it'll display all mask textures without prefixes.And here are some guides about using mask textures.
If you want to use an alpha mask : Tick "Alpha Test" or "Translucent". A new option called "Translucent" will show up. You can click the folder icon to find your alpha mask.
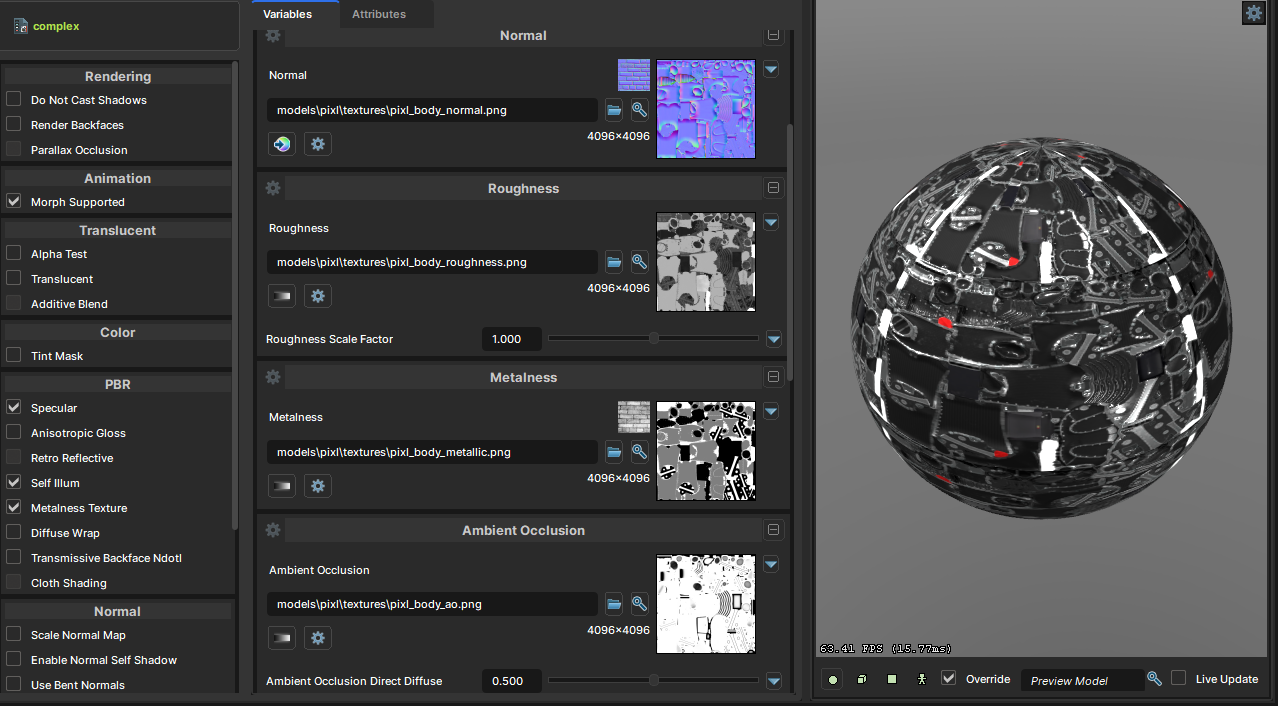
If you want to use PBR : Tick "Specular" from the "PBR" for PBR specular lighting. Also, tick "Metalness Texture" to use Metalness map".
If you want to use an emissive mask : Tick "Selfillum" and a new option called "Selfillum" will show up. Import your emissive mask and adjust settings if needed.
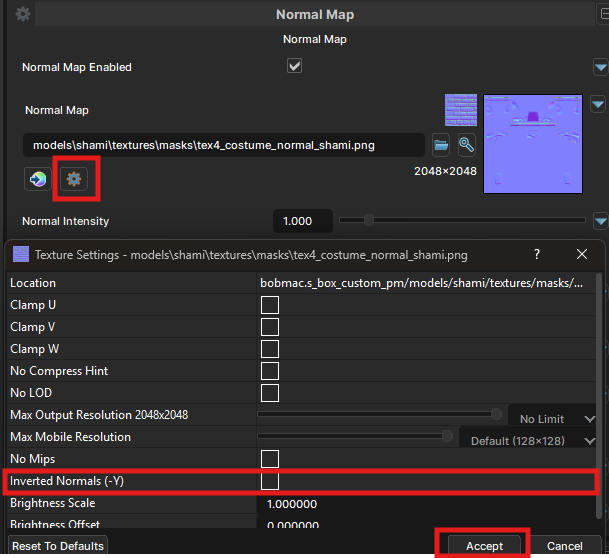
You just have to mess around for others as well. And you'll know how it works. Here's an example material setup.When you edited the material. Press "Ctrl + S" to save the material. For Source 1 models with normal/bump maps. Source 1 use DirectX format for them which means you'll have to flip the Y-channel in S&box as it needs OpenGL format for normal/bump maps.
Luckily, the material editor has a feature you can use in the editor. Which can be found by clicking the "Gear" icon beside the color ball icon button. In there, tick Inverted Normals (-Y) and click Accept. Which'll flip the Y-channel to make the normal map compatible with S&box. OpenGL format is used in many modern engines. So, that's an extra step for converting from old engines to a modern one.
• Setting up Materials
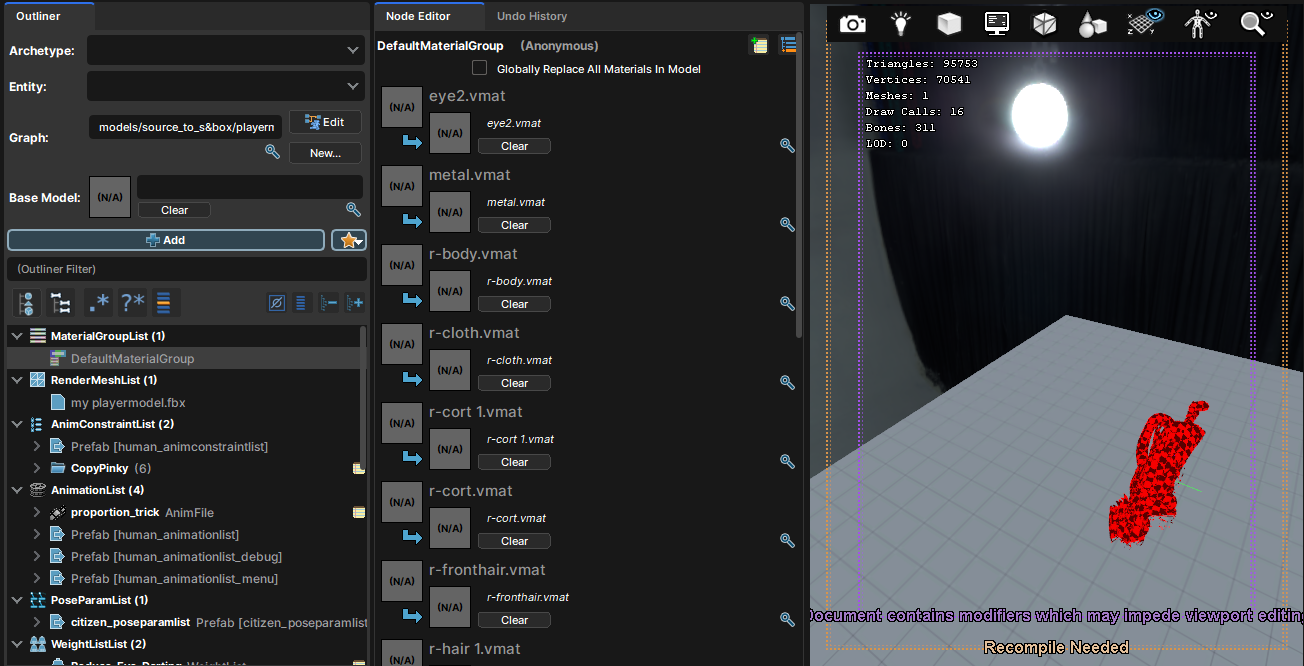
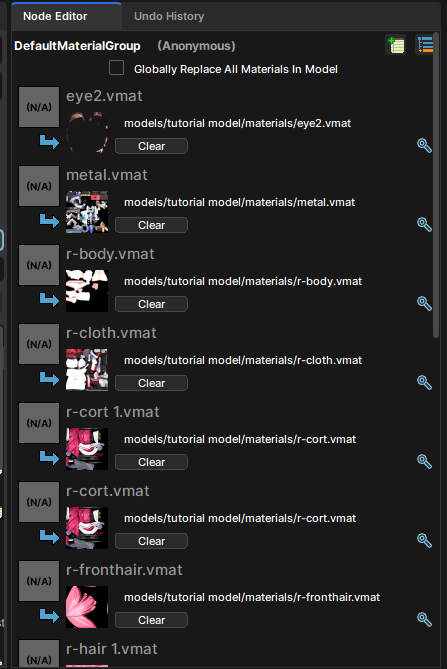
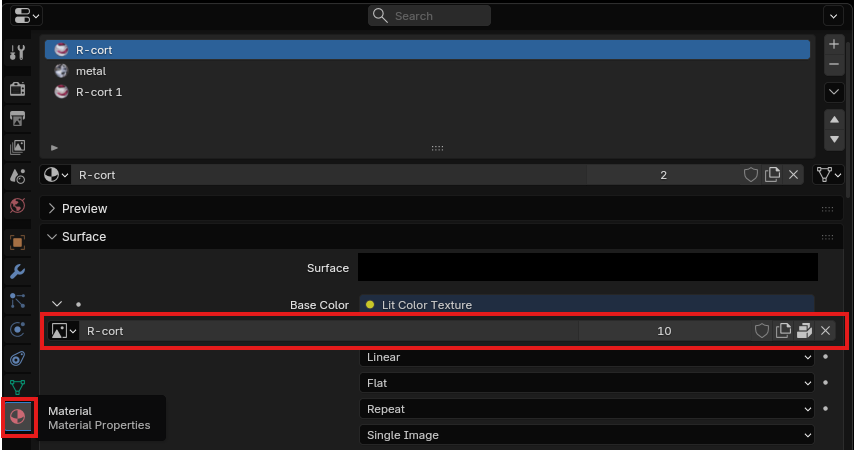
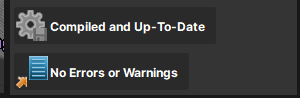
We're done with the materials. So, we'll go back to the "ModelDoc". You'll see "MaterialGroupList". Click the "DefaultMaterialGroup". Make sure "Globally Replace All Materials In Model" is unticked. It'll be unticked, but untick it if it's ticked. And, you'll see the list of materials used in your model. We just need to open the material file for each one. Don't mind about my model lying down on the ground in the viewport.This part is very easy peasy. Just click the magnifying glass icon for each material and open your material files (VMAT) for each material slot. See how it did below.That's it. You just need to assign each material to its correct place. If you don't know which one should be used for which one. Check inside "Blender" for that. Click the "Materials" tab, select one material, and you'll see the imported texture files for the material.After all, press "Needs Compiling" and it'll compile your model, or you can also press "F9". But, make sure you imported the correct files, including the "anmgrph" or the animations won't work. Wait a few good seconds and stalls.When it says "Compiled and Up-To-Date", your model will be compiled as a usable playermodel.────────────────────────────────────────────────────────────────────────
👶 Size Adjustment
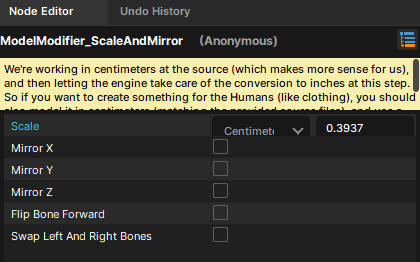
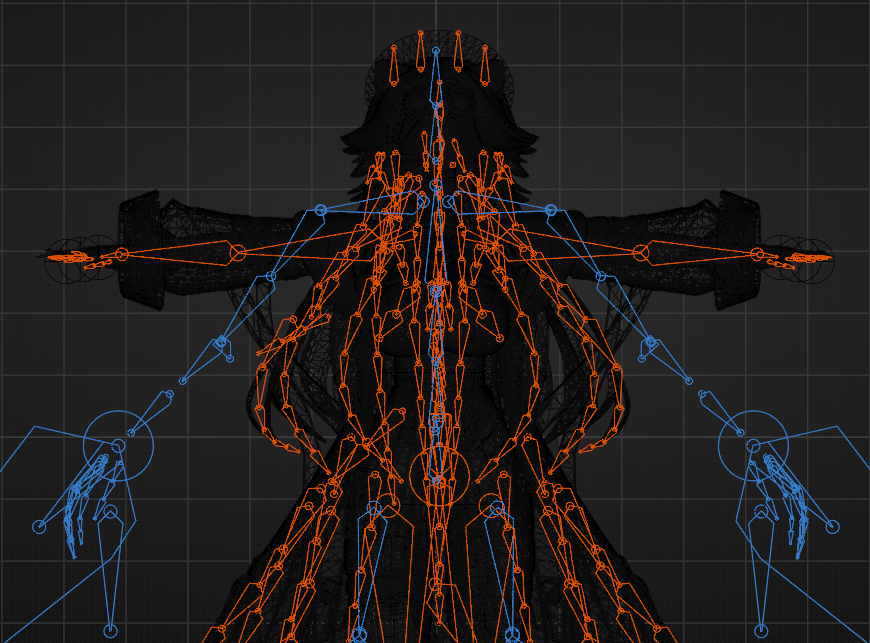
I know you were forced to scale down/up your model depending on your model to fit the reference armature in the script part. But we can fix it just by adjusting some values and calculations.
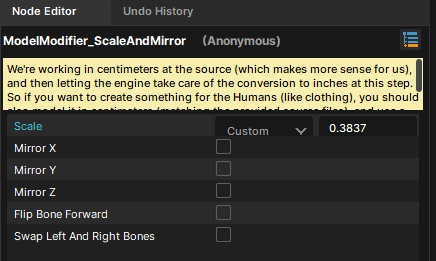
First, open your "VMDL" or if you're still in the "ModelDoc". Scroll down a bit in the node outliner, and you'll see "ModelModifierList" with a node called "ScaleAndMirror". And you'll see a value "Scale". Let's just say your model is 1/4 of the reference armature's size. Then, we'll calculate the size by dividing "0.3937" with "4". So, we get "0.0984". Then we will type in the calculated value in the box and compile the model again. We'll have to eyeball it until it looks correct for this until I find a correct solution. For my model. It's just a little bit shorter than the reference armature. So, I'll just use "0.3837". For your model, open the Blender scene file again, import your model, and compare it. After that, compile the model to see the changes. If you're not satisfied. Keep messing with the values until the size looks good for you. ────────────────────────────────────────────────────────────────────────
👕 Adding Bodygroups [Optional]
In this section, we'll add bodygroups for our model. It's simple and easy. We only need to mess around in the "ModelDoc" for that. I'll guide you the way.
Adding bodygroups is very easy to do as well. But I learned to add them while writing this right here. It was fast to learn tho. Let's see.
First. Make sure you're in the "ModelDoc". Alright, You're in. So, if we want to make bodygroups. We also need to have them separated renderMesh. But, as we know. Our FBX is imported as one single file for all, and we don't have time to separate them inside Blender.
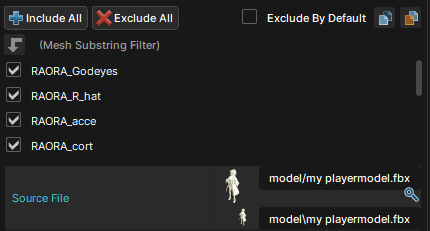
Luckily, we have a trick to deal with it without having to mess with Blender. Click your imported rendermesh in the "RenderMeshList". And, you'll see your model's parts being ticked.What we have to do is. Duplicate our rendermesh for the number of bodygroups we need. We'll keep one static. So, let me elaborate on our plan.
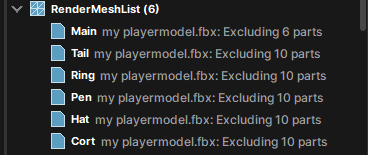
We'll duplicate our rendermesh by selecting it in the node outliner and pressing "Ctrl + D". And, we'll untick the parts we want as bodygroup in the first rendermesh and leave the parts we don't want as a bodygroup, such as face, hair, body parts, and some more.
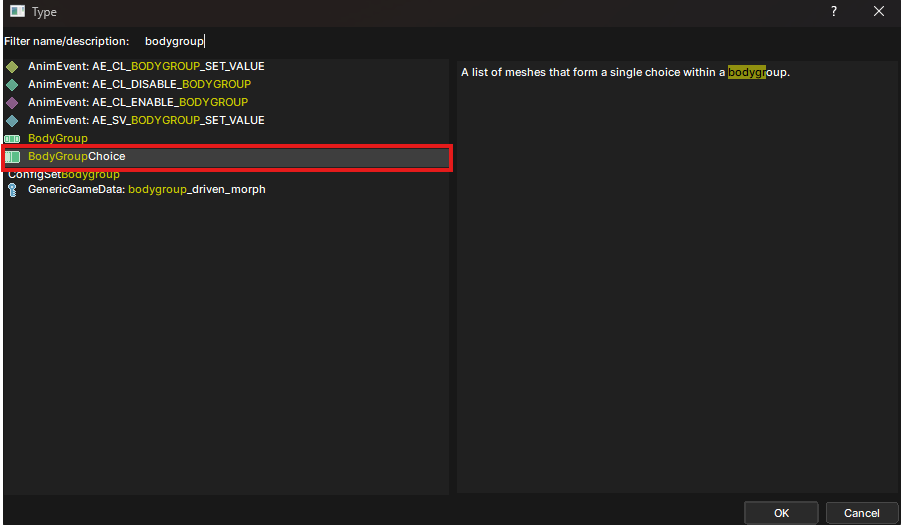
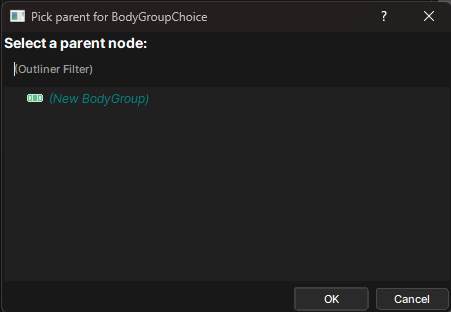
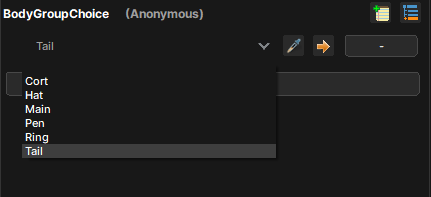
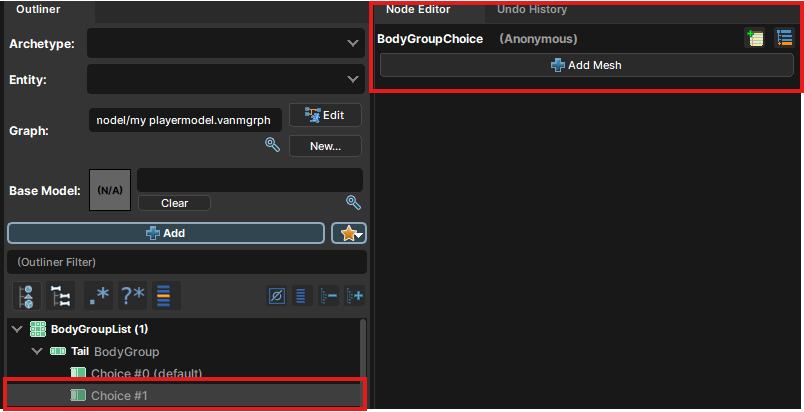
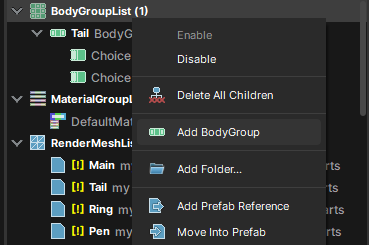
In the second one. We'll untick the ones from the first rendermesh and only tick what we want to have as a bodygroup part. And then, duplicate the second rendermesh as we need to make more bodygroups. We can also rename the rendermesh by pressing "F2" while the node is selected. See below. Just like that, I separated the tail part as a separate rendermesh without having to use Blender. We'll do it for many meshes we need for bodygroups. This is how I did. It's simple if you understand. Leave the first rendermesh with the main parts we don't want as bodygroups, and duplicate the rendermesh for the parts we want as bodygroups. After that, compile the model again. So, our separated meshes will be compiled to set up and use as bodygroup later.After that, we'll add a node called "Bodygroup". Click "Add" and type in "Bodygroup" and click "BodygroupChoice" instead. So, we can skip the part of creating the parent node.And, click it. It'll ask you where the bodygroup choice should be created. We don't have any parent bodygroup node. So, click "(New BodyGroup)". Type in a name for your bodygroup without spaces. Use underscores instead of spaces if you need. Click "OK" and a bodygroup will be created. I'll do a bodygroup for the tail. So, I'll name it "Tail". When it's created. Click "Choice #0 (default)" and click "Add mesh" in the node editor, and click the small dropdown arrow to select the meshes we separated. You can select one and then add more if you need. After you added a mesh or more than two for a slot. Right-click the "Bodygroup" node with the name you gave and click "Add BodyGroupChoice". And leave it empty to make an empty group, which will make the mesh be able to toggle off when you select the second choice. Just like how bodygroups in Source/Gmod do.Keep in mind that you can also make switchable bodygroups by adding many choices with different types of meshes. Example as "Hat_01, Hat_02, Hat_03", etc.. Having an empty group is optional too!. So, you just need to know how the bodygroups can work with, and it'll be very fun and useful to work with!
Anyway, when you want to create a new bodygroup. Right-click "BodyGroupList" and click "Add BodyGroup". And, you'll be able to do another one for other meshes. Keep repeating until you have added bodygroups for all the meshes you want as toggleable,
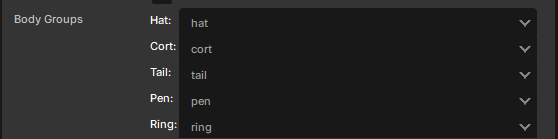
Compile your model again, and the bodygroups will show up when you use your model in the scene editor. That's all for this section.────────────────────────────────────────────────────────────────────────
👁️ Moving Eyes [Optional]
Alright, you want extra work. Let's work then. For this section. It's still optional even if you had "EYES_ENABLED" as true. It's not very noticeable unless you look closer. We'll do some adjustments if needed, but I've adjusted the thing as best as I could. But, might need adjustments depending on your model's eye size and bones.
• Attachment adjustments
As long as your model has eye bones and is set up in the script. The eyes should be working. But, there's a chance it might've messed up. For that, you'll have to fix it by adjusting values.
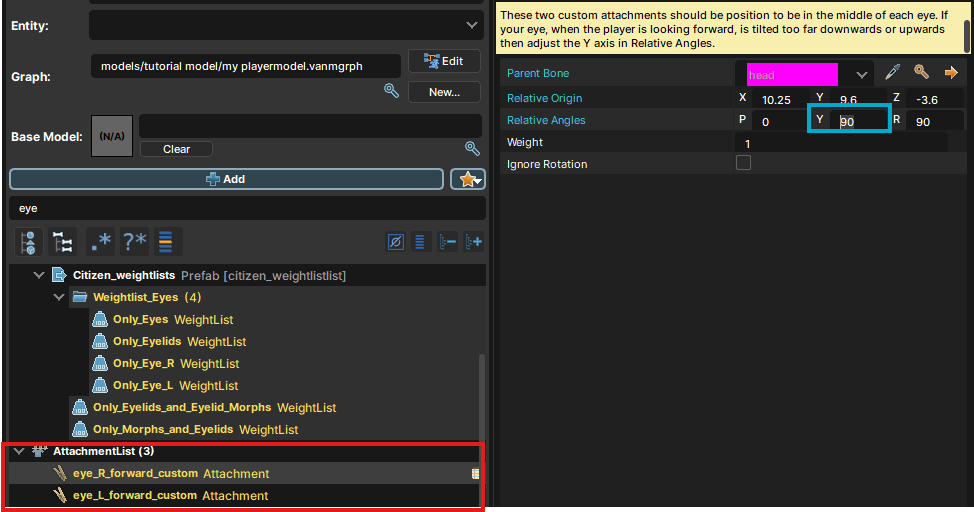
The first thing is fixing the eyes to face forward correctly. Your model's eyes might not be facing the foward correctly. To fix that. Open your "VMDL" to open it in the "ModelDoc". Scroll down in the node outliner and find "AttachmentList". You'll see two attachments below it.
Select each ones and you'll have to edit the Y value in "Relative Angles" in the node editor. By default. It should be "90", which works best for me. If your model is having a problem with that value. Try decreasing or increasing the value of the value and compile the model again.There's also a note saying about that. So, I hope you understood that. After that, for models with big eyes. You'll have to adjust the "Reduce_Eye_Darting" weightlist. You'll find it under "WeightListList". Select it and adjust the slider values of "eye_L and "eye_R"I haven't ported any models with big eyes or gotten problem with it. So, I can't tell what's good for you. My model is fine with how it is. Here's the note for that.
"Some models have their eye bone far behind the eye, so the pivot angle is greater than the human citizen model, which has the eye bone in the center of the eye. Adjust the eye_R and eye_L sliders below to adjust how much to reduce the animation by. The default is 75%, meaning that the animation is 25% of what it normally is."
• Adjusting Eye Movement
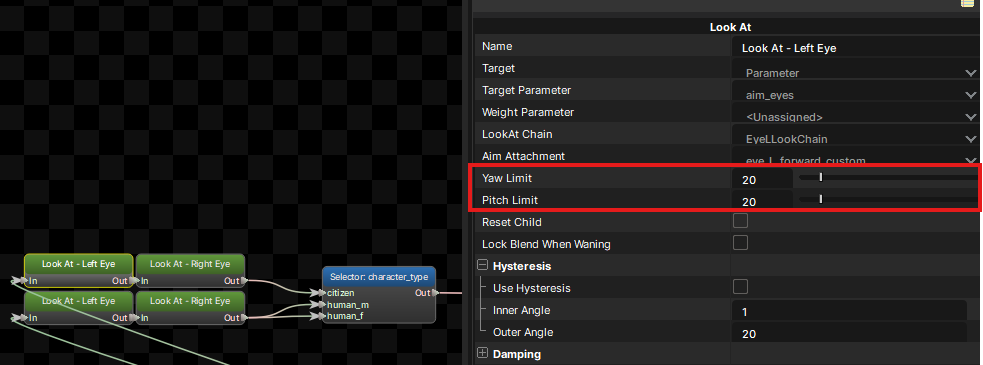
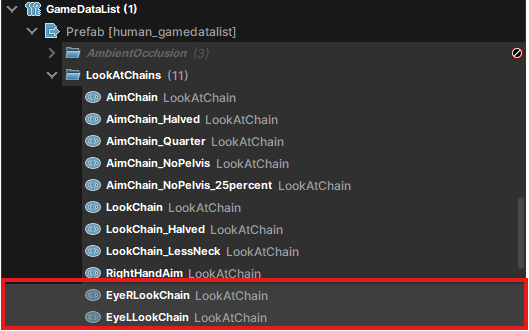
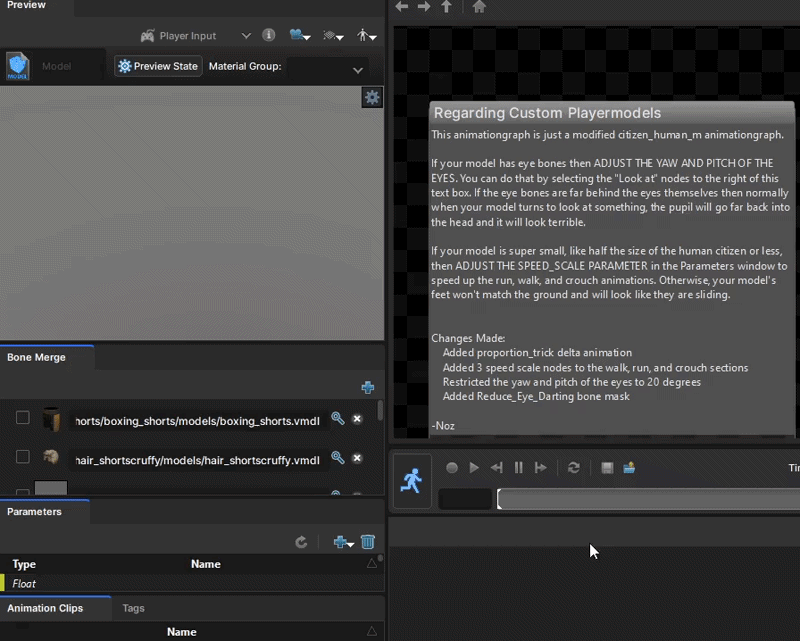
After that, you can do one more thing. Which is limiting how much the eyes can move. You might want to use it to make the eyes move further or use it to fix some issues. To do that, move your eyes up to the "Graph" thing first. Where the "anmgrph" for your model is loaded. You'll see an "Edit" button. Click it.Move your cursor into the checkerboard window where all of the animation nodes are located. funny checkboards.. And then, hold "MMB" to move around. But, you gotta move to the right side. Scroll your "MMB" button to zoom in/out. What we gotta find is four green nodes above a huge "Section 05..." node.When you found them, you gotta have to edit all four of them. First, by selecting one of them, it'll show its properties in the "Properties" panel. You'll have to adjust "Pitch" and "Yaw" values to limit or give the eyes a bigger space. And when you're satisfied. Press "Ctrl + S" and close the "AnimGraph". If you want to disable the feature. You'll have to find the "GameDataList" category. Click the dropdown of "Prefab [...]". And, you'll see "LookAtChains" group. Click the dropdown of it and scroll a bit. You'll see "EyeRLookChain" and "EyeLLookChain" nodes. All you gotta do is right-click and click "Disable" and compile your model again.────────────────────────────────────────────────────────────────────────
⏩ Animation speeds [Optional]
For very tiny models or models half the size of a human citizen or less. Your model might be sliding on the ground instead of walking, crouching, or running. You can easily fix that if that happens! You can also use this for speeding up the animations!
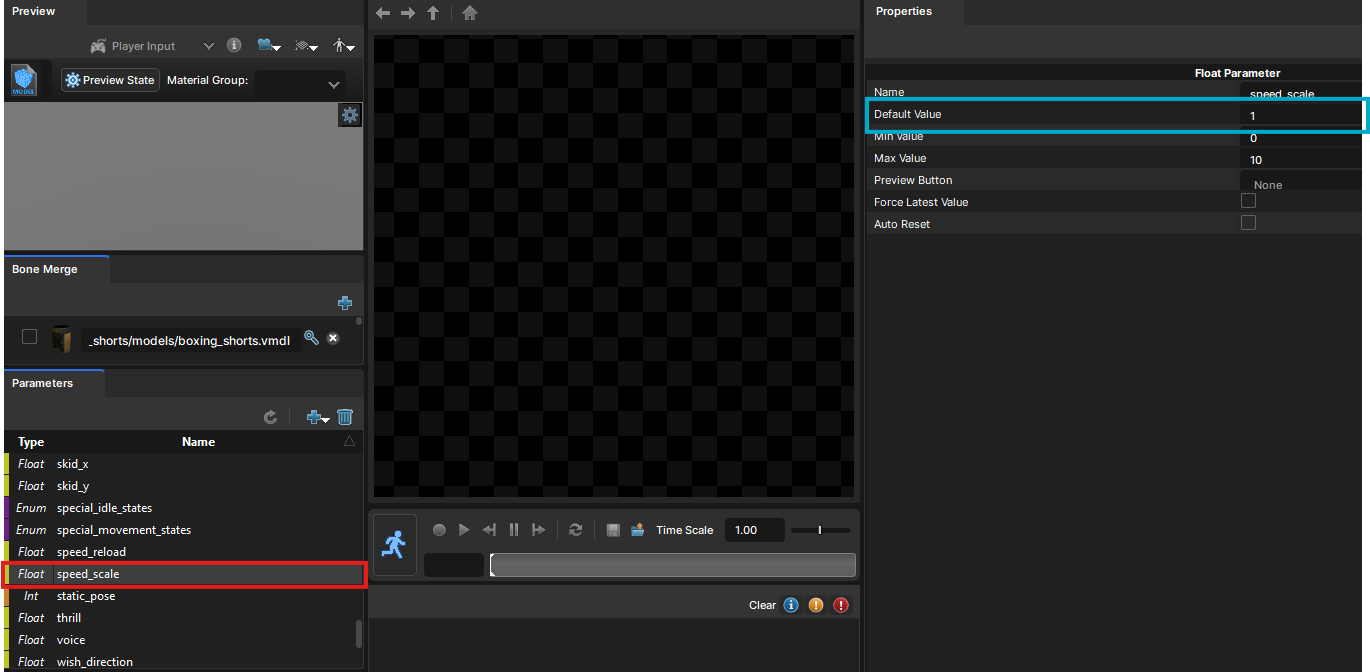
Open your "AnmGrph" in the "ModelDoc" again. And, then you'll see a tab called "Parameters". By default, the tab is very small. So, we can hold the edge of the tab with our cursor and move it up to move up the tab. like this.After that, scroll down in the list and find "speed_scale" float parameter right under "speed_reload". Select it and you'll see its properties in the "Properties" tab. Change "Default Value" to higher to fix the issue. Press "Ctrl + S' to save it. See the changes in the scene editor. Modify if not satisfied. Repeat until it looks fine. For very tall models. You might need to do the opposite to fix the issue.That's all for this section :) ────────────────────────────────────────────────────────────────────────
🏃➡️ Testing
Oh boy.. We've been doing this thing for a while. Now, it's time to test it. To do that, we'll create a "Player Controller" and replace our custom model with the sausage model. Let's do this.
First, right-click in the scene viewport or in the hierarchy. Hover your cursor on "Create" and then click "Player Controller". Name the controller whatever you like, and then the player controller with a sausage guy will be created. Pull the controller until it touches the ground if it's flying. Oh, btw, sausage guy's name is "Terry". But, we don't want "Terry". Instead, we'll use our model. Click the small arrow beside "Player Controller" in the hierarchy. You'll see a child component called "Body". Click it and see the inspector. The model is rendered with a "Model Renderer (skinned)", and you'll see that the sausage model is used there.
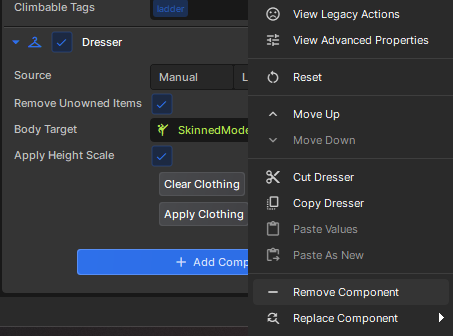
To use our custom model. Drag our custom model's "VMDL" from the "Asset Browser" and drop it in the box beside with "Model". Bam. Terry is now gone and will be switched to your custom model. After that, we'll remove the "Dresser" component from the "Player Controller". Scroll down in the inspector while "Player Controller" is selected. You'll see a component called "Dresser". Click three dots from right-upper side of that component and click "Remove component". That'll remove the "Dresser" component which we don't need and it will add a leg part of citizen model to your model if you don't don't remove it. Seems like a new bug.
To play around with your model and test. Click the green ▶ button at the top. Scene will load, and you'll get to control your custom model. Move around, jump around, Crouch and more to test your model if it's fine or not. It'll be fine as long as you follow the instructions carefully!
As you can see, mine is working correctly. If it's working correctly. Congrats! You just ported a custom model into S&box!. To test the ragdoll physics. Drag and drop your model's "VMDL" into the scene and place it anywhere, and click the play button.
You might ask why we don't have to do the ragdoll ourselves? Because the collision joints and collisions are calculated when we compile our model. We used the citizens' VMDL as a base. So, they're set up for you. But sometimes. There can be issues with it but it's very rare.
That's all for this section!. You made it! :D ──────────────────────────────────────────────────────────────────────── ────────────────────────────────────────────────────────────────────────
🏁 Final Words
Huge congrats! You just finished the guide. I know this guide would be pretty long to write, and I wrote this guide in just 5 days after finding a proper way. I ain't a professional in this area yet. So, feel free to point out mistakes, give suggestions, and more as you want.
I hope this guide is useful for people who want to use custom models and who've been hating "S&box" for currently sausage (Terry) and default citizens available to use. There's currently no custom playermodel support for the sandbox gamemode yet. We'll most likely get it because why not? But you can still use them in your own game in the meantime.Oh—and if this guide helped you out, feel free to share it with someone who needs it. Spread this one out as you can! Thank you so much for using the guide! :) ────────────────────────────────────────────────────────────────────────
👑 Credits & Changelogs
Credits to everyone who deserves it and, ”Changelog” for the guide.
• Added "VTF conversion" for Source 1 models. • Added warnings and more info for Blender version and addons. • Made the sub-topics uses "H2" for better switching. ────────────────────────────────────────────────────────────────────────
 I know you're here because you hate the sausage characters even I don't. So, this guide is for you. I'll be showing you how to port custom models into S&box for your own game. (Sandbox mode support isn't here yet.)