It is expected of you to know how to make the panel components, the basics of front-end development (HTML, CSS and all that stuff), and some C#. You can read more about the basics of s&box UI programming here: https://sbox.game/dev/doc/ui/
Introduction
Let's say you want to show some kind of a value on the screen. For example, you want to make a simple number input field with one button to add 1 and subtract 1 and a label to show the current number.
First, make a new Razor Panel Component. For this tutorial, it will be our main canvas. We will make the same number field using two different approaches: Imperative and Reactive. I'll explain the difference as we go.
Copy the following code to your Panel Component:
@using Sandbox;
@using Sandbox.UI;
@inherits PanelComponent

<root class="root">
    @* Empty for now! *@
</root>

<style>
    .root {
        /* Fill the whole screen */
        position: absolute;
        top: 0;
        right: 0;
        bottom: 0;
        left: 0;

        /* Align the child elements in a row and put them in the middle of our screen */
        flex-direction: column;
        align-items: center;
        justify-content: center;
        gap: 16px;

        color: black;
        background-color: white;

        /* Accept any mouse input */
        pointer-events: all;
    }

    /* The common style that we will use for both counters */
    .counter {
        flex-direction: row;
        gap: 8px;
        font-size: 24px;
    }

    .button {
        min-width: 32px;
        height: 32px;
        padding: 4px;
        color: white;
        font-weight: bold;
        background-color: #3273eb;
        cursor: pointer;
        align-items: center;
        justify-content: center;

        &:hover {
            background-color: #46a1ff;
        }
    }
</style>
Now, the root panel is empty, but we will make a new panel for our counters. They will follow the same structure: (DON'T COPY THIS CODE YET!)
The key difference will be in how we create the panel and how we update its state.
Imperative approach
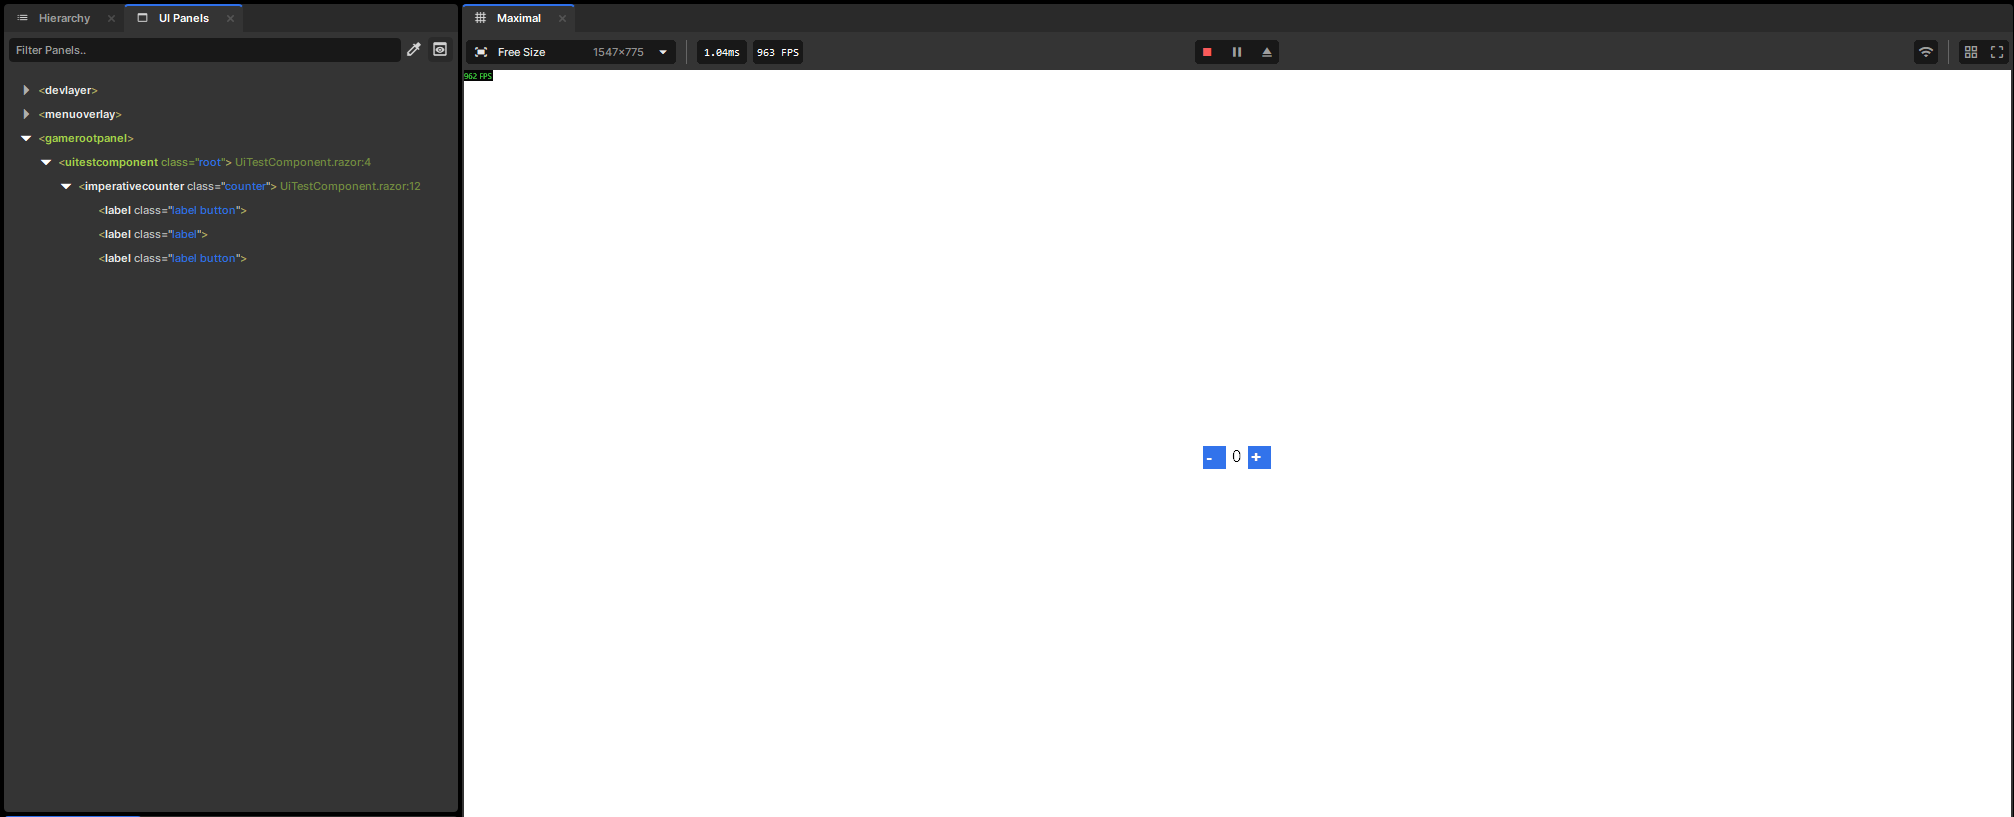
In order to fully appreciate the convenience of Razor, let's suffer together through making a panel in C#. Make a new C# file called ImperativeCounter.cs and write a panel the old way. Fill it with the following code:
In this C# class, we have made two buttons and one counter manually. Our counter has an internal state, represented by the "int counter = 0". The plus and minus buttons call the functions "PlusOne" and "MinusOne" when clicked. The "Label counter" is populated with the initial value of "int counter", that is, 0.
Now add our new component to the root panel and start the scene by pressing the Play button:
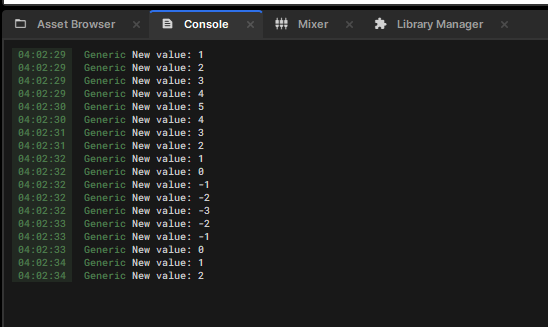
You can click the plus and minus buttons, and down in the Console tab you can see that something is happening with the value, but our UI is still displaying a zero. That's because, in the Imperative approach, you have to update the displayed values by hand. There are two ways to do that:
First, the lazy way. All the panels have a virtual method Tick that is being called by the engine for every frame (60 times a second for 60 FPS, 120 times for 120 FPS, etc.). In this method, we can easily update the text of a "Label counter".
⚠ ⚠ ⚠ PLEASE NOTE! ⚠ ⚠ ⚠ Each time you change the layout of any Panel written in C#, you have to restart the scene, as these panels don't automatically remake themselves.
Now would you look at that—it works! 🎉 But there is a problem: we are changing the text every frame, even if the user hasn't clicked any buttons. And we aren't just changing the text—the UI engine has to recalculate the sizes of every other panel. Needless to say, you wouldn't waste any performance with one such panel. Not even with a hundred of these panels. But a thousand? 😬
Let's remake this component the smart way and update the text only when the number actually changes. Our buttons are calling the MinusOne and PlusOne, so let's remove the Tick() and write the following code:
Or, to avoid repeating the same code twice, let's make a setter that will be called automatically whenever anyone tries to modify the field:
using Sandbox.UI;
using Sandbox.UI.Construct;

class ImperativeCounter : Panel
{
	Label buttonMinus;
	Label buttonPlus;
	Label counter;

	// vvv Replace the old count variable with this code:
	int count
	{
		get;
		set
		{
			field = value;
			if ( counter.IsValid() )
			{
				counter.Text = $"{count}";
			}
		}
	} = 0;
	// ^^^

	public ImperativeCounter()
	{
		AddClass( "counter" );

		buttonMinus = Add.Label( "-", "button" );
		buttonMinus.AddEventListener( "onclick", () => count-- ); // <-- Now that the button's code fits in one line, let's make it an anonymous function

		counter = Add.Label( $"{count}" );

		buttonPlus = Add.Label( "+", "button" );
		buttonPlus.AddEventListener( "onclick", () => count++ );
	}
}
Save the file, restart the scene - everything should work the same, but this time we change the layout only when it's really necessary.
As you might have noticed by now, the Imperative approach is the most basic way to display data, but It is also the most tedious way that leads to code repetition and a higher mental load, often resulting in logic bugs.
Reactive approach
Thank goodness it's 2026, and with the widespread use of front-end frameworks like React, Svelte, and Vue (for better or worse, depending on who you ask) pushing the reactive UI to the masses with JSX/TSX - a mix of JavaScript/TypeScript with HTML markup, our beloved indie company called Microsoft caught up to the trend with the Razor language - basically, an HTML page with C# scripting.
The biggest advantage of the Reactive approach is that the engine itself decides whether to update the layout or not, lifting the hard work from the programmer.
Let's make a new file called ReactiveCounter.razor and write the following code:
This time, you don't have to restart the scene - Razor supports hot reloading, which is considered the killer feature of s&box!
And would you look at that - we wrote noticeably less code, yet both counters function exactly the same! That's because the Razor engine handles the re-rendering process of the panel for us: it checks what parts of the element have changed, and commits only the necessary modifications to the UI tree.
Changes from the outside
Now let's focus on the reactive counter only. In this example, the ReactiveCounter panel is the only user of the number, but if for example you're making a settings page, you want to get these numbers back somehow! Or what if you want to set some different default value?
First, change the code ReactiveCounter like so:
@using Sandbox.UI;
@inherits Panel

<root class="counter">
    <label class="button" onclick=@(() => Count--)>-</label>
    <label class="number">@(Count)</label>
    <label class="button" onclick=@(() => Count++)>+</label>
</root>

@code {
    public int Count { get; set; } // <-- Notice the { get; set; } part - Razor's arguments only works with the *properties*, not *fields*!
}
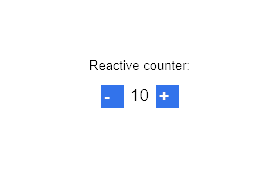
And for the root panel, let's remove the old ImperativeCounter panel and add a @code block after the <style> block with a Count property. Oh, and let's make the count start from 10 - why not?
...

<root class="root">
    <label>Reactive counter:</label>
    <ReactiveCounter Count=@Count />
</root>

<style>
...
/* Keep the same styles as before! */
</style>

@code {
    int Count { get; set; } = 10; // <-- Notice the { get; set; } part - Razor's arguments only works with the *properties*, not *fields*!
}
Now, restart the scene (we made too big of a change for the hot reload to do a graceful upgrade), and as expected, the counter starts from 10: Oh! Let's also add a button above that adds 100!
Oh, that doesn't work as intended - the root panel has its own copy of the Count, and when we add 100 with our own button, the root just overwrites whatever ReactiveCounter had in its store.
Let's add a two-way bind - Razor's way to let both the parent panel and its children modify each other's state. More on that in the official Facepunch documentation page: https://sbox.game/dev/doc/ui/razor-panels/
Notice the new Count:bind=@Count bit. Also note that the two-way bind works only with the properties, not fields! This Stack Overflow answer explains the difference:
Or, y'know, might as well ask your favorite Large Lying Machine 🤷♂️
Restart the scene, and... Uh-h-h-h... It kind of works, but for some reason only when you hover your mouse over the panel. Why does it happen?
How the Razor ticks
You see, we got lucky the first time: every move or click of the pointer generates an event, which makes the Razor panel update. But actually, all this time Razor never knew that Count had ever changed! How do we tell Razor that it's time for an update?
First, let me prove to you that the two-way bind actually works by committing a bit of a programming crime. Razor panels are just like the regular C# panels - you can override a Tick() method to do your logic for each frame. But Razor panels also have a function called StateHasChanged(), which notifies the Razor engine that it's time to update our panel. So what if...
...

@code {
    public int Count { get; set; }

    public override void Tick()
    {
        // NEVER DO THIS!!! Every time you do StateHasChanged() in a Tick() function, God kills a kitten
        StateHasChanged();
    }
}
Yeah, it works! But again, it's extremely wasteful - for every frame, the engine has to rebuild your panel from scratch, and more often than not, there's nothing to change at all.
There is a better way to ask Razor for a rebuild. For every panel out there, the UI engine stores a special number called hash code - I won't bore you with the cryptography (as I don't know anything about it either😭), but the whole idea is that you pass all of your state variables to the hash function, and it makes a number. If you pass the same values, you get the same result. Every frame Razor goes through the panel tree and calculates the hash - if the hash code of any panel has changed since the last time, then it's time to rebuild it!
That's an efficient way to do it, and it's much simpler than you think: all you need is to override the BuildHash() method and return a combination of every variable that impacts the rendered result. C# has a decent hash code generator built into the System library - add the @using System; line at the top of your .razor file, and you're good to go!
Restart the scene (just in case), and our panel should work the same way as before - but this time, it doesn't do any extra work!
HashCode.Combine can process almost any type of field (except some complex stuff like custom classes - you've got to implement the hash function for that yourself):
@code {
    public int N { get; set; }
    public string S { get; set; }
    public Action F { get; set; }

    protected override int BuildHash()
    {
        return HashCode.Combine(N, S, F);
    }
}
Conclusion
There is a use case for both approaches. If you're using stuff like generics, or you want to generate the component at runtime for any reason, nothing will replace a C# class. But for anything else, Razor is the way to go. Just keep the BuildHash() in mind, and try to be efficient in what variables cause the rebuilds.