Seam-Less Material Suite
Released
Editor/SeamlessSuiteHelpDialog.cs
using Editor;
using Sandbox;
public sealed class SeamlessSuiteHelpDialog : Dialog
{
public SeamlessSuiteHelpDialog()
{
Window.WindowTitle = "Seam-Less™ Material Suite Help";
Window.Size = new Vector2( 760, 680 );
Window.MinimumWidth = 620;
Window.SetWindowIcon( "help" );
Layout = Layout.Column();
Layout.Margin = 14;
Layout.Spacing = 10;
Layout.Add( new SeamlessSuiteBannerWidget( this ) );
var header = new Label( "A tool to quickly make images seamless and generate full game ready PBR material's'.", this );
header.SetStyles( "font-size: 18px; font-weight: bold; color: #ffffff;" );
Layout.Add( header );
var body = new TextEdit( this );
body.ReadOnly = true;
body.TextSelectable = true;
body.BackgroundVisible = true;
body.PlainText = HelpText;
body.SetStyles( "font-size: 12px; color: #eeeeee; background-color: #171717; border: 1px solid #2b2b2b; border-radius: 4px; padding: 10px;" );
Layout.Add( body, 1 );
var buttonRow = Layout.AddRow();
buttonRow.AddStretchCell();
var closeButton = new Button( "Close", this );
closeButton.MinimumWidth = 90;
closeButton.Clicked = () => Close();
buttonRow.Add( closeButton );
}
private const string HelpText =
@"What This Is
Seam-Less™ Material Suite is a Game-ready Seamless and PBR Material Generator directly in s&box.
It has two tabs:
Seam-Less™
A tool to quickly make images seamless and reduce repetitive texture tiling.
PBR Generator
A tool to quickly turn a color texture into a full PBR material stack.
The idea is:
Load a texture.
Fix the tiling if needed.
Link the seamless texture to the PBR Generator if you want.
Generate estimated PBR maps from the seamless texture.
Preview the maps.
Export what you need.
Or just use either tool on its own!!!
Good First Workflow
1. Open Seam-Less™ Material Suite > Open Suite.
2. Start in the Seam-Less™ tab if your texture has visible seams.
3. Load your image.
4. Tweak the seamless settings until the repeat looks better.
5. Switch to PBR Generator.
6. Click Link Seamless Output if you want to use the current seamless result.(THIS IS IMPORTANT! If you want a quick workflow with no export/import between tools.)
7. Click Generate Maps(It should auto-generate).
8. Use Atlas view to see the whole generated PBR stack at once.
9. Tune Height first, then Normal, AO, Roughness, and Metallic.
10. Export all maps, ORM only, or all maps plus a VMAT.
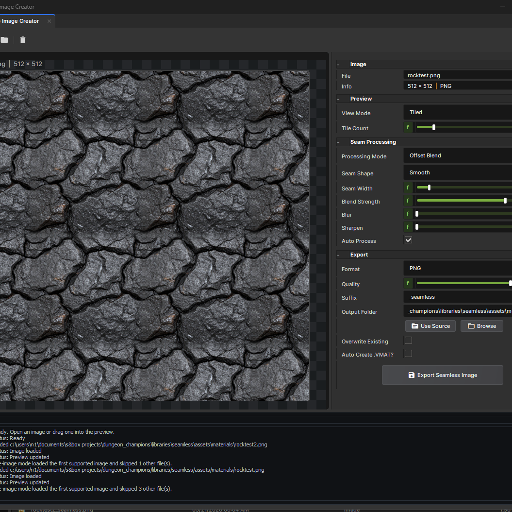
Using Seam-Less™
Use this tab when the image itself needs to tile better.
This is useful for things like:
brick walls
stone
ground textures
fabric
wood
painted surfaces
stylized patterns
The goal is not to make a brand new texture. The goal is to hide the obvious edges so the image repeats better.
Seam-Less™ Workflow
1. Load the image.
2. Switch View Mode to Tiled.
3. Raise Tile Count until the repeat is easy to see.
4. Pick a Processing Mode.
5. Adjust the main settings a little at a time.
6. Compare Original, Processed, and Tiled view.
7. Export when the repeat feels natural.
A good seam fix should still look like the original image. If the texture starts looking smeared, warped, or too busy, back the settings down.
Use tiled preview to check your work. A texture can look fine once, but obvious when repeated.
If your texture has straight structure, like bricks, tiles, planks, or panels, use gentler settings. These images are easier to break because your eye notices bent lines fast.
Processing Mode Tips
Offset Blend is the safest general mode. Start here when you are not sure what the texture needs.
Irregular Patch is useful for organic textures, noisy surfaces, stone, dirt, moss, worn paint, and rough ground.
Texture Bombing helps break up obvious repeated shapes by scattering small patch variations. Use it carefully, because too much can make the texture look busy.
Brick, Tile & Planks is for structured textures. Use this when the image has rows, grout, boards, panels, or obvious grid lines.
Seam-Less™ Control Tips
Tile Count only changes the preview. It helps you see the repeat, but it does not change the exported texture.
Seam Width controls how wide the hidden seam area is. If the edge is still visible, raise it a little.
Blend Strength controls how strongly the seam is blended. Too low can leave seams. Too high can smear detail.
Seam Shape changes the blend mask. Smooth is a good first choice. Wavy, Noise, and Irregular can help hide seams in organic textures.
Seam Gravity pulls the processing toward the seam area. Raise it when you want the tool to focus more on hiding the border instead of changing the whole image.
Variation Strength controls how much random variation is mixed in. Low values preserve the image better. Higher values break repetition more.
Patch Count changes how many patches are used in Irregular Patch and Texture Bombing modes. More patches can hide repeats, but can also make the result noisy.
Patch Size controls how large those patches are. Small patches are better for fine noise. Large patches are better for bigger surface chunks.
Mask Softness controls how soft patch edges are. Softer masks blend more naturally. Harder masks keep sharper details.
Bomb Density controls how busy Texture Bombing feels. If the image starts looking crowded, lower this first.
Cell Width and Cell Height help the Brick, Tile & Planks mode understand the structure size.
Grout Width helps protect or rebuild the spaces between bricks, tiles, or planks.
Row Offset is useful for running brick and plank patterns.
Grid Strength controls how much the structured grid is respected. Raise it if the pattern is drifting. Lower it if the result feels too rigid.
Blur can hide harsh seams, but too much removes detail.
Sharpen can bring detail back after processing, but too much can make edges crunchy.
Seam-Less™ Quick Fixes
The seam is still visible:
Raise Seam Width or Blend Strength.
The texture looks smeared:
Lower Blend Strength, Blur, or Patch Size.
The repeat is still too obvious:
Try more Variation Strength, Texture Bombing, or a higher Patch Count.
Straight bricks or planks look bent:
Use Brick, Tile & Planks and lower the more random settings.
The preview looks good once but bad repeated:
Use Tiled view with a higher Tile Count before exporting.
Using PBR Generator
Use this tab when you want Estimated PBR maps from a color image.
It creates:
Albedo
Height
Normal
Roughness
Ambient Occlusion
Metallic
Packed ORM
These are not magic scanned maps. They are useful guesses made from the color texture.
Height is the big one. Most of the other maps are influenced by it, so tune Height before you spend time on the rest.
Height Tips
Height Strength makes the height effect stronger or weaker.
Black Point and White Point control the height range. Use these when the height map feels too flat.
Midpoint changes what counts as the middle height. Use it when the whole material feels too raised or too sunken.
Cavity Emphasis pushes darker recessed areas harder. This can help cracks, grout, chips, and worn spots read better. Too much can make the texture look dirty or crushed.
Height Blur smooths noisy height before normals and AO are made. This helps when the normal map looks crunchy.
Invert Height flips high and low areas. Use it when the result feels backwards.
Normal Tips
Normal Strength controls how bumpy the surface feels.
Normal Smoothing softens noisy normal detail.
Flip Green fixes normals that look inside-out in some workflows.
If the normal map looks wrong, try Flip Green before changing everything else.
Roughness Tips
Roughness is only a guess when it comes from color.
Use Roughness Base as the main control. Most non-metal materials should start fairly rough.
Use Roughness Contrast lightly. Too much contrast can make the material sparkle or look patchy.
Black Point and White Point control the roughness range. Use them when roughness needs clearer glossy or matte areas.
Cavity Roughness makes cracks, grout, pits, and recessed height areas more matte.
Variation adds subtle grunge/noise breakup when the roughness map feels too flat or plastic.
AO Tips
AO should usually be subtle.
If it looks dirty, lower AO Strength or raise AO Minimum.
AO is best for tiny cavity shading, not for painting big shadows into the whole material.
Metallic Tips
Metallic defaults to 0 for a reason.
Stone, brick, concrete, fabric, plastic, dust, dirt, wood, and painted surfaces are usually not metallic.
Only raise Metallic when you actually want a metal material.
Preview Tips
Atlas view shows every generated map at once. It is the best default view for checking the whole stack.
Clicking a map button switches to Single view for that map.
2x2 and 3x3 views help you spot seams.
The 3D preview is experimental. Leave it off unless you want a quick material check.
If you enable 3D preview, manual refresh is usually smoother than auto refresh.
Parallax preview uses the height map. It can help show depth, but it is still just a preview.
Export Tips
Export All Maps writes the full stack.
Export ORM Only writes the packed texture:
R = AO
G = Roughness
B = Metallic
Export All + VMAT writes the maps and creates a material from the individual texture slots.
If you want seamless PBR maps, make the color texture seamless first, then generate the maps from that result.
Quick Fixes
Normal looks inverted:
Turn on Flip Green.
Material is too bumpy:
Lower Height Strength or Normal Strength.
Normal map is too noisy:
Increase Height Blur or Normal Smoothing.
AO looks dirty:
Lower AO Strength or raise AO Minimum.
Roughness looks harsh:
Lower Roughness Contrast and tune Roughness Base.
Generated maps do not tile:
The source texture probably did not tile. Use the Seam-Less™ tab first.
Remember
This tool estimates height data from the base image. It should not be expected to be as good as baking from real 3d data or hand-crafted maps. It helps you get usable PBR material maps quickly, then you can keep tweaking them until they feel right.";
}