
👋 Introduction to S&box Shaders
(THIS TUTORIAL IS STILL BEING MADE!!!I want to get a bit out quick for anyone who was stuck like me!)
(If anything is wrong don't be afraid to correct me. I will update the tutorial asap!!!)
(Tutorial follows Daniel Ilett's - HLSL Shader Basics Course for Unity) - great progression in shader code to learn the basics adapted to S&box
(If anything is wrong don't be afraid to correct me. I will update the tutorial asap!!!)
(Tutorial follows Daniel Ilett's - HLSL Shader Basics Course for Unity) - great progression in shader code to learn the basics adapted to S&box
We will take a peak at a shader in a minute. Let's talk about why this Tutorial exist... (THE SHADER DOCS ARE 💩 ) the end...
No, for real it is documentation and Doesn't go into much detail for beginners!
No, for real it is documentation and Doesn't go into much detail for beginners!
I don't know about you, but if you haven't opened a .shader file yet it is a nightmare to look at. Especially, for someone who hasn't touched a shader in their life. And the documentation leaves much to be desired for us humble newcomers to shaders.
Here is a List of the known Resources for Learning S&box shaders.
Here is a List of the known Resources for Learning S&box shaders.
-Learning Material-
https://shaders.wheatleymf.net/?entry=pt2_firstshader (Open Source website made by: Facepunch Dev - Wheatleymf)
https://sbox.game/dev/doc/rendering/shaders/ (S&box's Official Shader Documentation)
https://sbox.game/dev/doc/rendering/shaders/ (S&box's Official Shader Documentation)
--- Links may be Broken!!! ---
Alright back to Shaders!
S&box states that their shaders are written in
HLSL (High-Level Shader Language) that is contained in a VFX Wrapper combining Vertex and Pixel (or Fragment) stages. The code is stored in a .shader file type. This is confusing but when we get to making them it will make sense. 📋Getting Started/Setting Up
Alrighty time to grab a coffee, sit down, and start the learning grind! You don't have to blindly follow how i set up my project. Though it is what I found to be easiest in terms of the shader creation workflow.
-Setting Up Project-
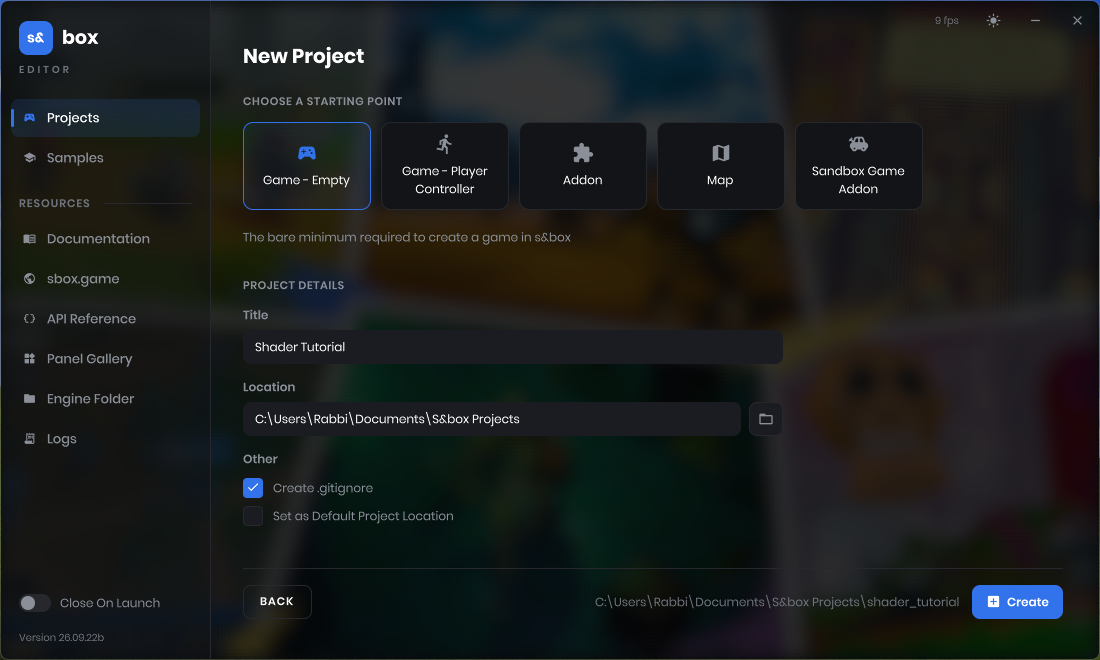
- Opening the S&box Editor make a new Empty - Game Project.
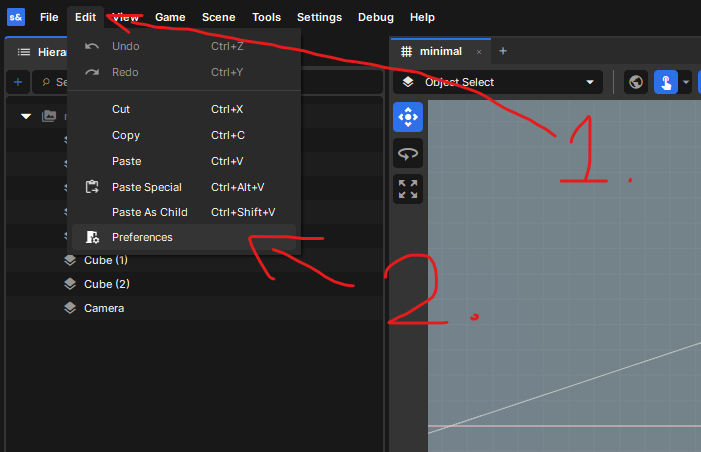
- Once the project opens make your way to the top left and select the Edit tab. Then, select the Preferences tab.
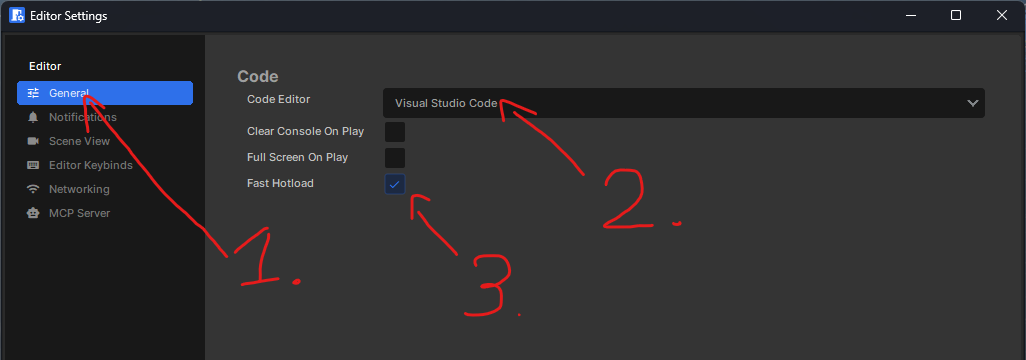
- Finally, in the General tab make sure your Code Editor is set to VS Code (you might have to download it), and make sure Fast Hotload is checked.
-Things to know-
- Saving a shader will cause it to be automatically recompiled and hotloaded showing you the results in the editor instantly.
- So making a material using your shader, and making sure it is in the scene will allow you to see it update real time while writing them! Finally, having the console open helps to know when the compile failed
- This is a little obvious but still. If you feel like this is overwhelming at all take a break and come back to it another time.
Now we should have our project set up for making shaders simple enough. You can use whatever you want this is just so you can match my project settings if you really wanted to.
- This is a little obvious but still. If you feel like this is overwhelming at all take a break and come back to it another time.
Now we should have our project set up for making shaders simple enough. You can use whatever you want this is just so you can match my project settings if you really wanted to.
-Setting Up IDE-
The recommended setup for editing shader code is VSCode with the Slang Extension, this gives you a full IDE experience with intellisense which shows you what functions and properties you can use.
Opening your project folder in VSCode will prompt you to install the Slang extension, and automatically sets up file extension associations, workspace flavor and search paths.
If you're having trouble make sure your language mode is set to Slang and your workspace flavor is set to vfx.
(Setting Up IDE was taken directly from S&box docs because it's good lol)
(Setting Up IDE was taken directly from S&box docs because it's good lol)
-Creating a New Shader-
- Make Your way to the Asset Browser in your project and create a shaders folder. Once done open the folder.
- Inside the shaders folder click on the [+ New] Icon in the top left of the Asset Browser, or Right Click on any empty space within the folder.
- Select the Shader Option, then the Unlit Shader Option.
- Give it a name mine will be
Unlit Shader. Click Confirm!
Now We a Have Created a Shader!!!

-Setting Up Scene for Shader-
- Right click the shader and select Create Material this will make a
.vmat(Valve MATerial) using our shader. Name it and save it. - Now in our Hierarchy let's create a sphere game object and center it in our scene.
- Drag and drop the material we creating previously onto the sphere. That will replace the default material with our own.
- Now we double click and open up that shader.
- Select all the code in the file and delete it. ;( [DO NOT SAVE FILE] it will Crash the Editor.
This is a great starting point why... well because you have nothing now we can go in piece by piece to make the shader.
🧬 Understanding Shader Anatomy
Let's Take a look at a Blank Shader!!!
I have commented out what each of the Block functions do Have a Look!
I have commented out what each of the Block functions do Have a Look!
// FEATURES block is for implementing options that you can click in sidebar of the material editor
FEATURES
{

}

// MODES block implements shader modes. They define ways to render with different passes or conditions.
MODES
{
    // This is a main rendering mode. You may want to always include it.
    Forward();

}

// COMMON block allows defining variables and other data that you can access from any shader stage.
COMMON
{

}

// In this area you can define any structs, or other stuff.

// VS block is your Vertex Shader, and obviously where vertices are manipulated.
VS
{

}

// PS is a Pixel Shader (aka fragment shader). This is the final stage and where the color is manipulated.
PS
{

}
Yea, see Horrifying 😨
Though, despite the fact it's a lot. It's not too confusing because your
hlsl simply goes in the VS or PS blocks. Common is for variables and Modes is for the different rendering modes. Right now obviously this code won't do anything in fact it won't even compile. In order to do that we will need to Set-Up some boilerplate code that gives us some info to work with. Also, if you still don't understand don't worry I will go over all of it in detail again later.
📝First Shader - Unlit Shader
The most basic it gets! We will use an unlit Shader to get ourself familiarized with S&box's Shader workflow.
-Writing an Unlit Shader-
Let's Jump Right in. You might notice I am repeating things I said already that is because they are important. And... At least for me I learn better when seeing things multiple times.
- Let's start with what we know. Add the code below to your Shader File
FEATURES
{

}

MODES
{
    Forward();
}

COMMON
{

}

VS
{

}

PS
{

}
-FEATURES Block-
FEATURES block is for implementing options that you can adjust on the left sidebar of the material editor.
- For now, let's keep it as simple as possible. Your shader will not compile without a specific core HLSL file that handles all the built-in options. Add this line to the FEATURES block of your new shader file:
FEATURES
{
    #include "common/features.hlsl"
}
-MODES Block-
Next, we will add rendering modes the MODES block. This section tells the game engine how to handle our shader during different rendering passes.
- For this guide, we only need to include Forward(); in the MODES Block
MODES
{
    Forward();
    //Depth(); // Try adding Depth if you want and see if you can see the changes
}
What is Forward() (Required): Forward or better known as Forward Rendering a 3D graphics technique that calculates material properties and lighting for an object at the same time in a single or direct pass as it is drawn to the screen.
(Your shader will not compile without it.)
(Your shader will not compile without it.)
-COMMON block-
For the COMMON block This acts like a shared storage space for your code.
By default, any variables or textures inputs you create inside a vertex shader are hidden from the pixel shader. However, when you put your textures inputs and variables inside the COMMON block, they automatically become accessible to both shader stages.
- For an Unlit Shader we don't really need anything accessible by both stages so just add the follow include statement.
COMMON
{
    #include "common/shared.hlsl"
}
-Vertex Input Struct-
VertexInput provides data needed by the vertex shader in order to process the mesh for the pixel shader. (over simplification but all you need for an unlit shader) All of this is already handled by S&box with pre-built vertex and pixel input structs, so we just have to add them to the shader.- Add this Code in the empty space between the COMMON block and the VS block
struct VertexInput
{
    #include "common/vertexinput.hlsl"
}; // don't forget the semicolon won't compile without it
-Pixel Input Struct-
When the
VertexInput is done is returns a PixelInput which in turn is data used by the Pixel shader. It carry's Pixel Positions, Texture Coordinates, Normals, UVs and more!- Add this under your Vertex Input Struct
struct PixelInput
{
    #include "common/pixelinput.hlsl"
}; // same here don't forget the semicolon
As stated on Facepunch Dev - Wheatleymf's website, "Both structs are utilized by S&box default shading model, so nearly all S&box shaders you will find online are utilizing these two default structs. This is pretty convenient as it contains almost everything you need. "
-VS Block-
In the VS (Vertex Shader) block is where we obviously have our Vertex Shader Code. We need to set up the default functionality so we can create our unlit shader.
- Include the core file (again...)
- Now add the Main Function. Passing in
VertexInputstruct.
 VS
{
    #include "common/vertex.hlsl"

    PixelInput MainVs( VertexInput i )
    {

    }
}
MainVS() takes in our VertexInput we created and does some black magic with it then returns the PixelInput. In our case, we will use the default setup.- Create a var of type
PixelInputand initialize it with theProcessVertex(i)function. (notice we pass in our Vertex Input) - Finally, return the
FinalizeVertex()passing in our variableowe created.
VS
{
    #include "common/vertex.hlsl"

    PixelInput MainVs( VertexInput i )
    {
        PixelInput o = ProcessVertex( i );

        return FinalizeVertex( o );
    }
}
That's the vertex shader simple and straight forward. I am kind of brushing over a few things. The main purpose is to make an unlit shader so default information can clutter your brain things like that will be covered later when we decide to change them from the default.
-PS Block-
MainPS() takes in our PixelInput created by the Vertex Shader and out puts a float4 which is our color split up a R, G, B, and A (alpha/aka transparency). Wtf is a
float4? - Well when coding you now what a vector3 is or a vector2... float4 is the same just 4 values. (HLSL annoys me sometimes)(float color values typically range between 0 and 1)
- Include the core file (again... again...)
- Now add the
MainPS()Function passing in thePixelInputstruct. - Add
: SV_Target0at the end of theMainPS()function. This is a Semantic that says that the Pixel Shader returns a color.
PS
{
    #include "common/pixel.hlsl"

    float4 MainPs( PixelInput i ) : SV_Target0
    {

    }
}
Now because we are in the Pixel (Fragment) Shader we can modify the color to do so we have to write our code with in the
MainPs() function.- Create a
float3this will be our color variable the values are represented asx,y, andz. Though, they are also interpreted asr,g, andb. (red, green, and blue channels) set them to as shown should output a red color. - We will lastly add a return because the MainPS returns a Color. That Color is represented as a
float4so we will need to convert ourfloat3to afloat4this is done by construct an newfloat4variable and assigning ourcolvariable to the first part of thefloat4and a 1 value to the last part or thefloat4.
The the compiler knows that the col variable is a
float3 so it will assign those to the first three parts of the float4 and we can add in hardcoded values ourself. As seen with the value 1 we added to the alpha channel. PS
{
#include "common/pixel.hlsl"
float4 MainPs( PixelInput i ) : SV_Target0
{
float3 col = float3( 1, 0, 0 );
return float4( col, 1 );
}
}- Your finished script should look like this
FEATURES
{
#include "common/features.hlsl"
}
MODES
{
Forward();
//Depth(); // Test out if you want
}
COMMON
{
#include "common/shared.hlsl"
}
struct VertexInput
{
#include "common/vertexinput.hlsl"
};
struct PixelInput
{
#include "common/pixelinput.hlsl"
};
VS
{
#include "common/vertex.hlsl"
PixelInput MainVs( VertexInput i )
{
PixelInput o = ProcessVertex( i );
return FinalizeVertex( o );
}
}
PS
{
    #include "common/pixel.hlsl"

    float4 MainPs( PixelInput i ) : SV_Target0
    {
        float3 col = float3( 1, 0, 0 );

        return float4( col, 1 );
    }
} That's the whole shader save the file with
Ctrl + S and see it update automatically in the Scene View this is an Unlit Shader. 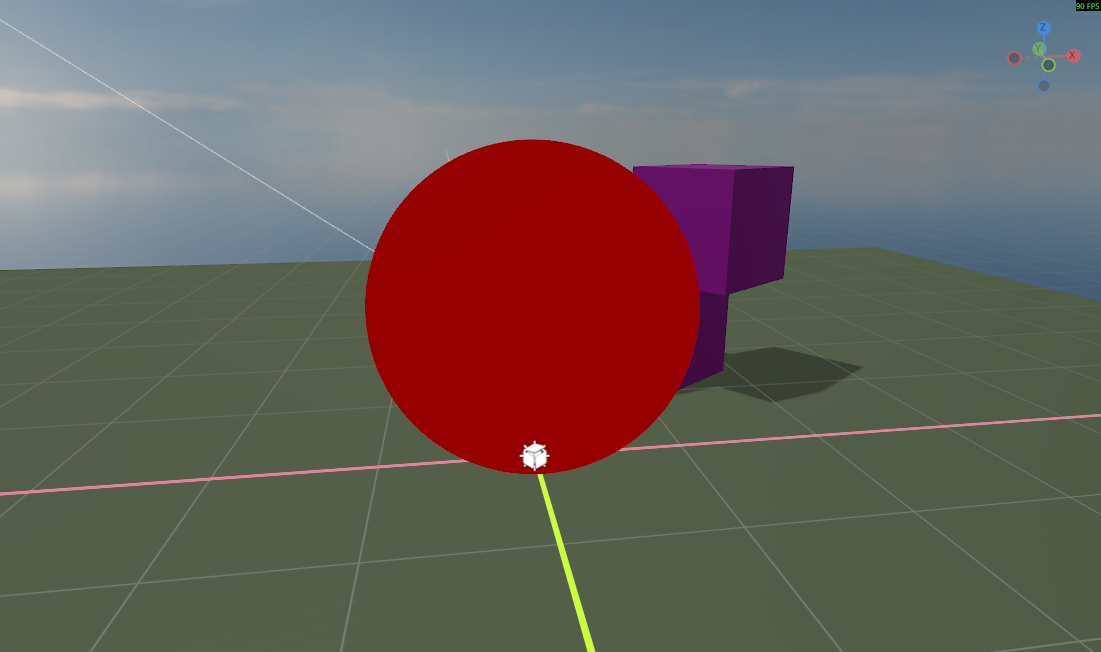
We can even change the values in the
float3 col = float3( 1, 0, 0 ); to get different colors.For Example -
-
float3 col = float3( 0, 1, 0 );is green -
float3 col = float3( 0, 0, 1 );is blue -
float3 col = float3( 1, 1, 1 );is white -
float3 col = float3( 0, 0, 0 );is black
The point is this is a great starting point for Progressing with shaders and should give you a extremely basic understanding of them to progress your knowledge on them.
📝Second Shader - Unlit Scrolling Texture Shader
-WIP-
Still working on it spent day and a half writing the last part... ;(
It takes time I am testing the code, writing the tutorial, and checking from multiple sources to see if what I am saying is correct!
Should be faster now that I don't have to go over a lot of the extreme basics again
(THIS TUTORIAL IS STILL BEING MADE!!!I want to get a bit out quick for anyone who was stuck like me!)
(If anything is wrong don't be afraid to correct me. I will update the tutorial asap!!!)
(Tutorial follows Daniel Ilett's - HLSL Shader Basics Course for Unity) - great progression in shader code to learn the basics adapted to S&box
It takes time I am testing the code, writing the tutorial, and checking from multiple sources to see if what I am saying is correct!
Should be faster now that I don't have to go over a lot of the extreme basics again
(THIS TUTORIAL IS STILL BEING MADE!!!I want to get a bit out quick for anyone who was stuck like me!)
(If anything is wrong don't be afraid to correct me. I will update the tutorial asap!!!)
(Tutorial follows Daniel Ilett's - HLSL Shader Basics Course for Unity) - great progression in shader code to learn the basics adapted to S&box